Follow Me On:
The Adventurous Silversmith
  • Home
  • Blog
  • Portfolio
    • Metal Work >
      • Chasing & Repousse
      • Holloware
      • Jewelry
      • Other Wonderful Items
    • Fiber Arts >
      • Temari
      • Yubinuki
  • Resources
    • Library
    • Tools & Equipment
    • Links
  • About
    • Artist Statement
    • Curriculum Vitae
    • How it is Made
    • Contact

The Box Project #6c - Putting a Hinge on The Box

12/24/2019

 
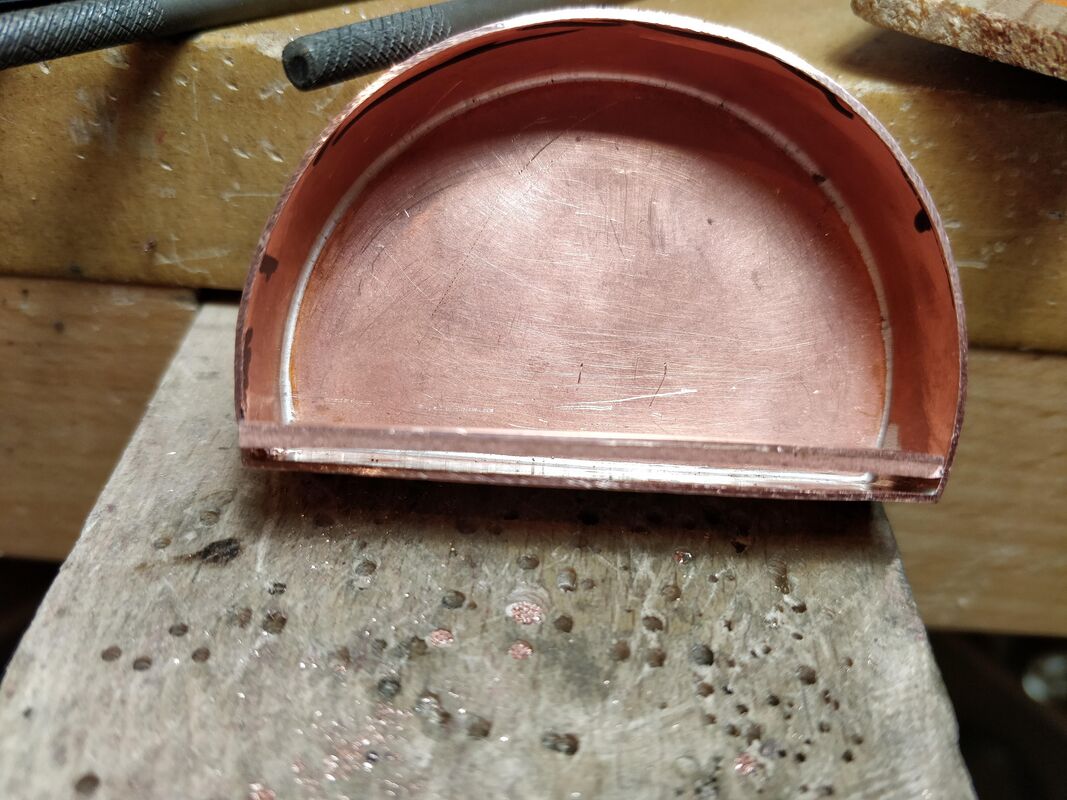
To read about learning to make hinges read part a, to see making the box read part b
Tuesday:
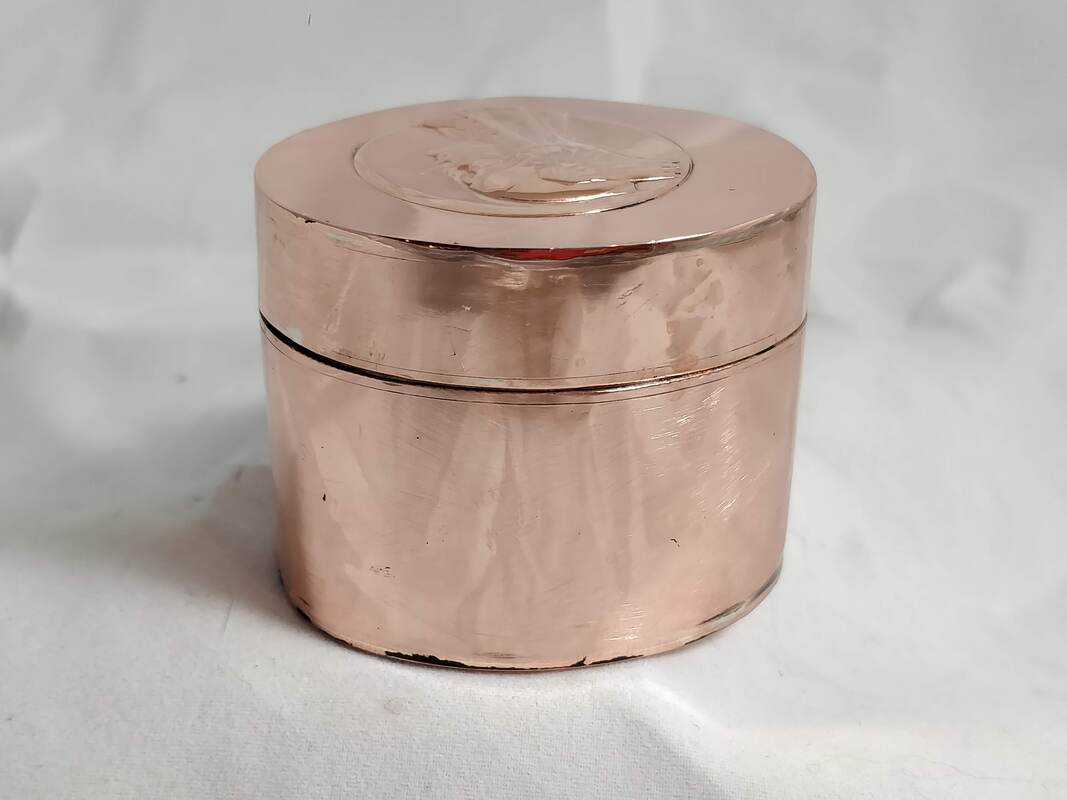
The day was finally here - time to tie it all together and make a hinge and put it on the box I made just for this purpose.

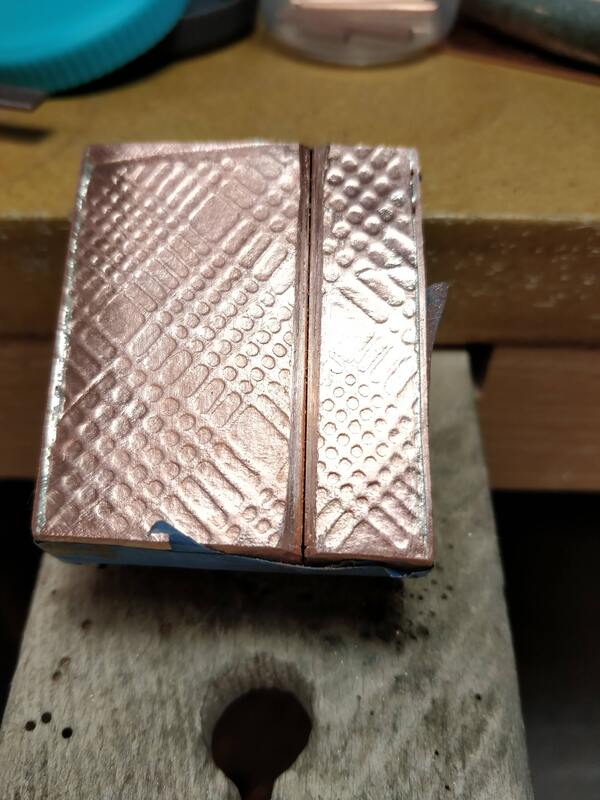
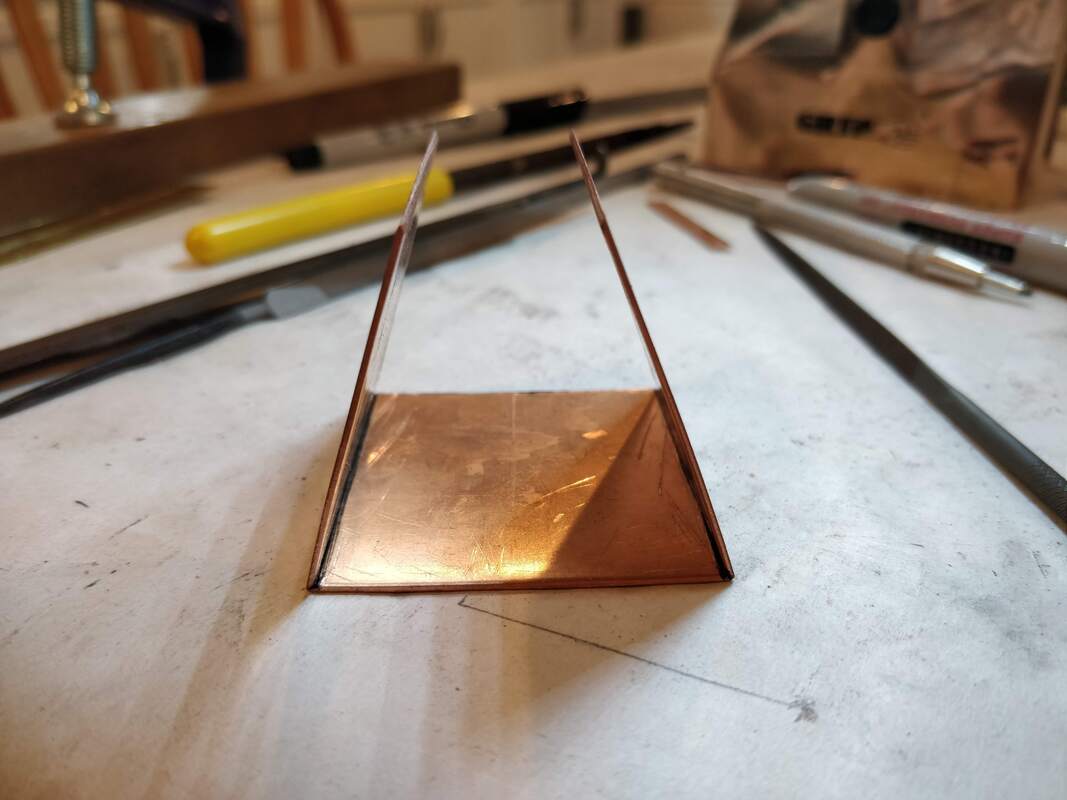
This is the scary part as I mentioned in the last post. I had a box but what if I screwed up the hinge and soldered it all closed - GASP! The only way to NOT do that is to Just go slow and think everything through.

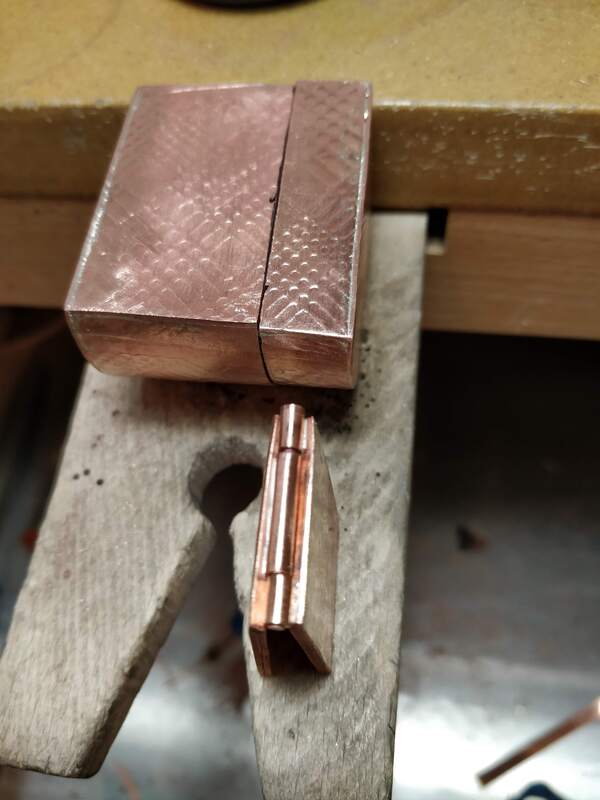
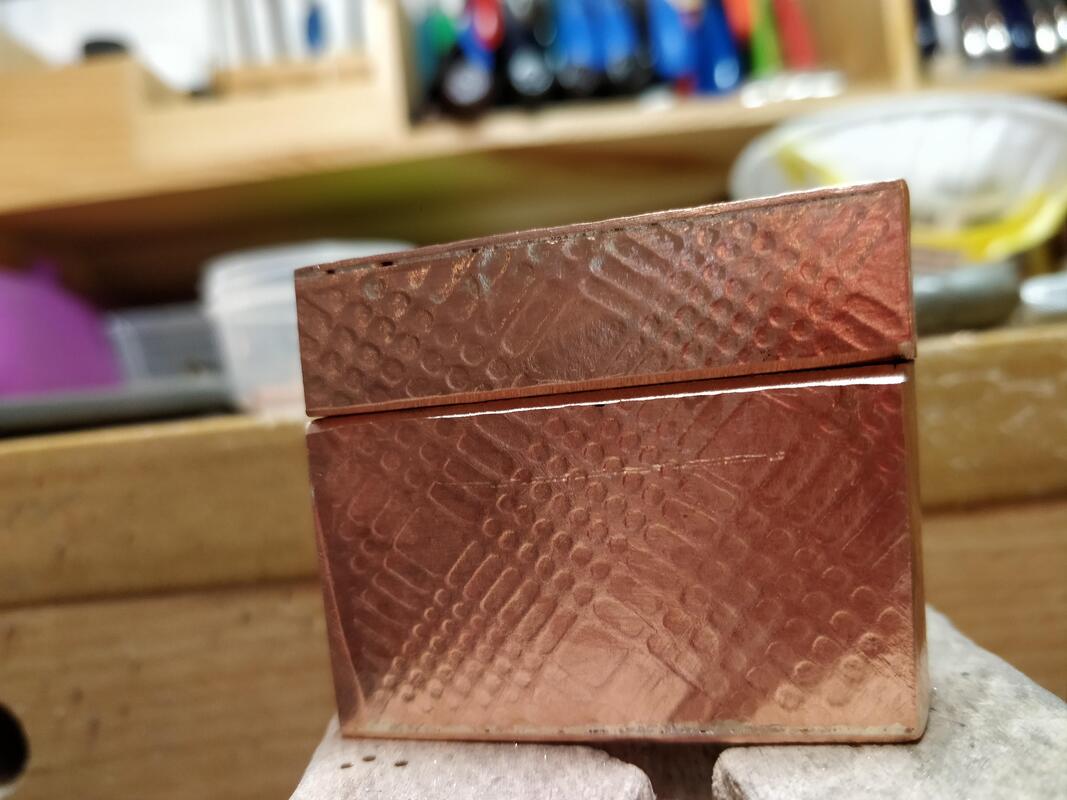
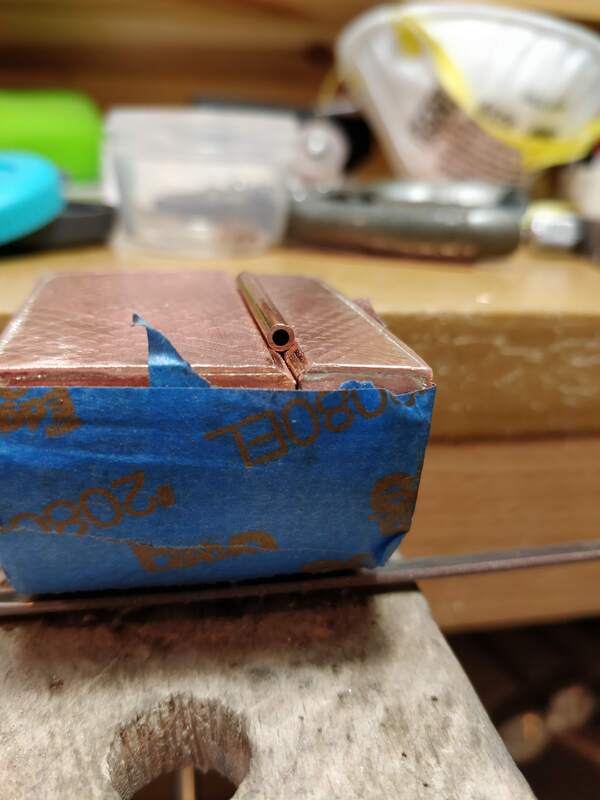
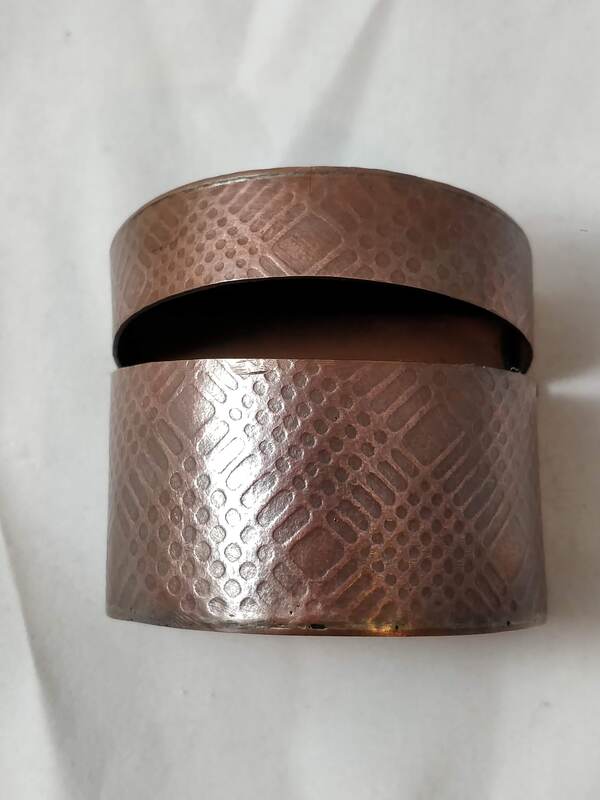
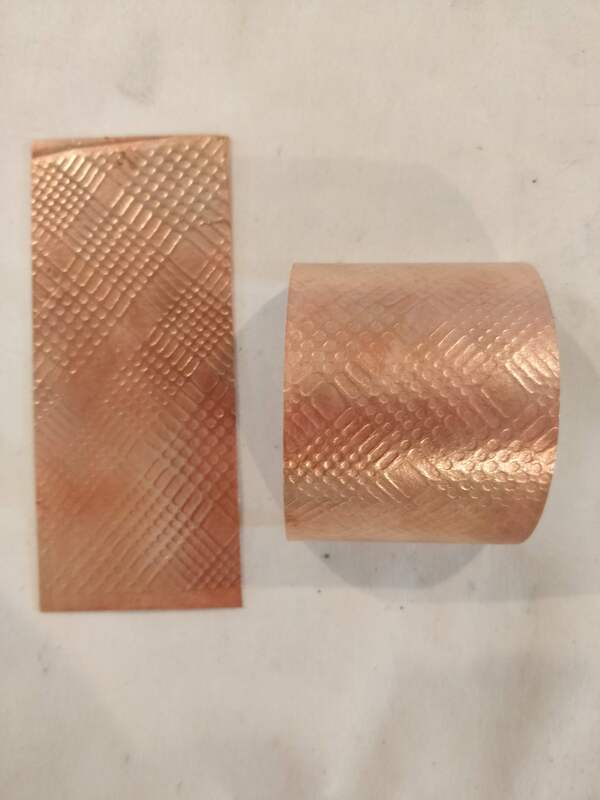
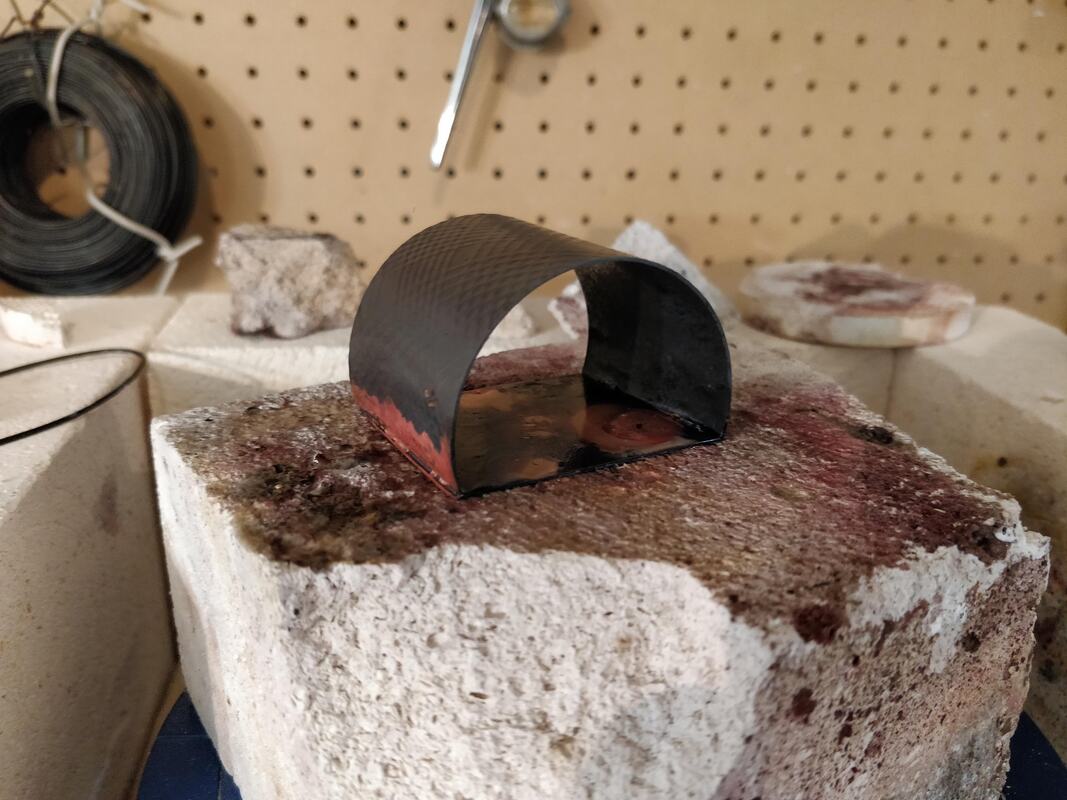
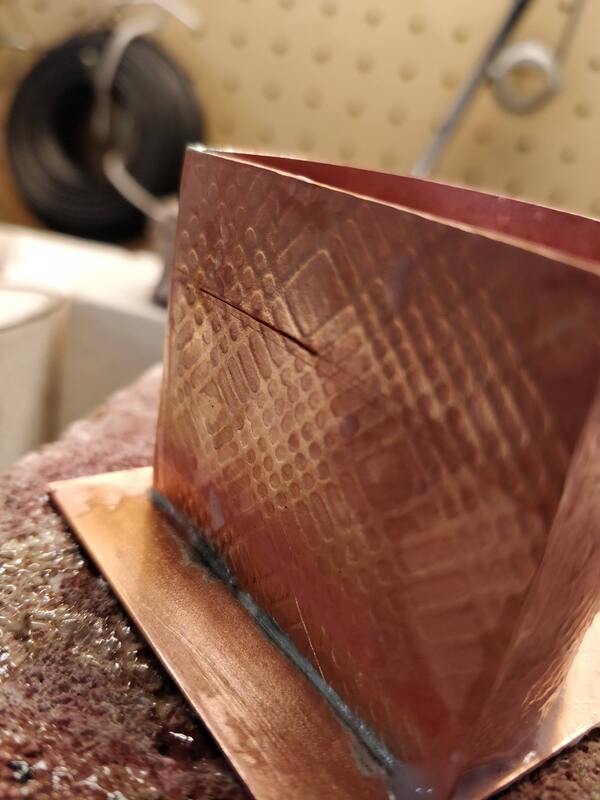
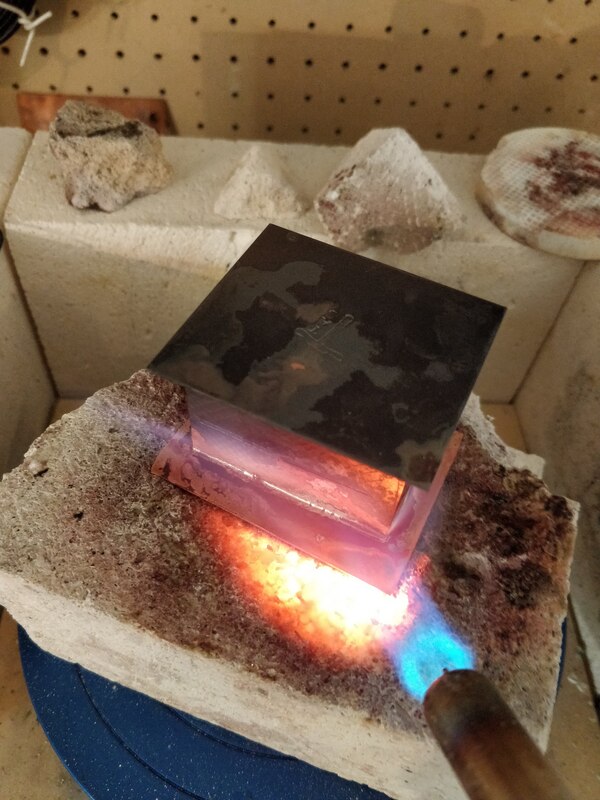
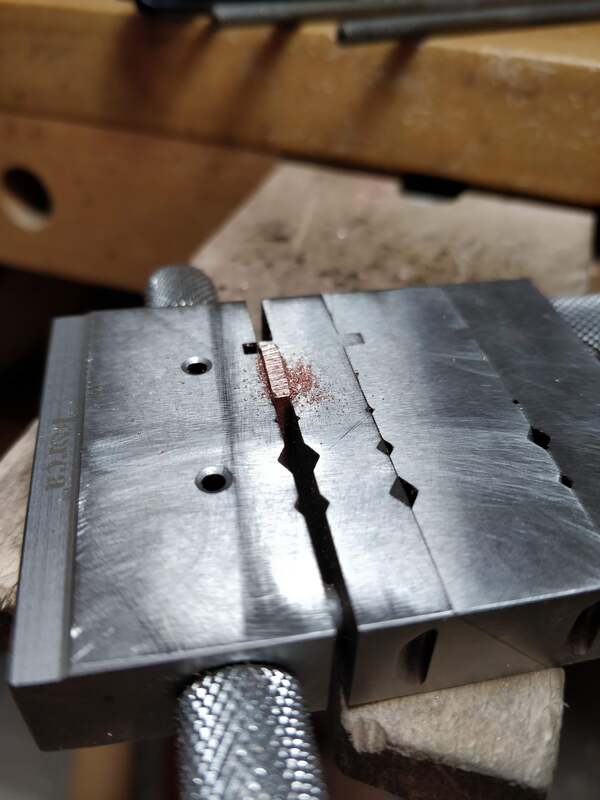
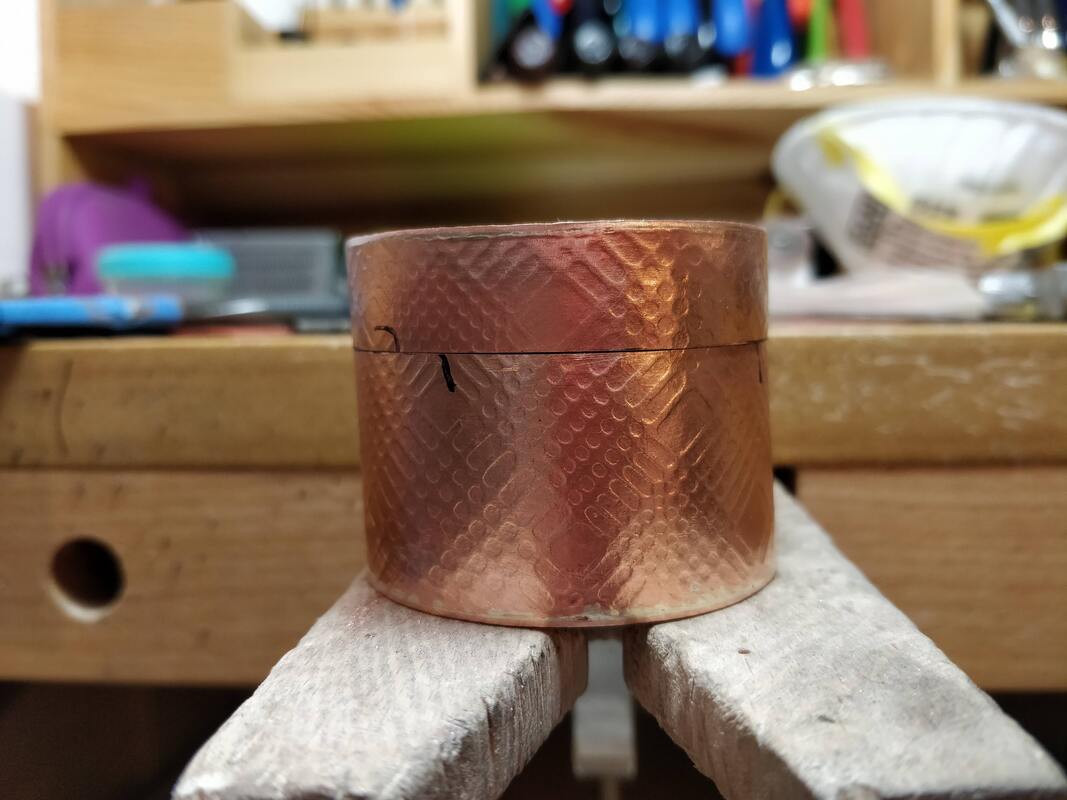
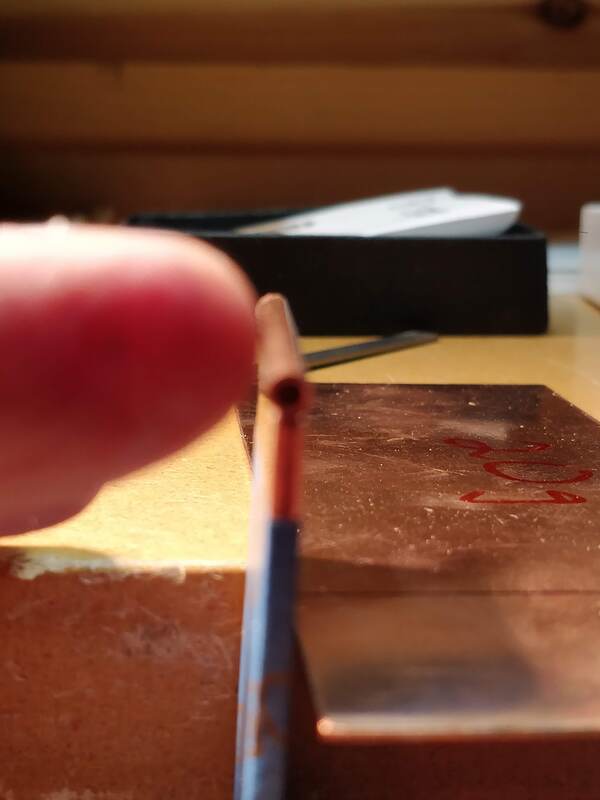
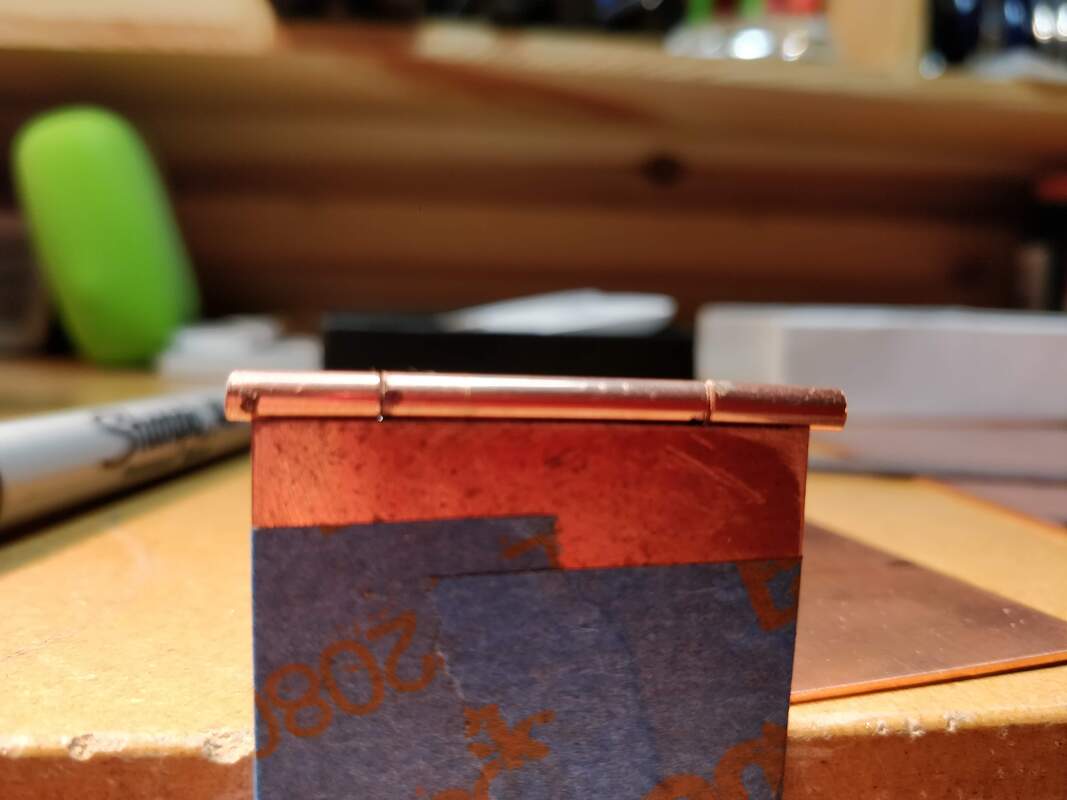
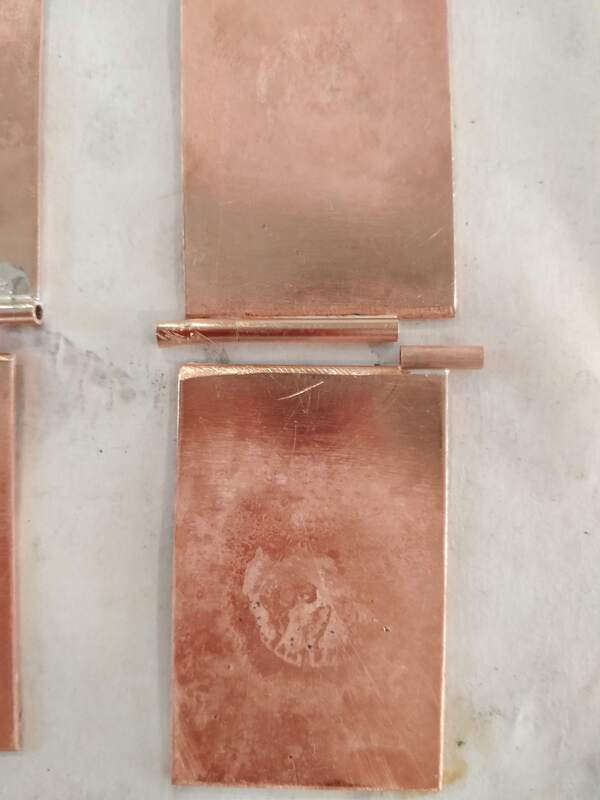
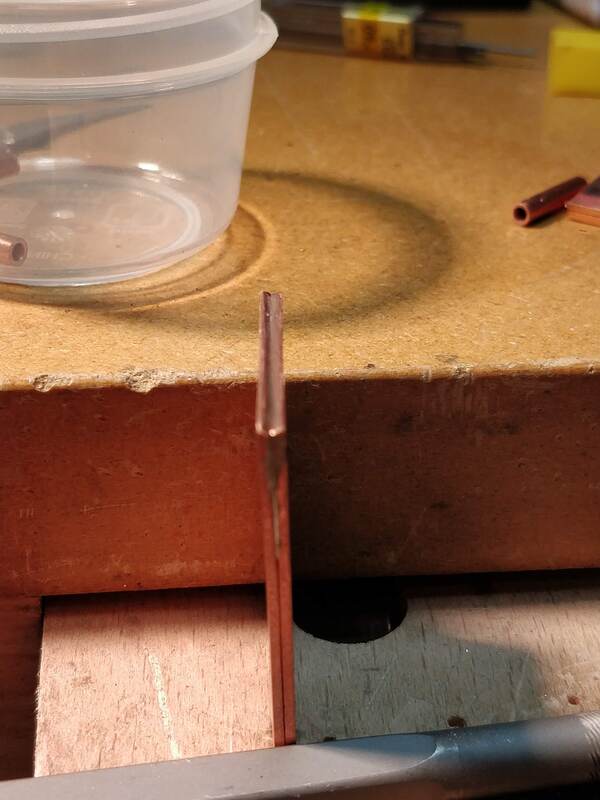
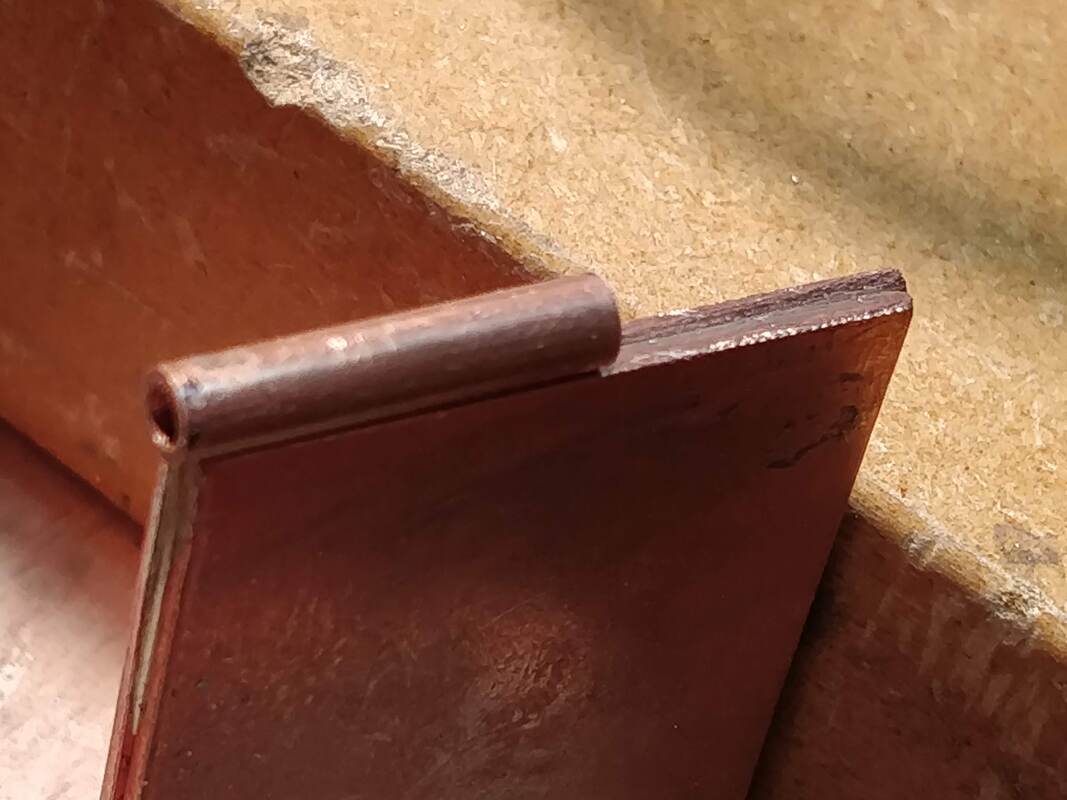
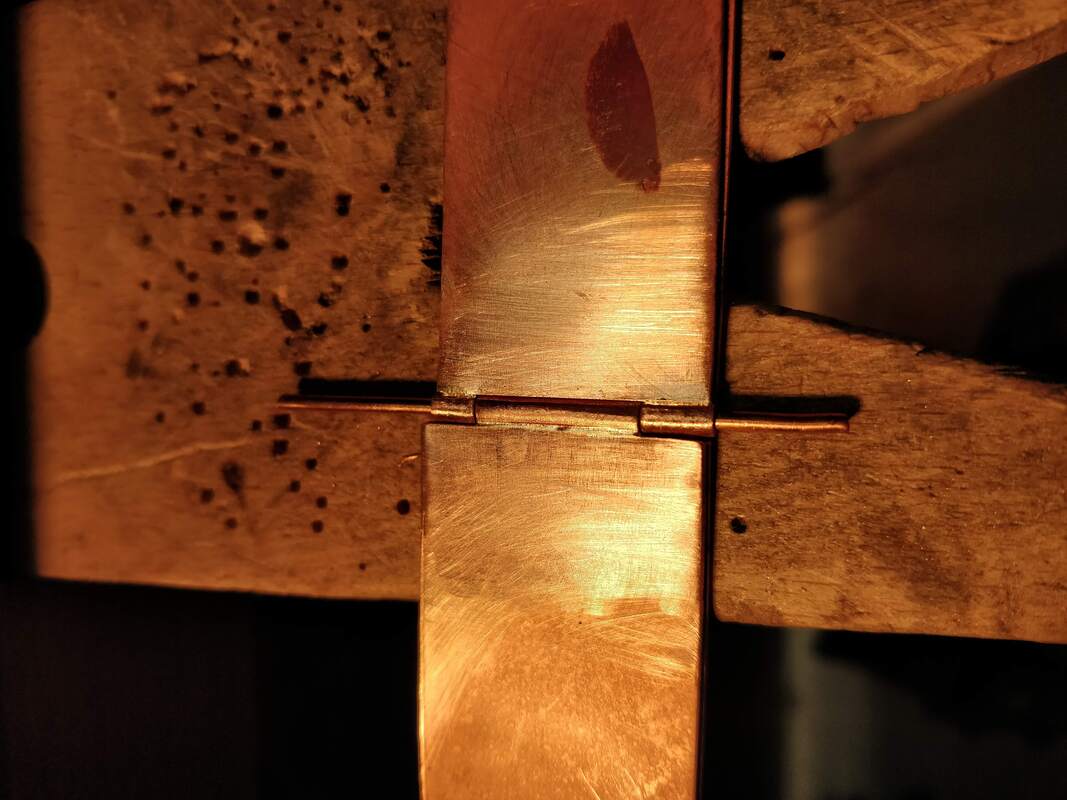
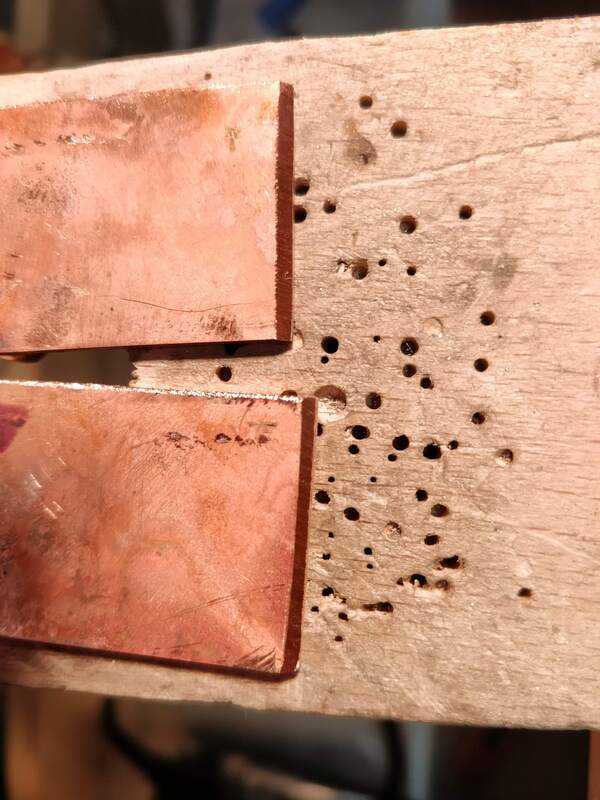
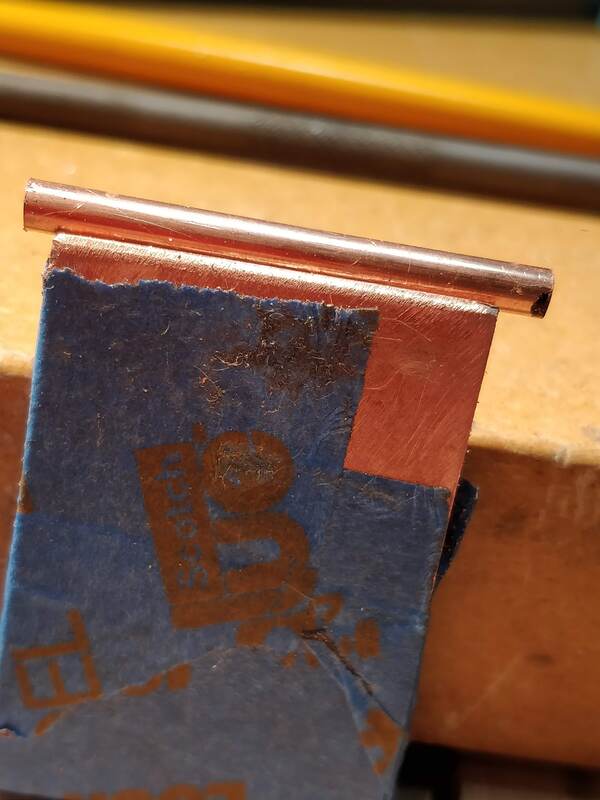
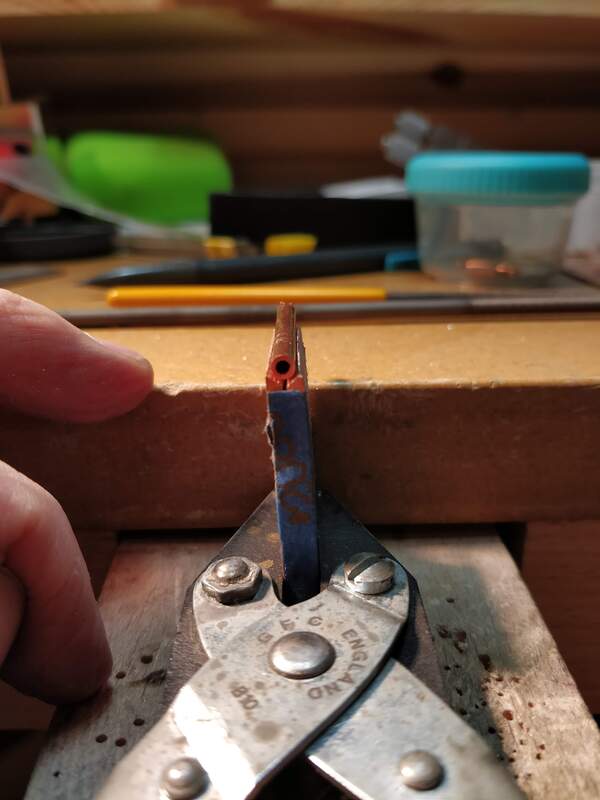
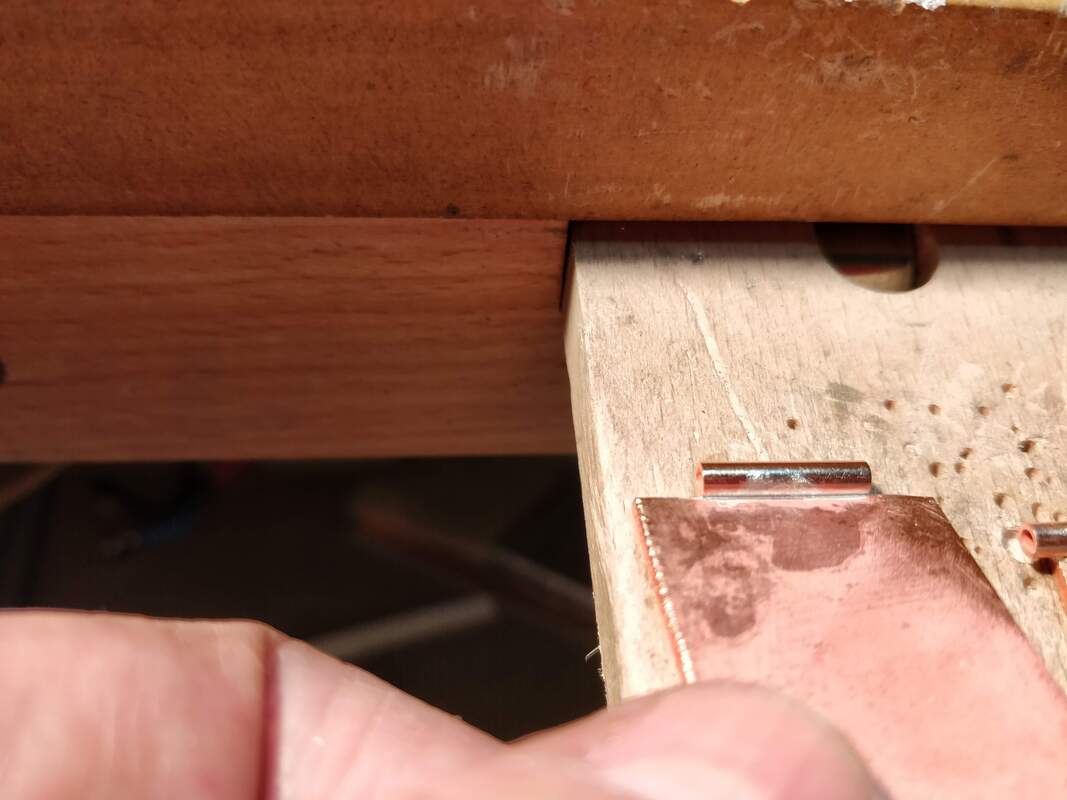
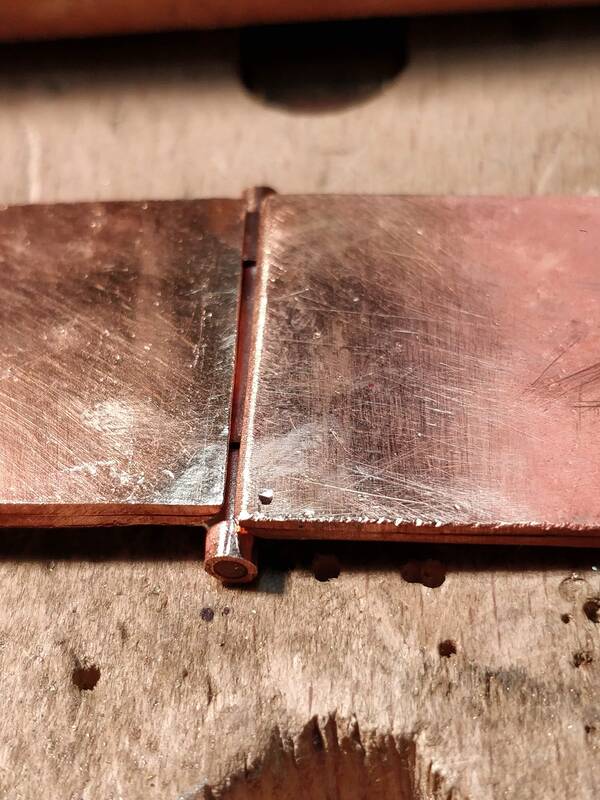
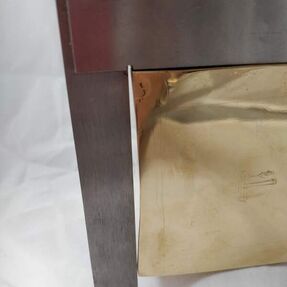
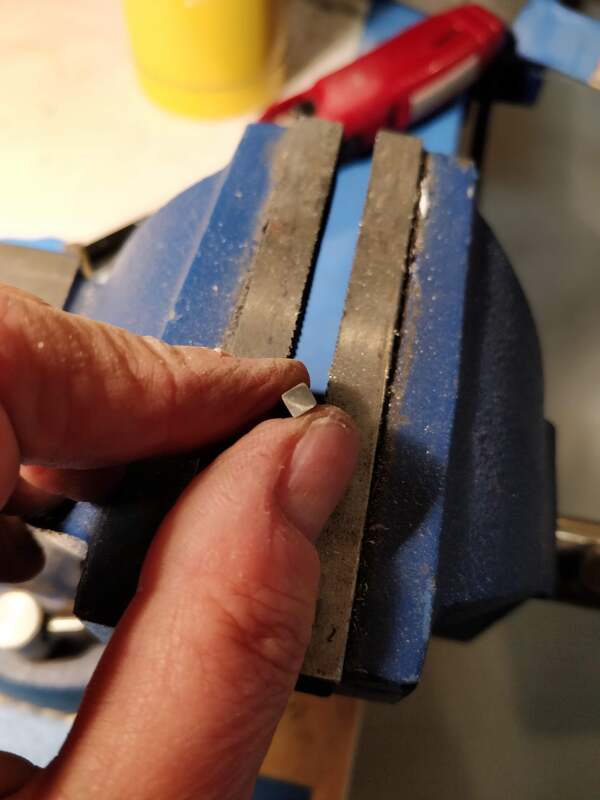
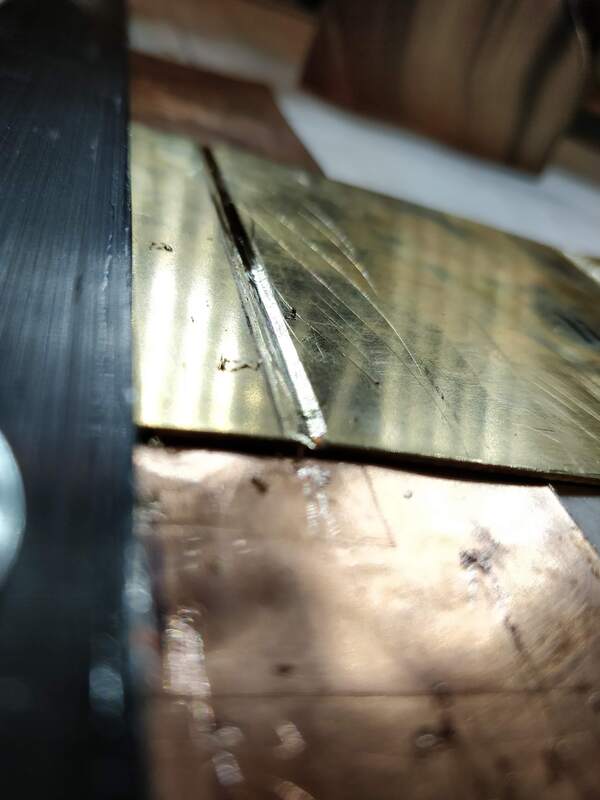
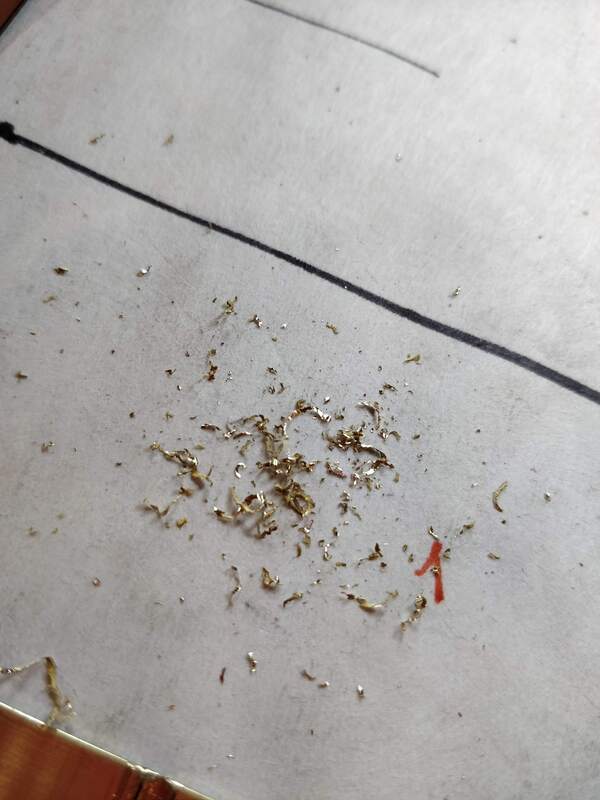
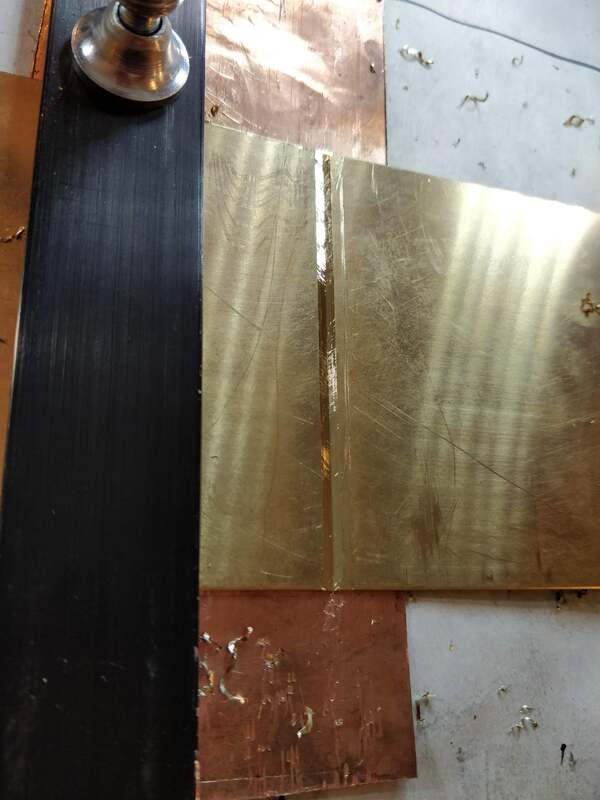
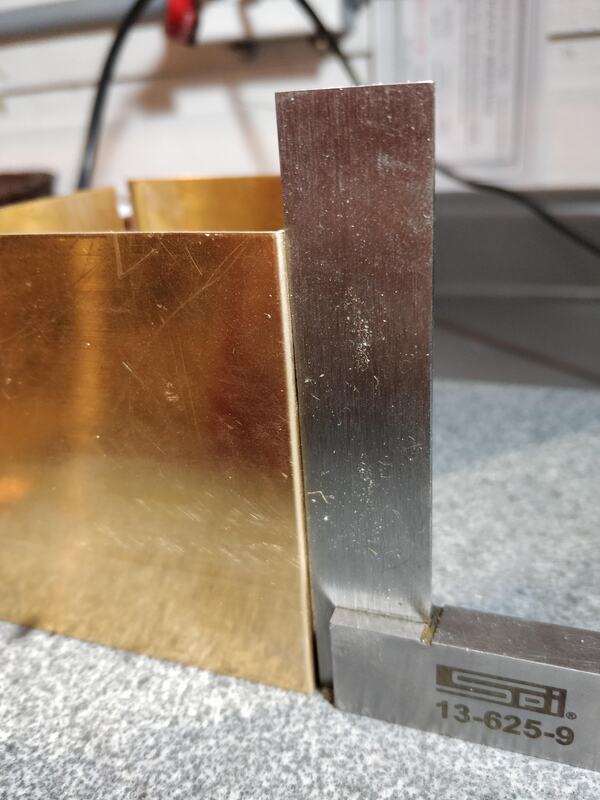
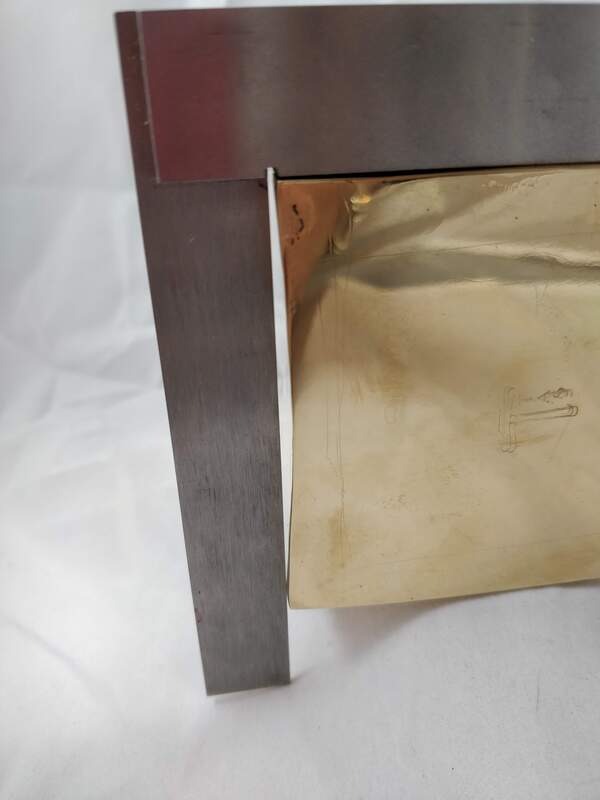
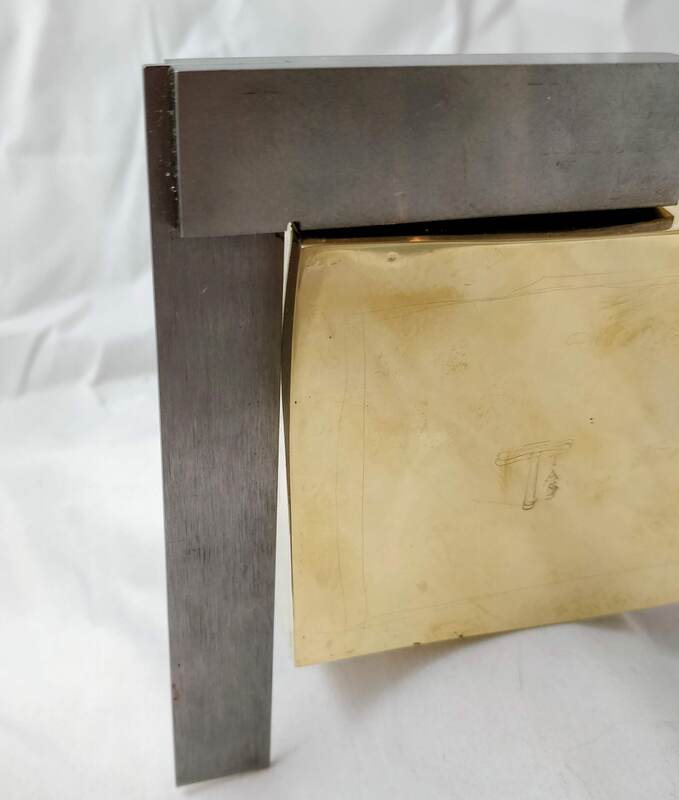
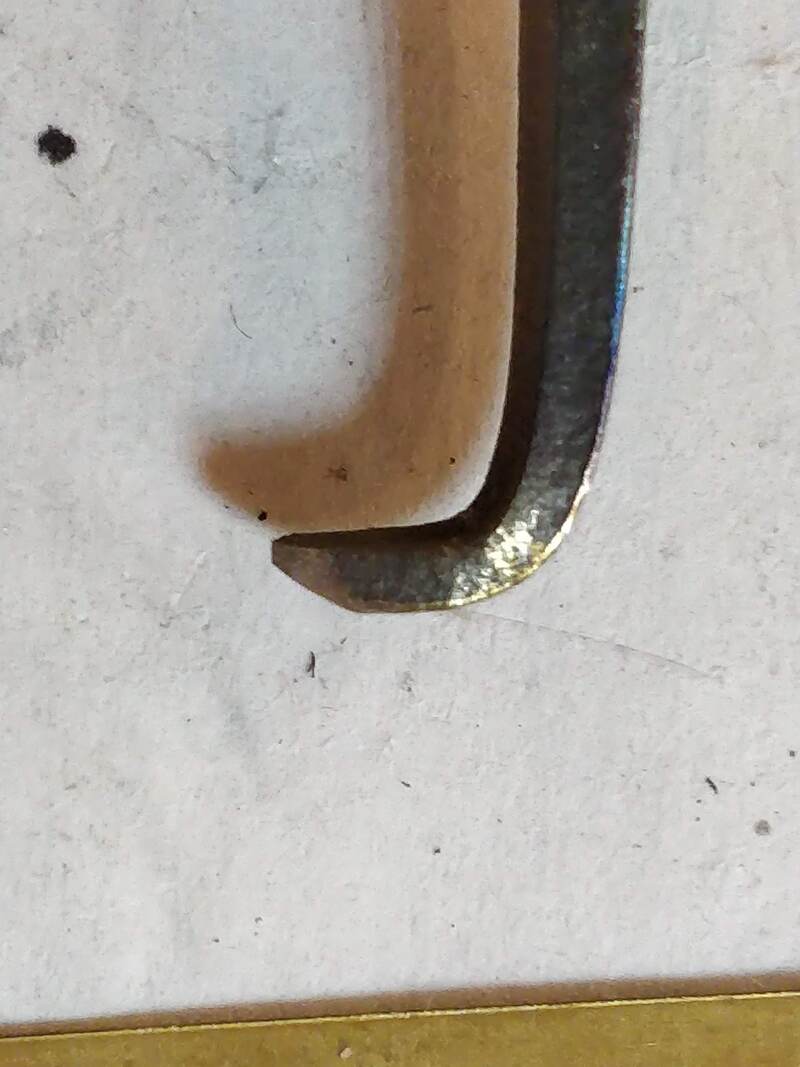
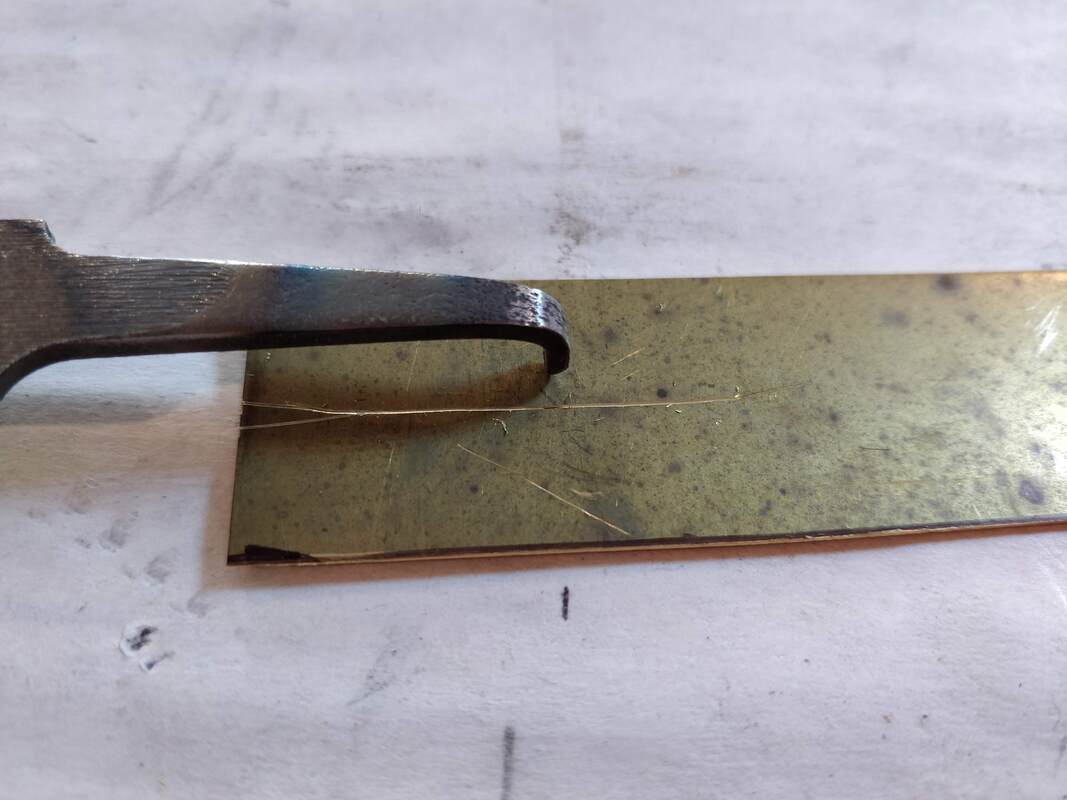
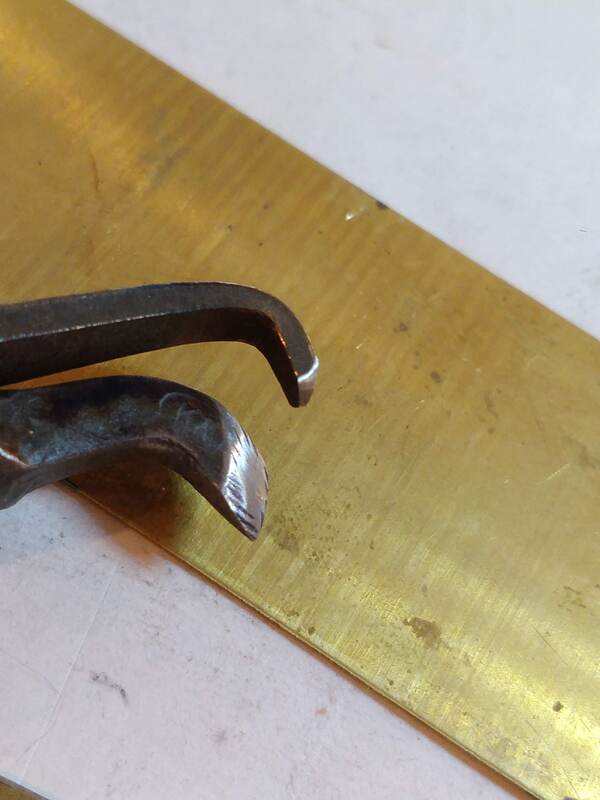
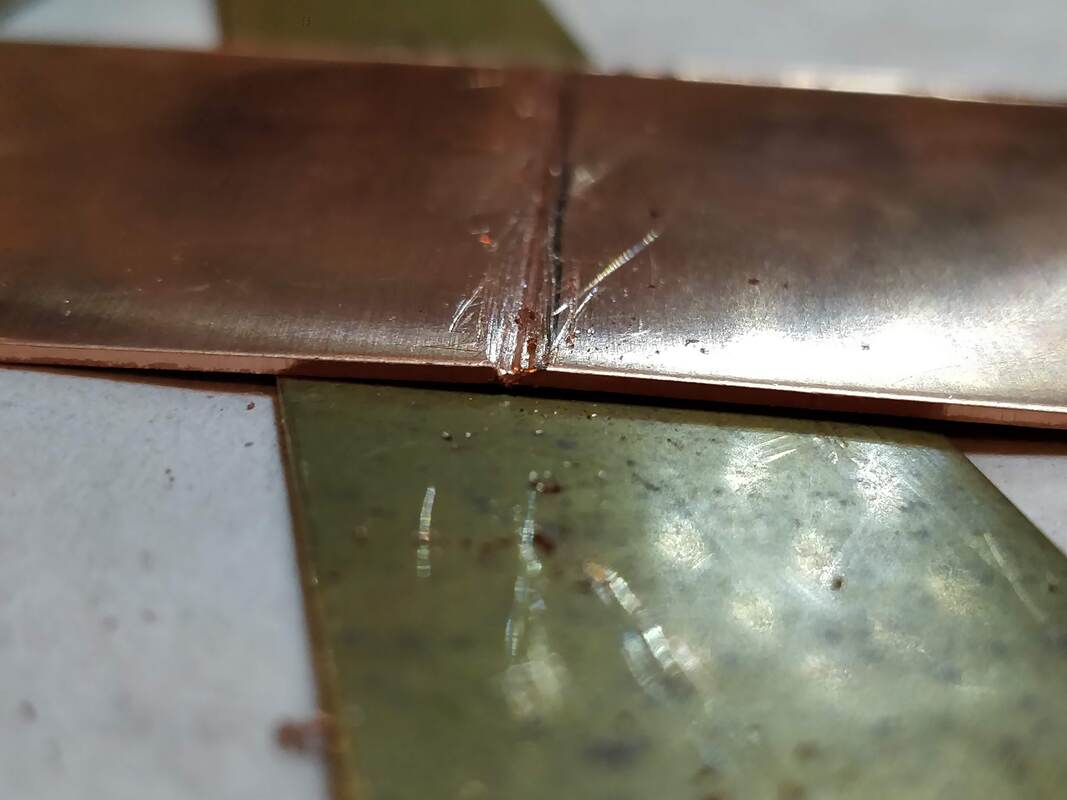
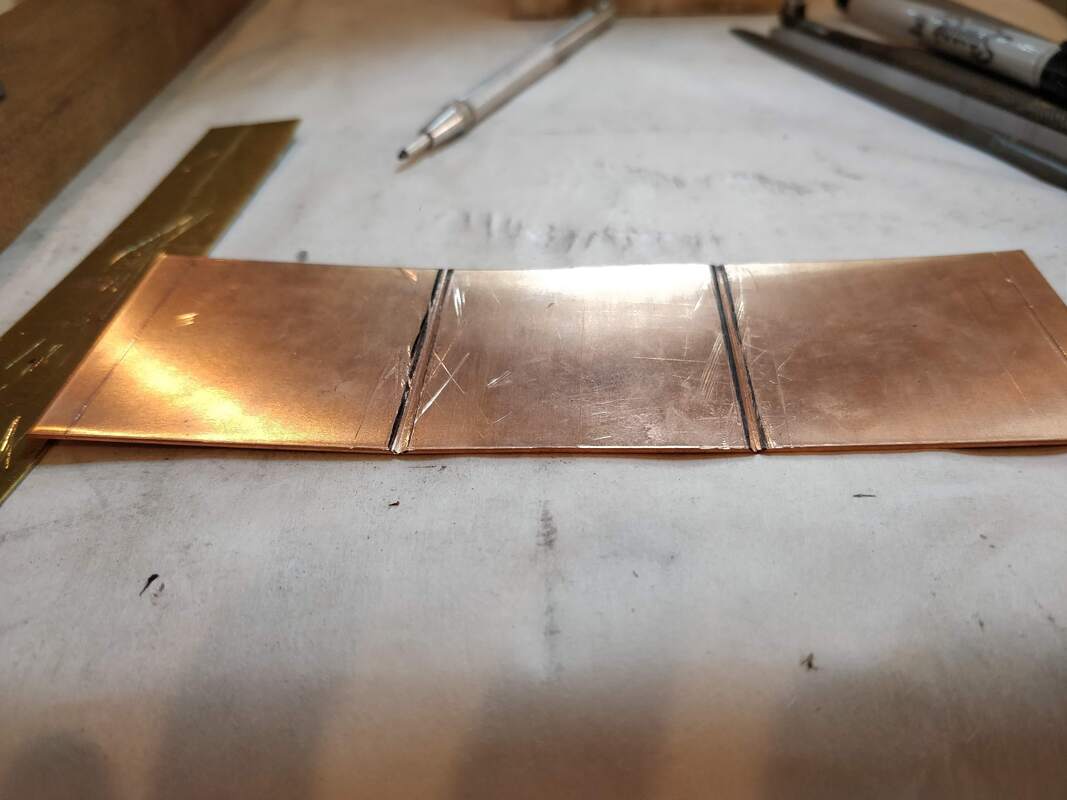
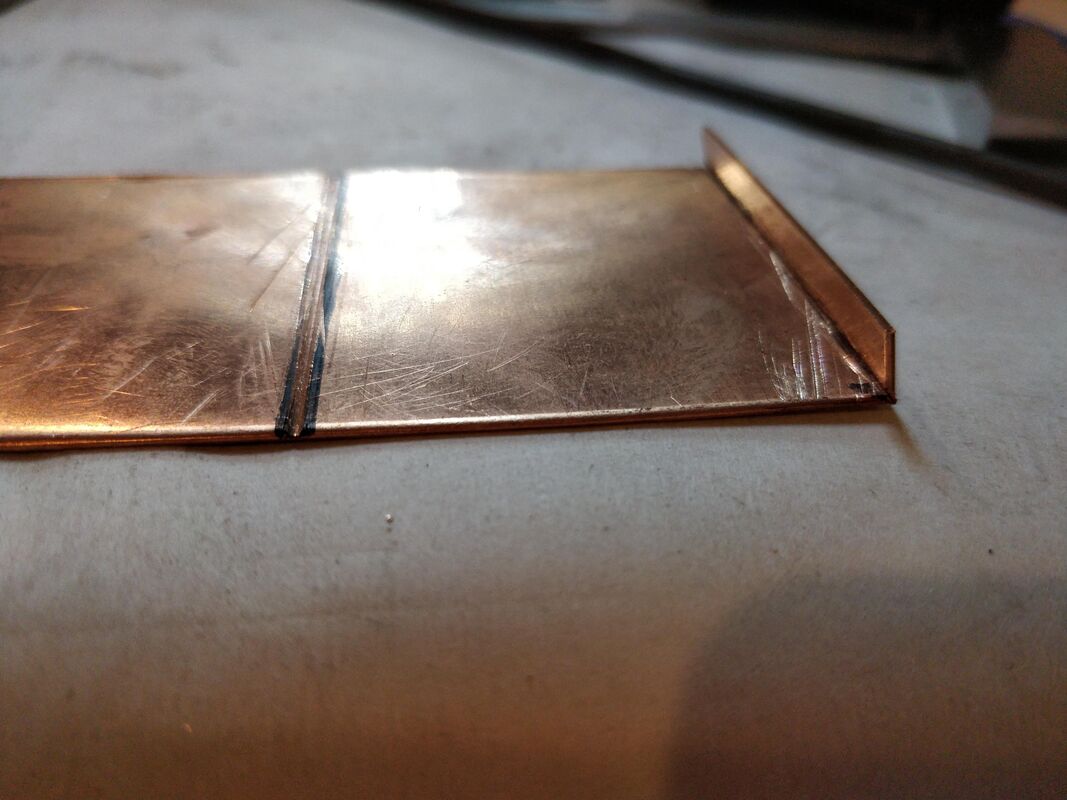
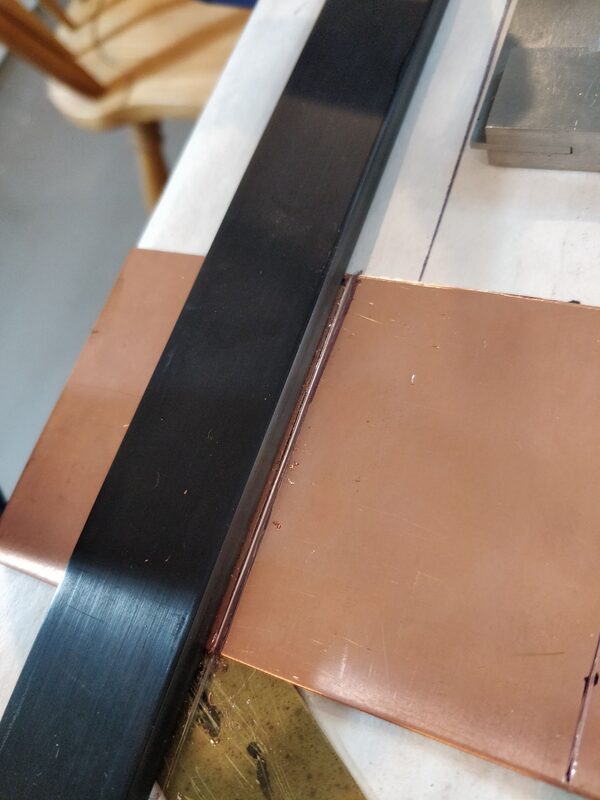
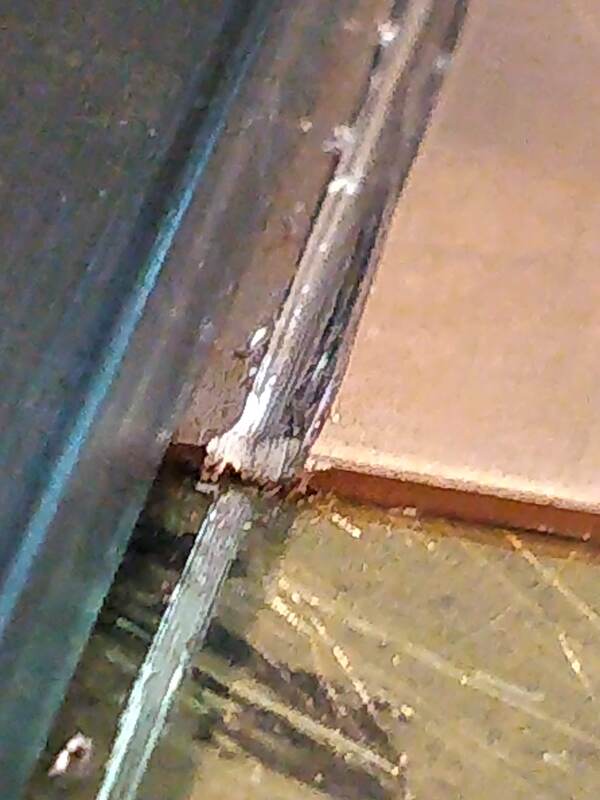
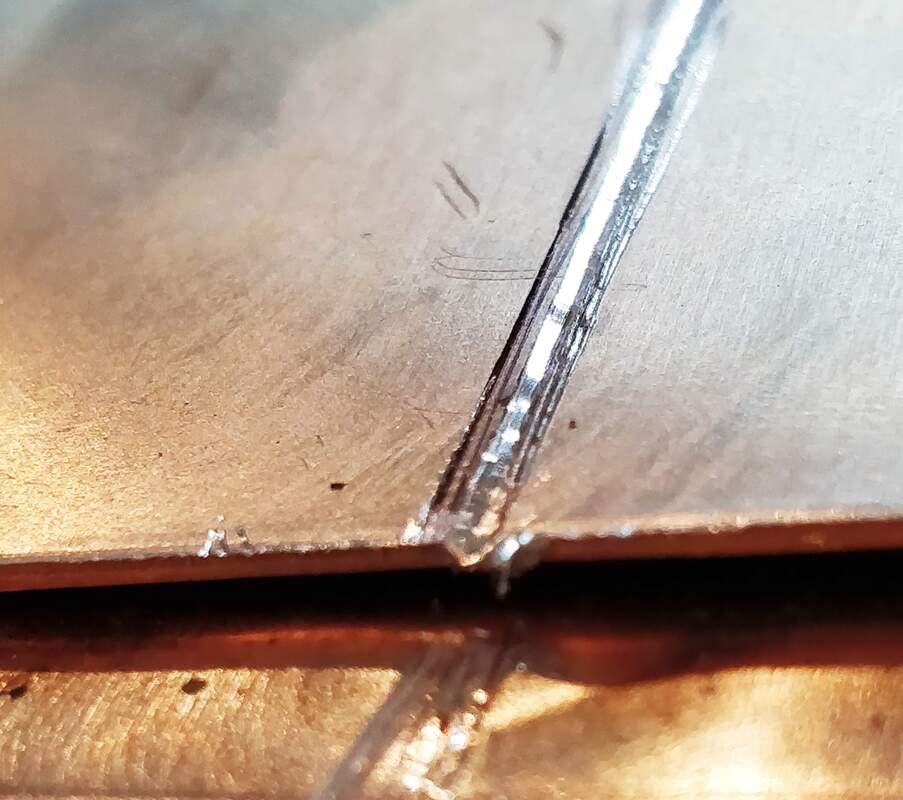
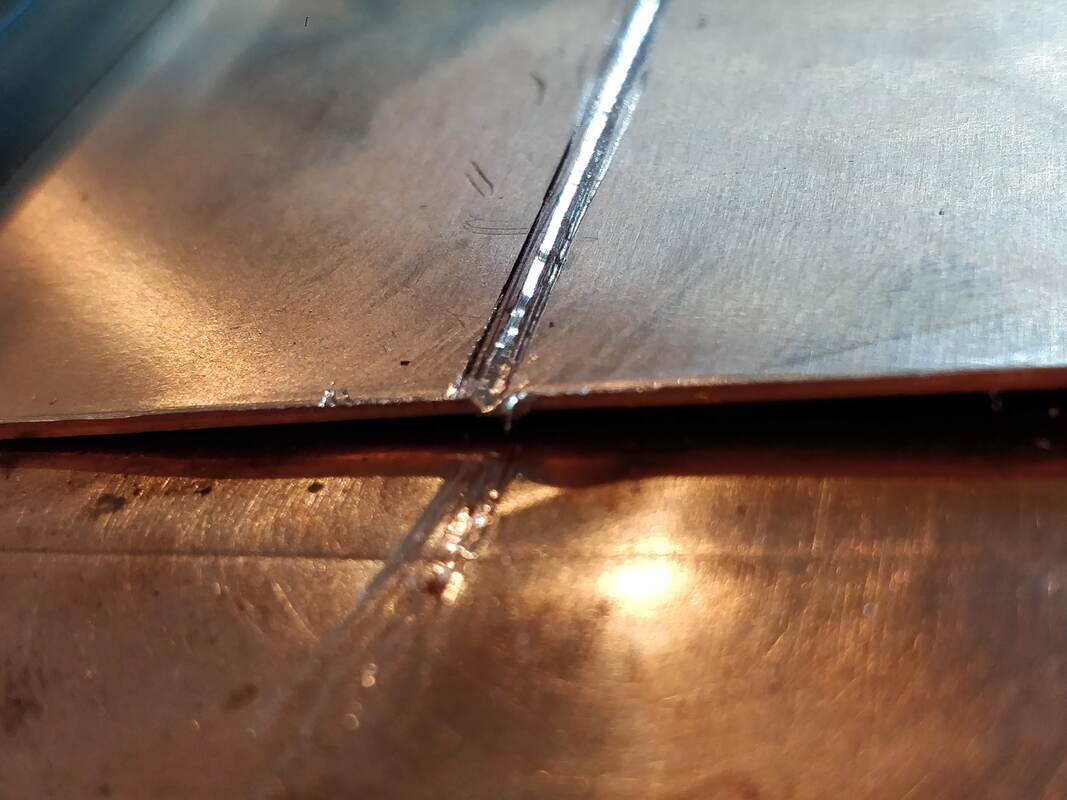
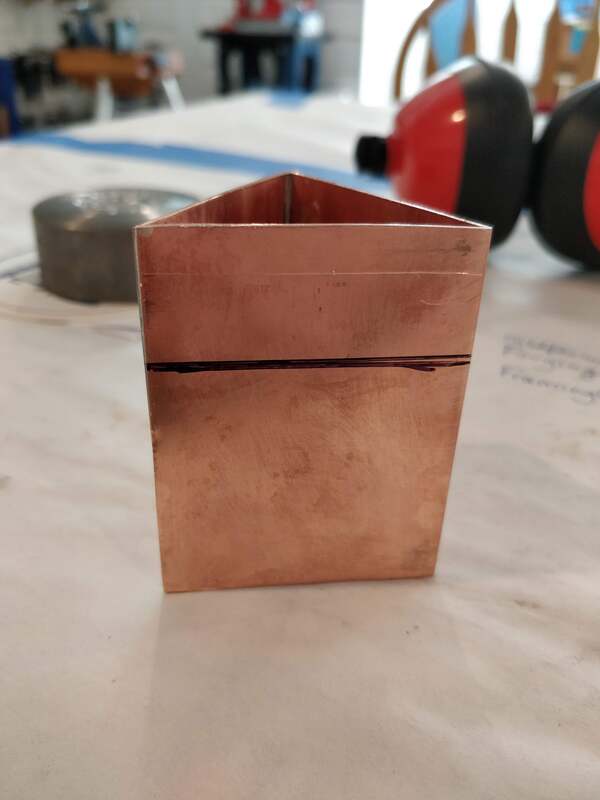
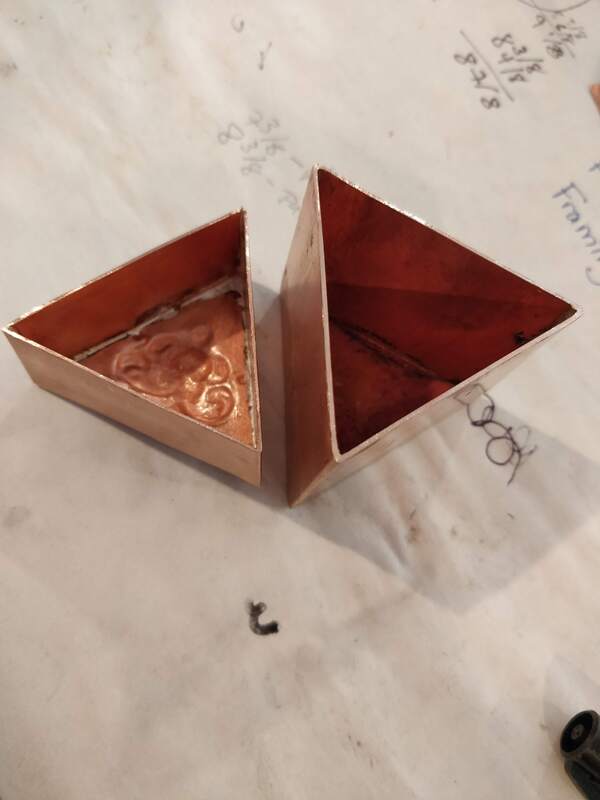
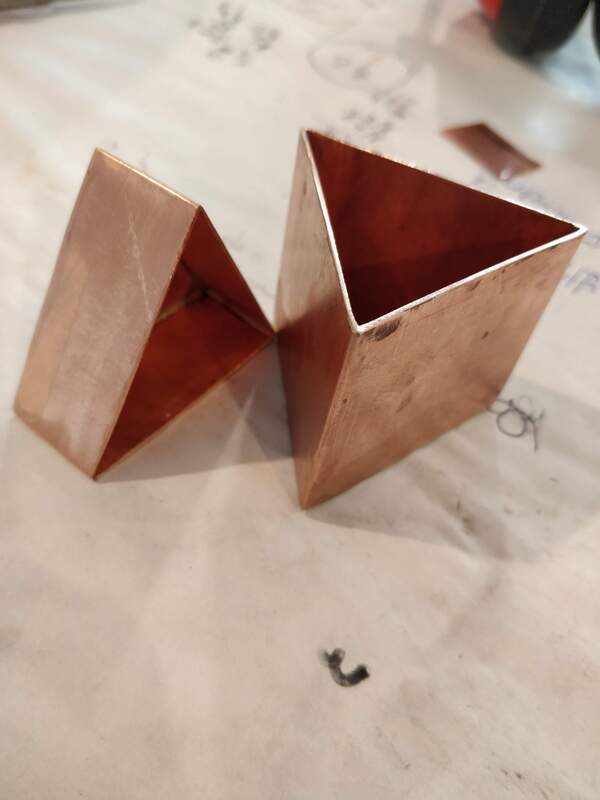
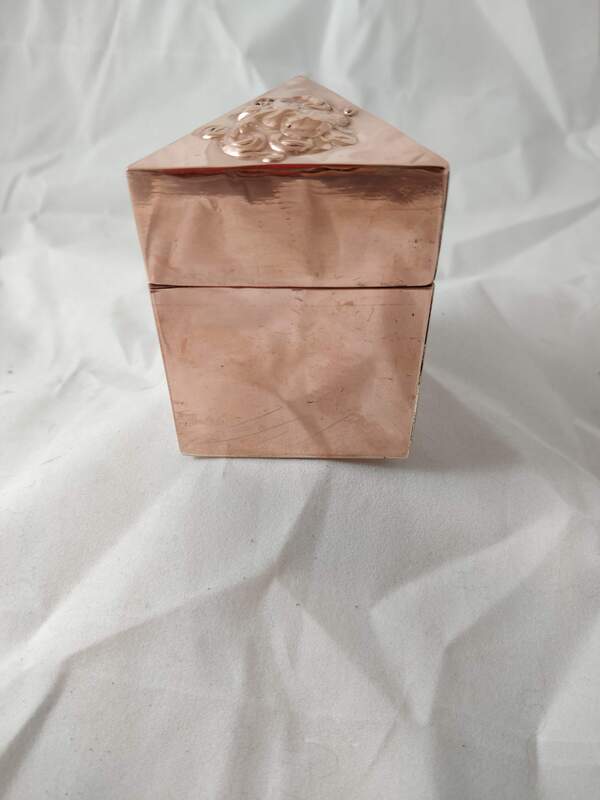
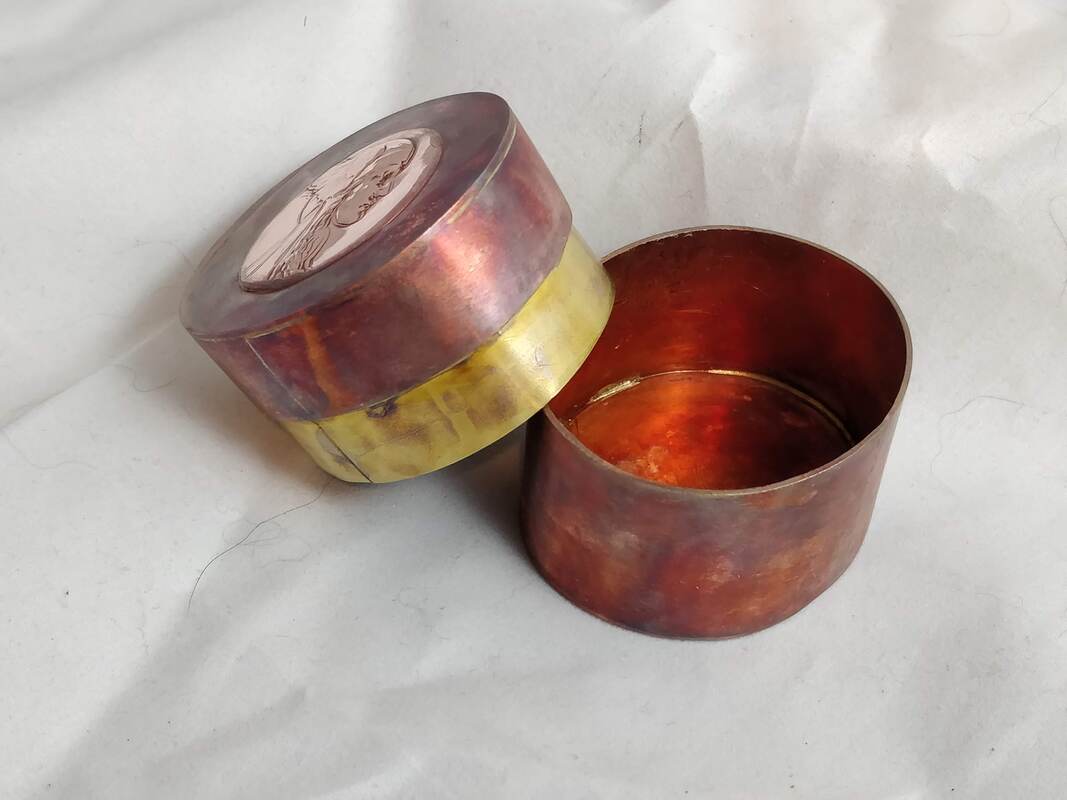
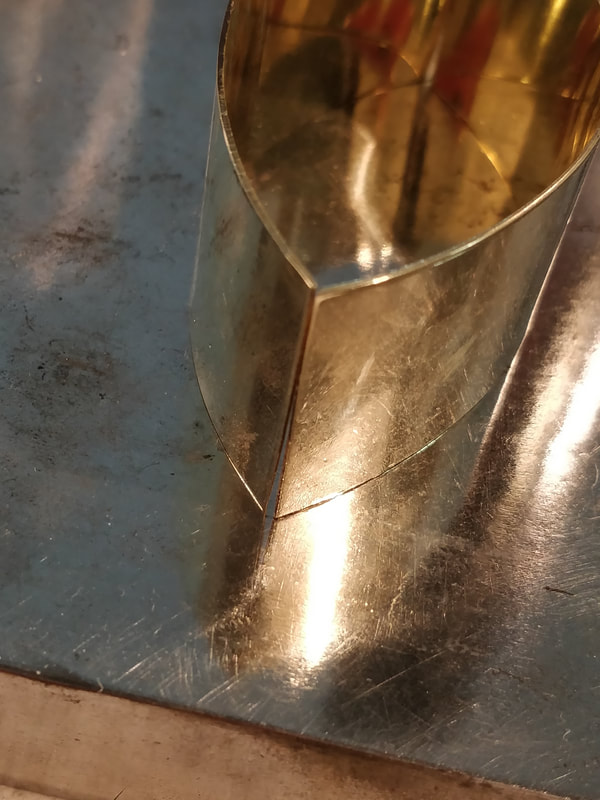
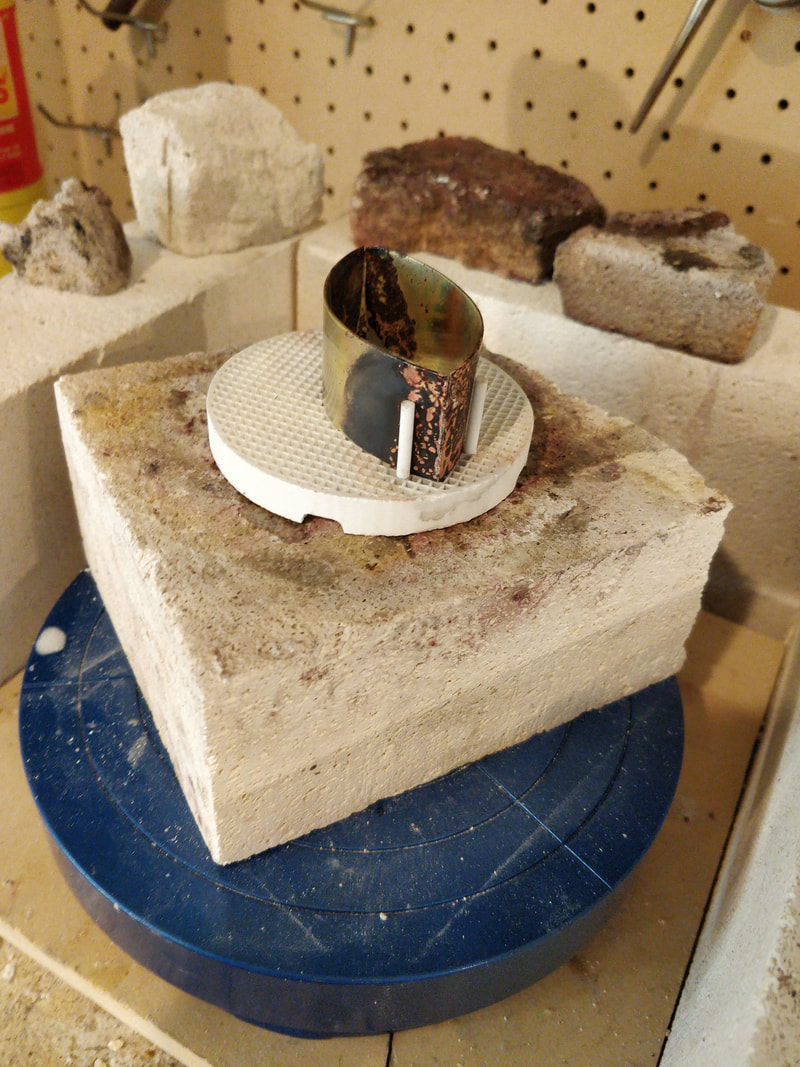
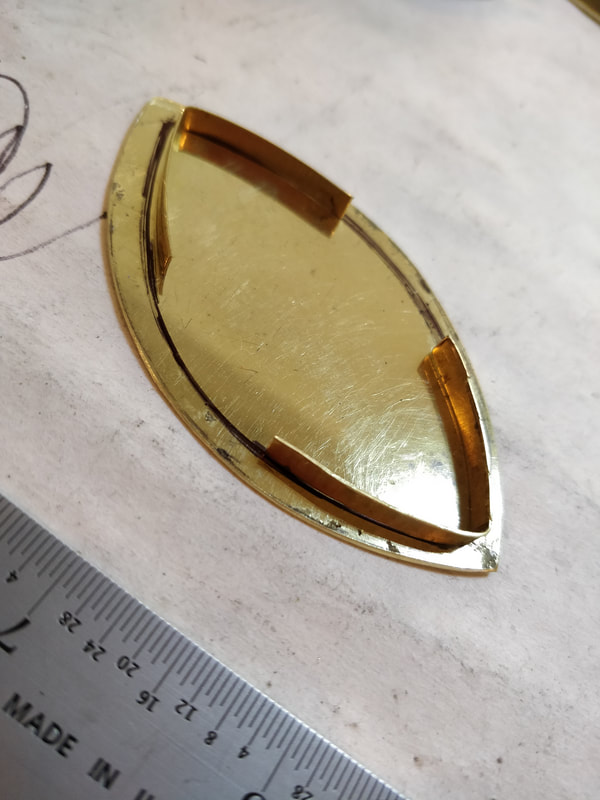
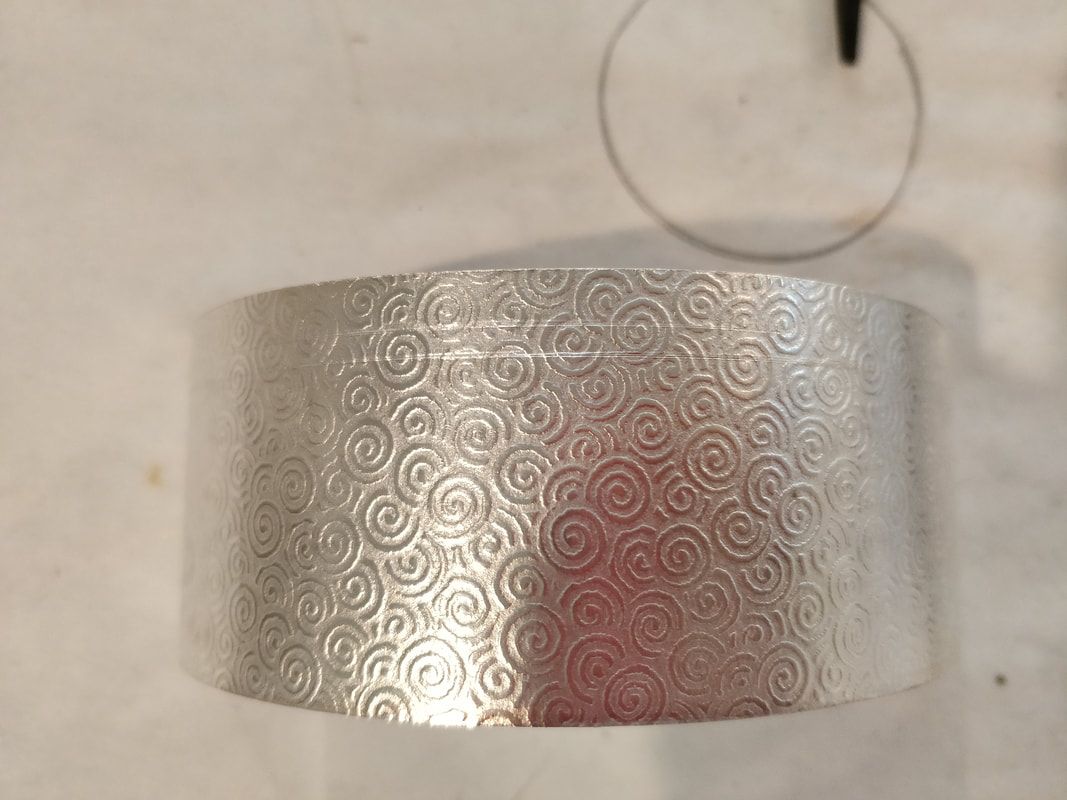
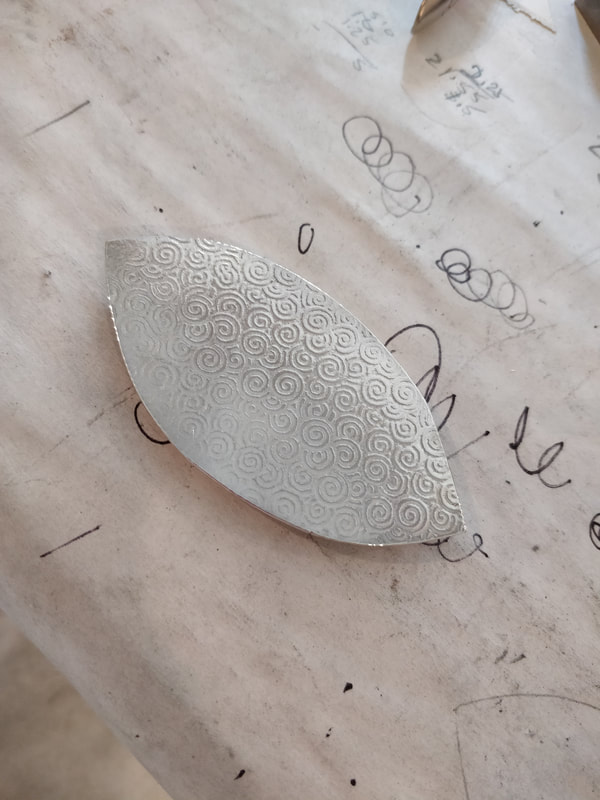
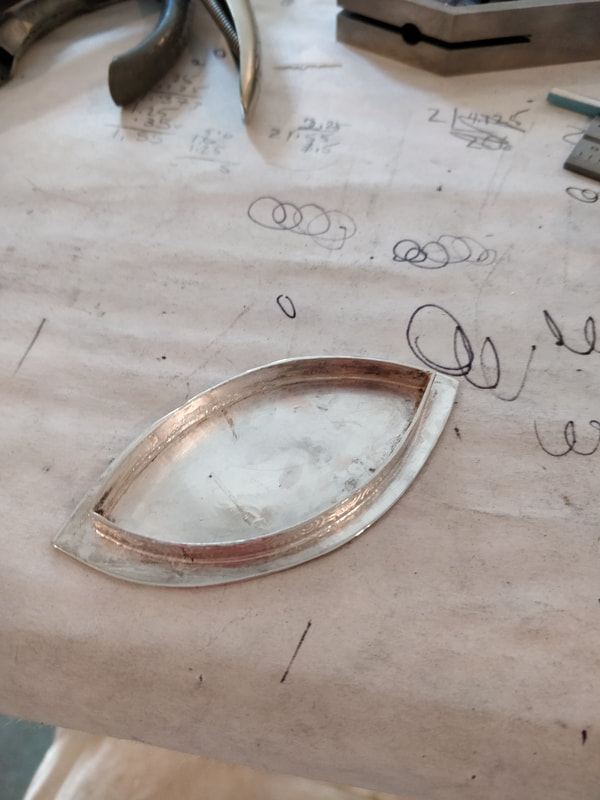
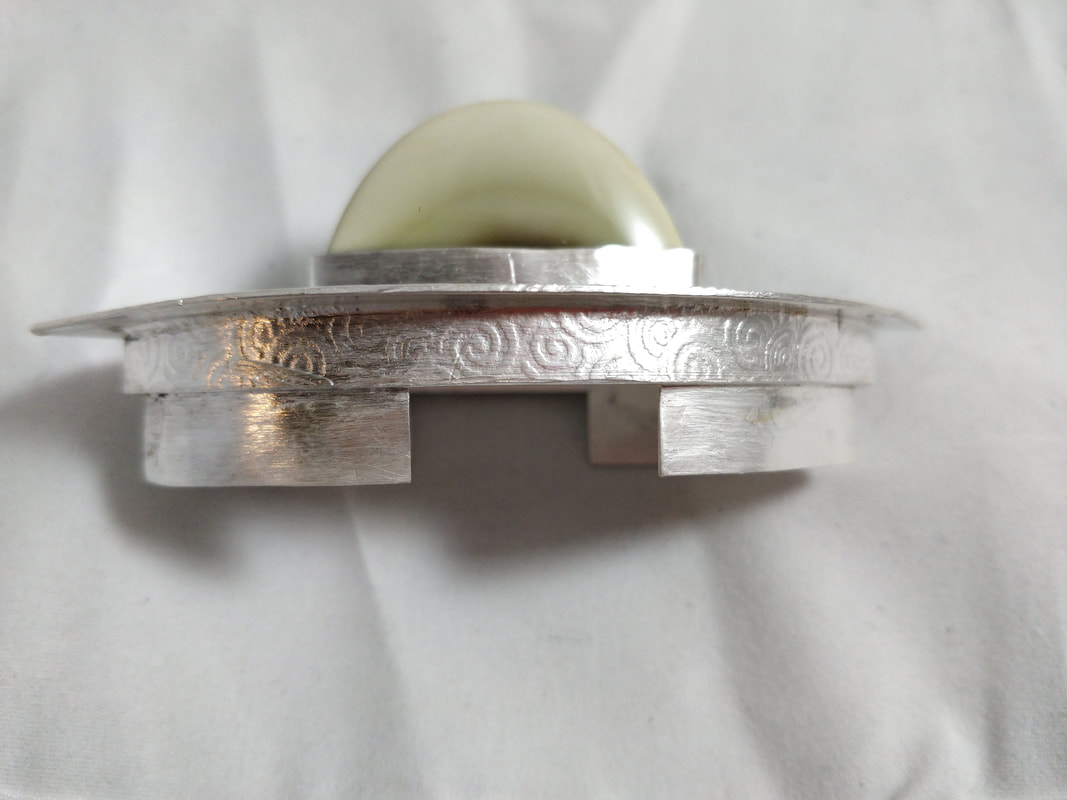
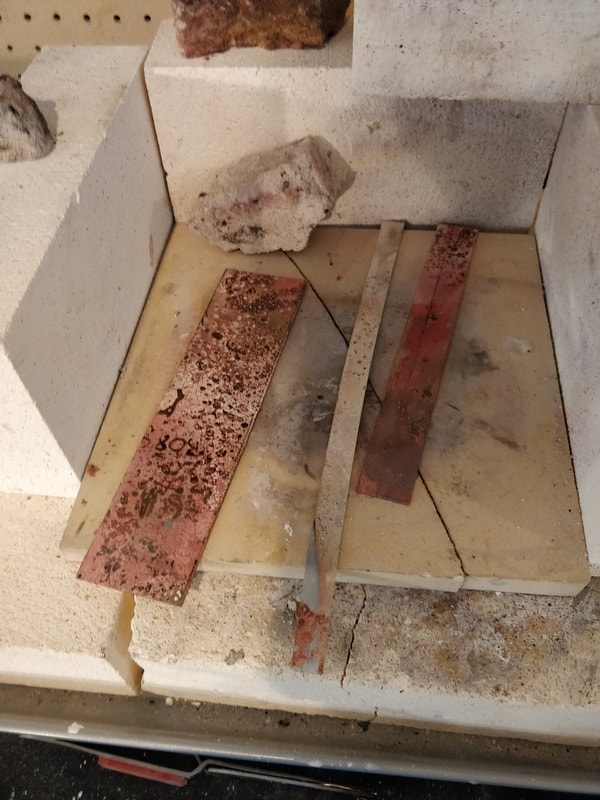
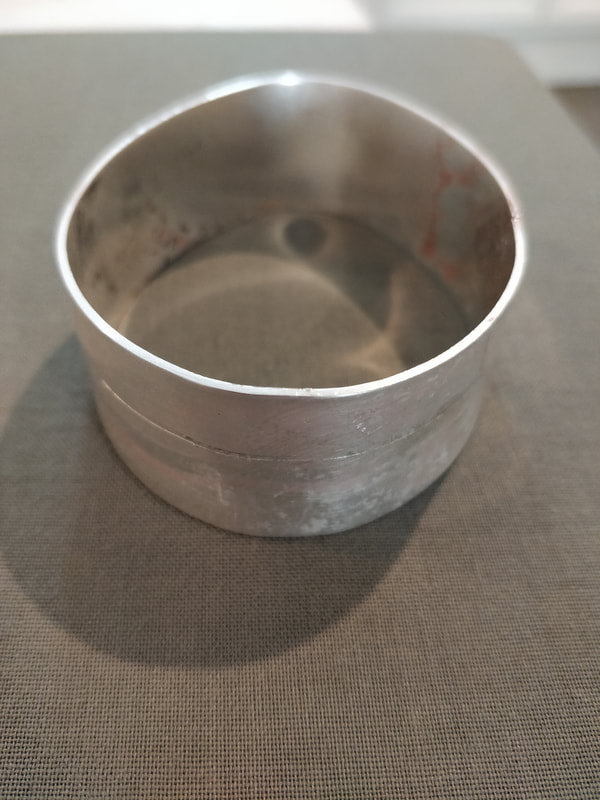
First up was to cut the hinge seat into the back of the box where the lid meets the bottom.  I started by filing in a 45 degree angle on each outer edge. Then I taped it all together and using the chenier files, cut the rest of the seat for the tubing. It was file, blow away the copper dust, place a piece of tubing in the groove and determine if it was deep enough, repeat....

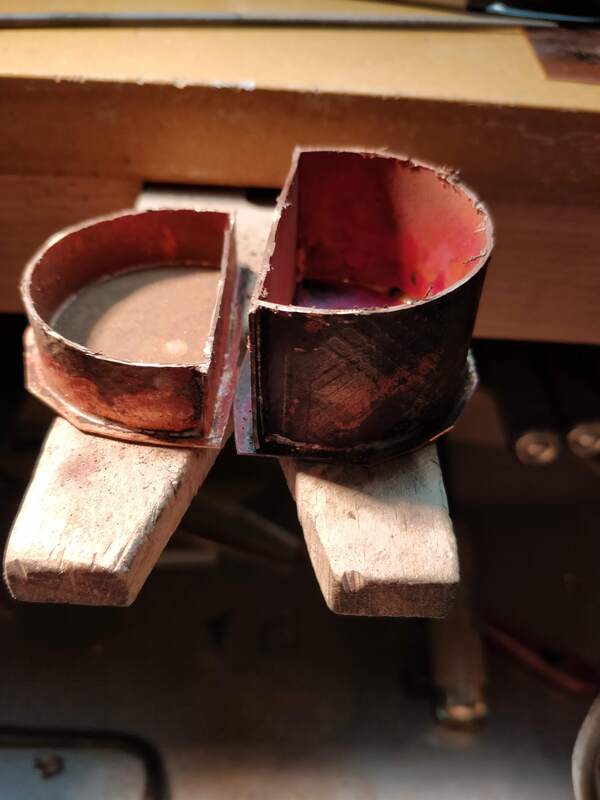
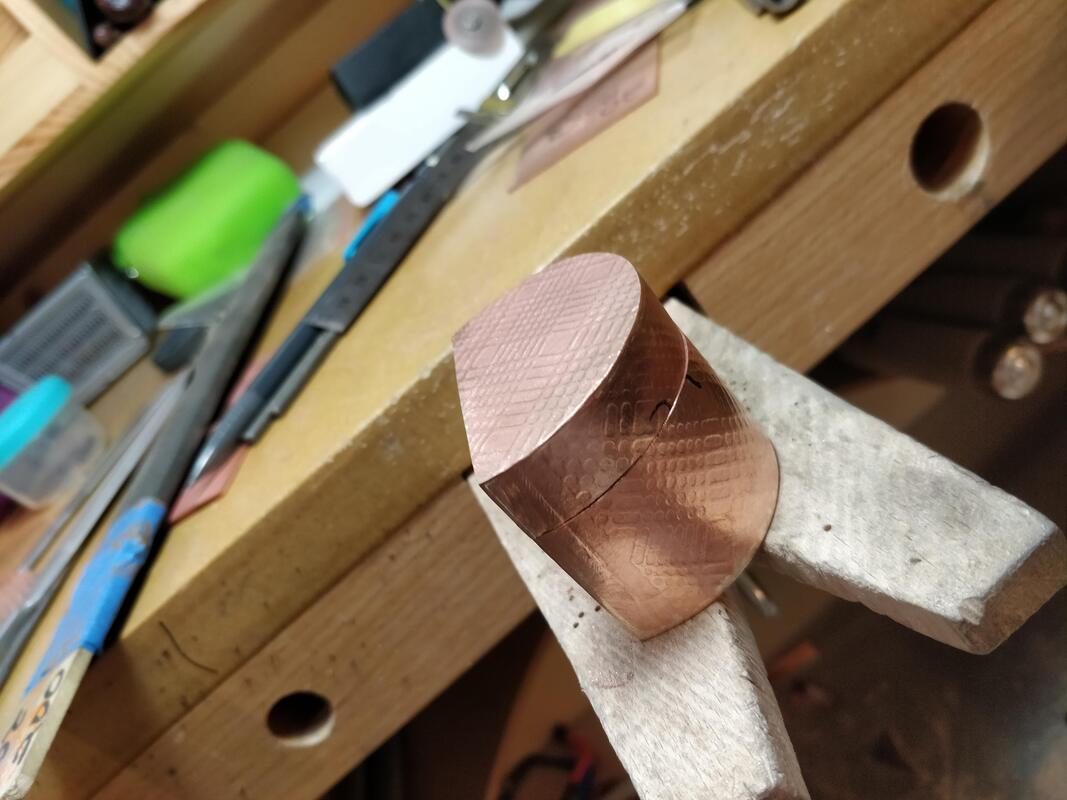
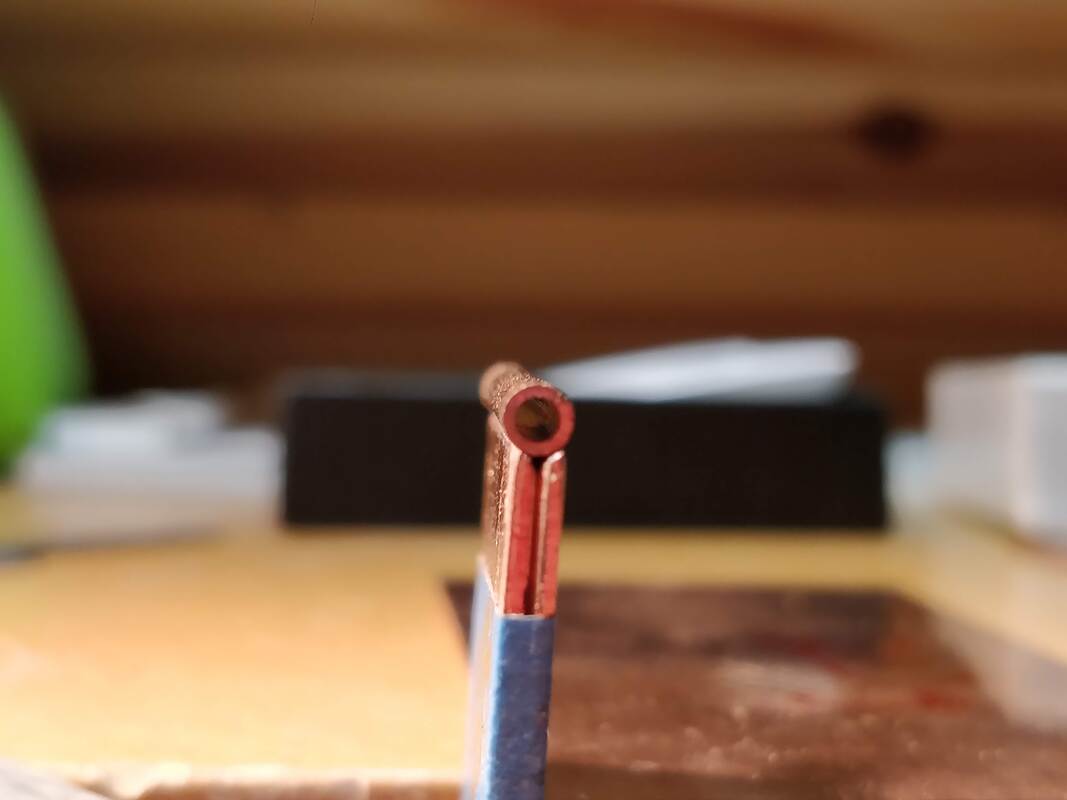
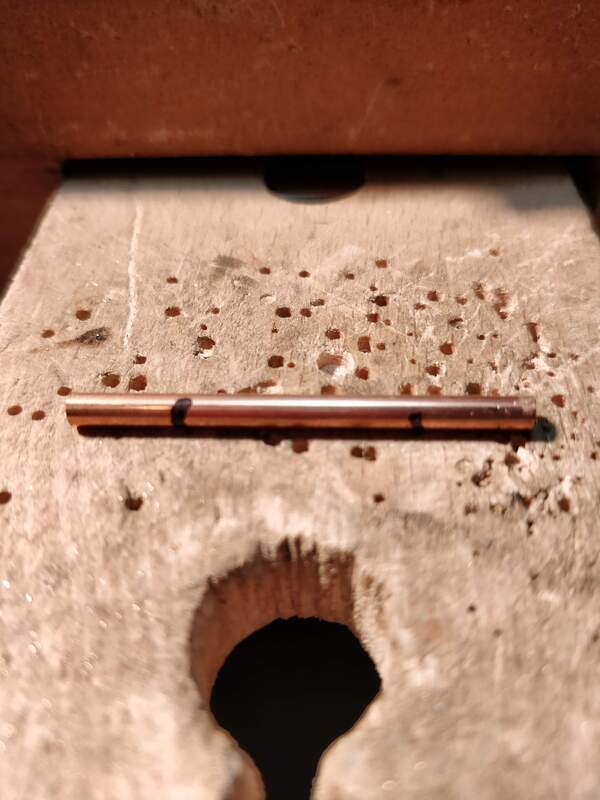
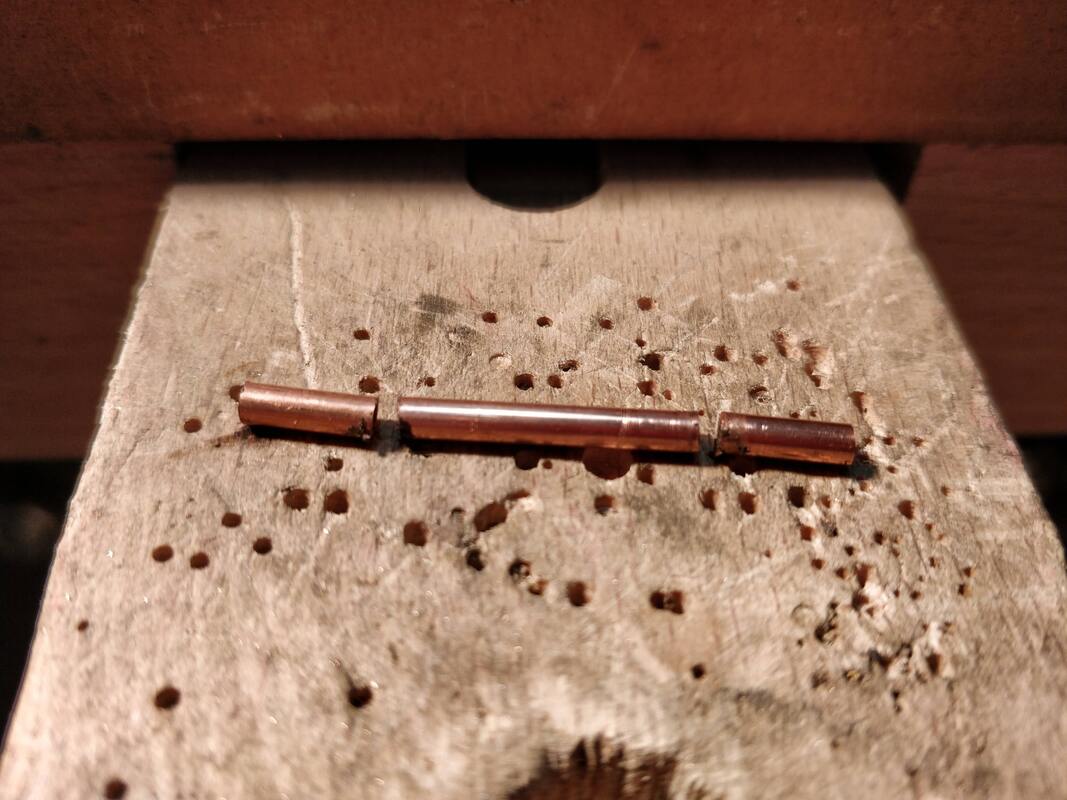
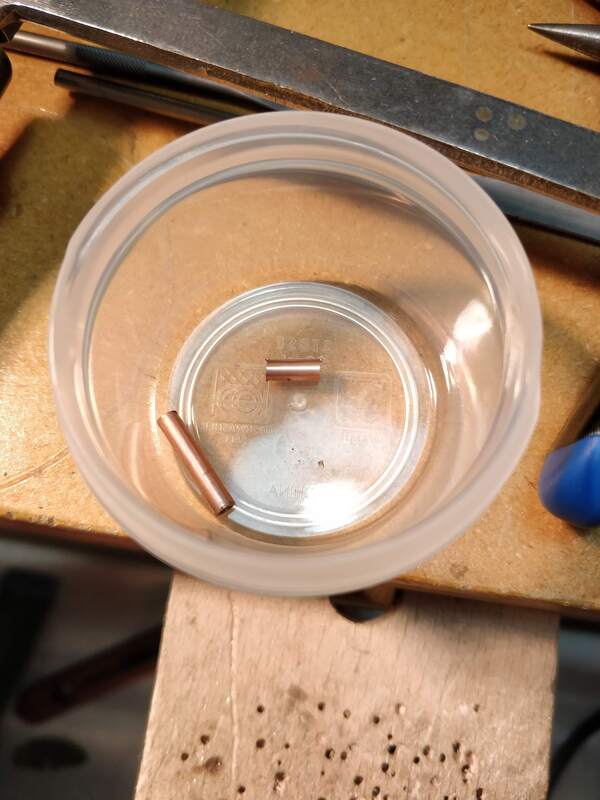
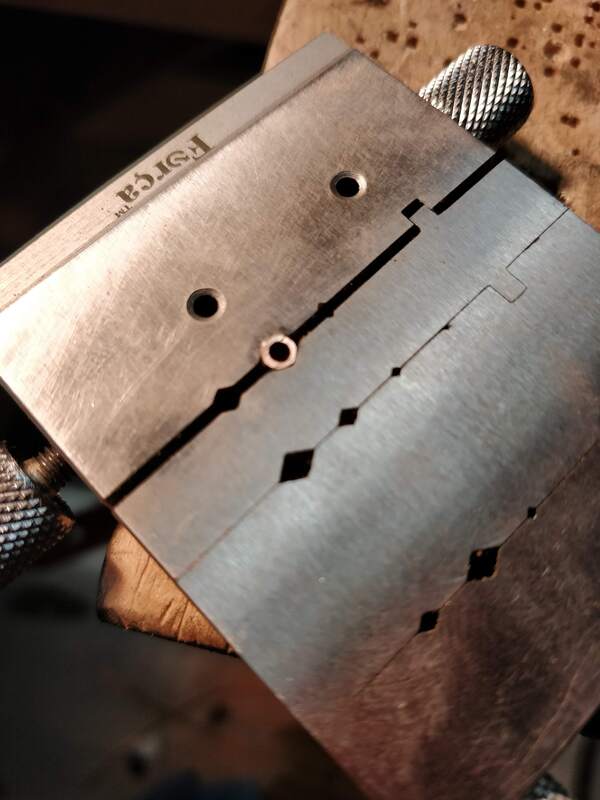
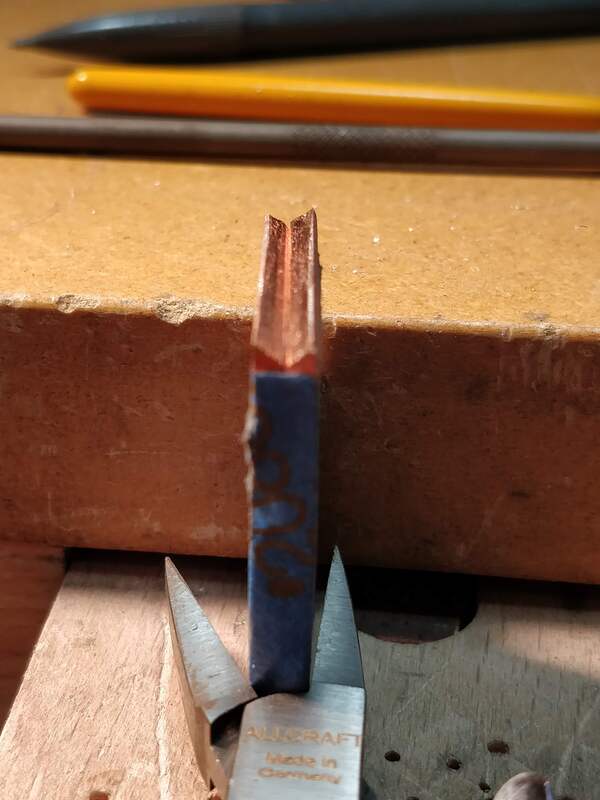
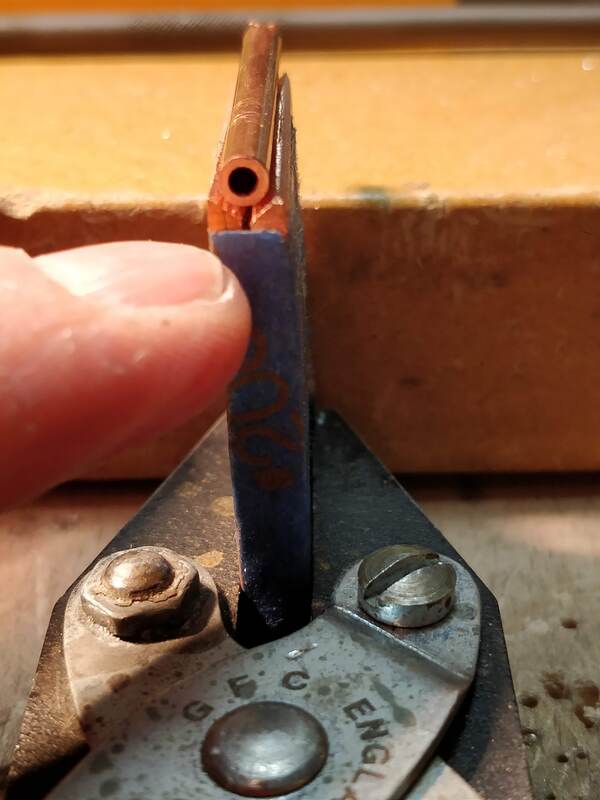
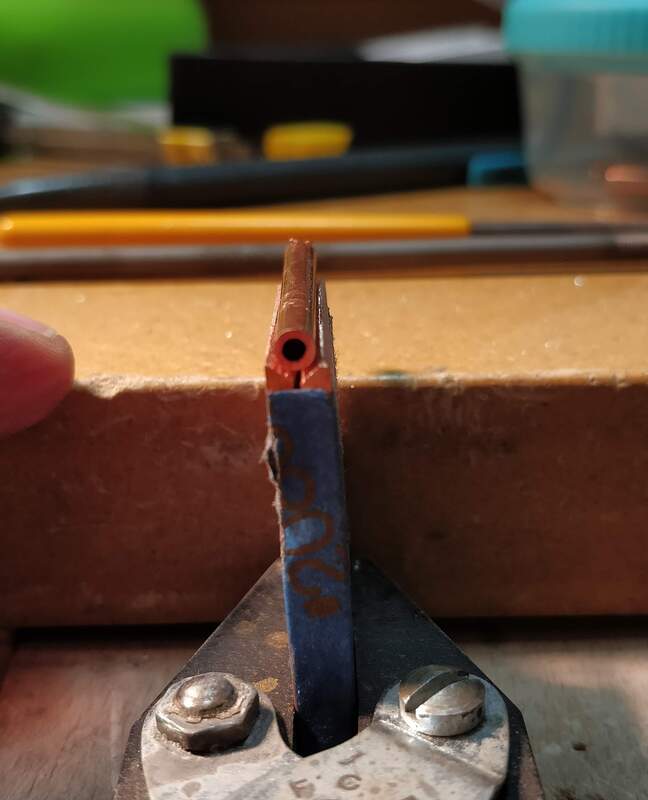
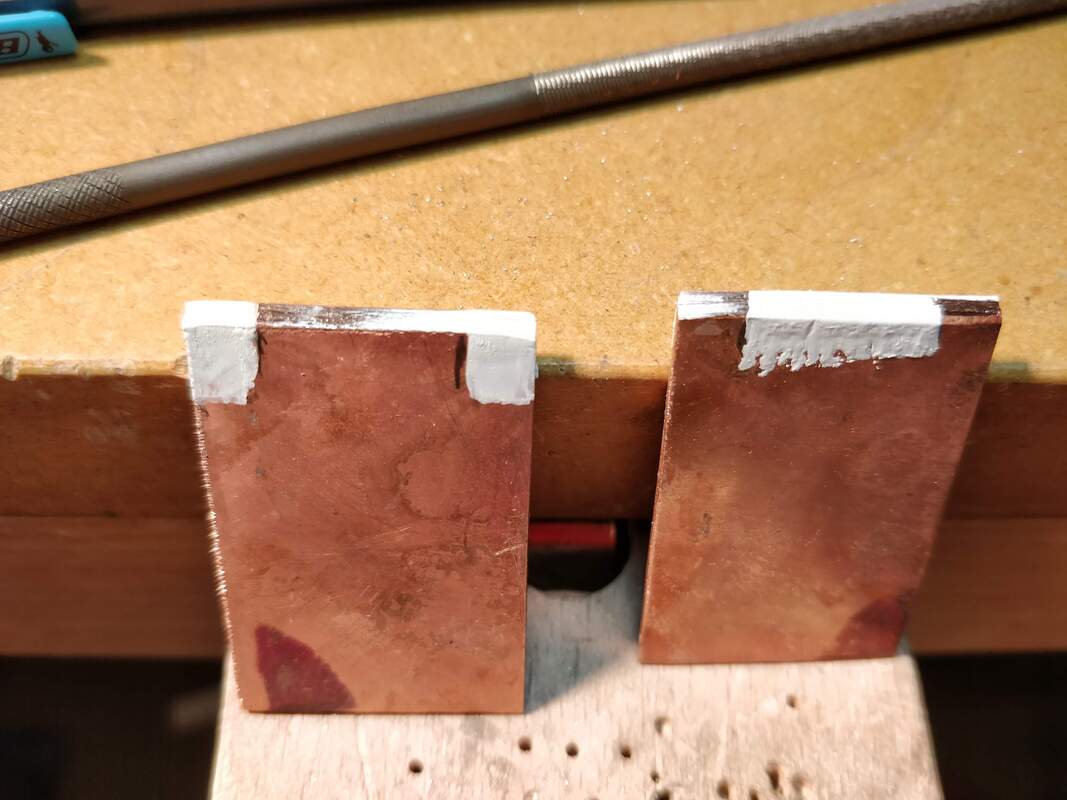
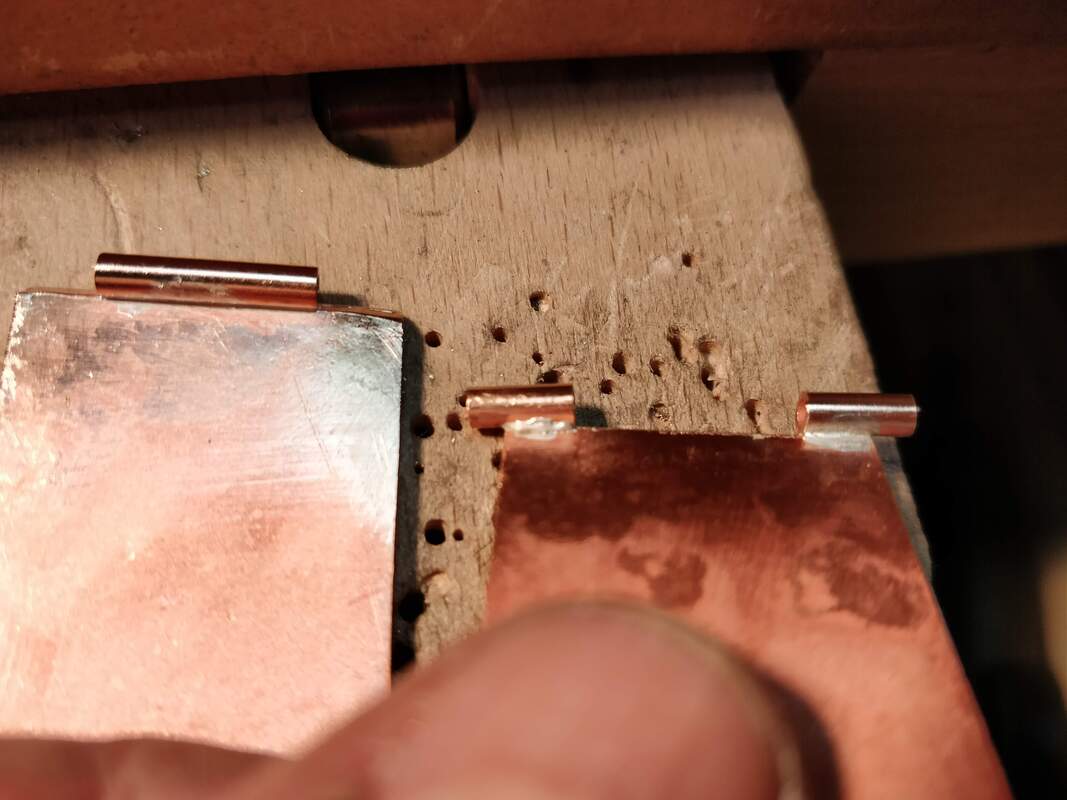
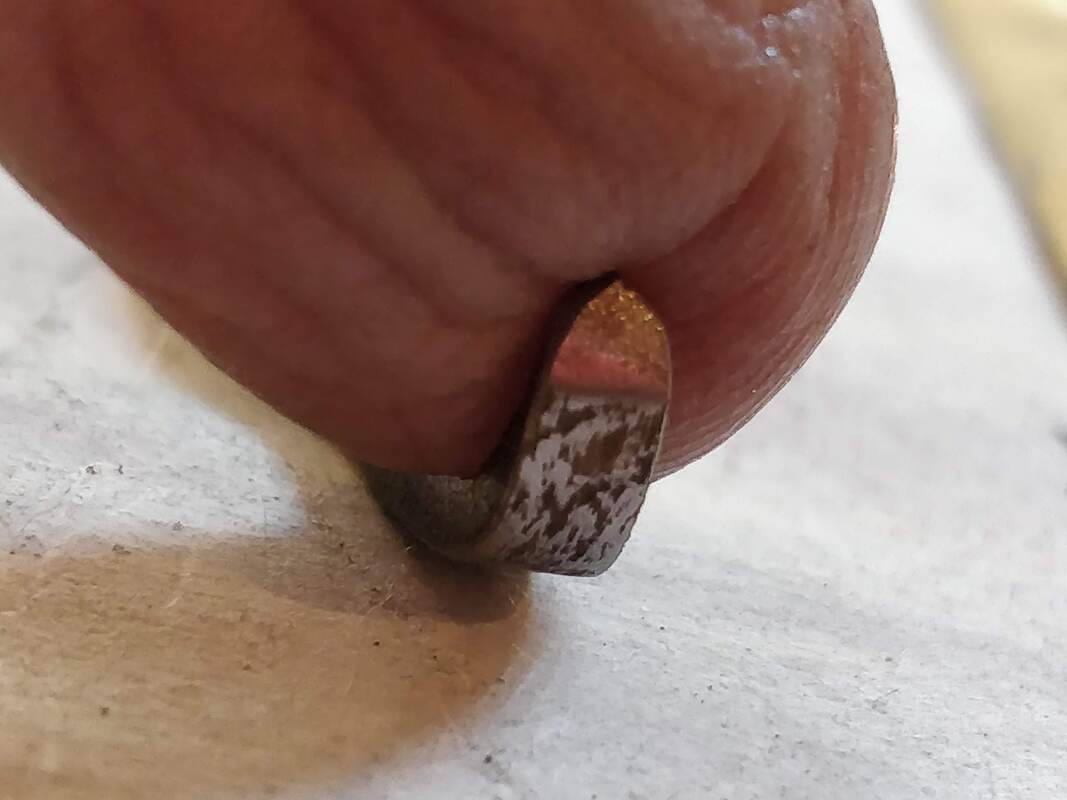
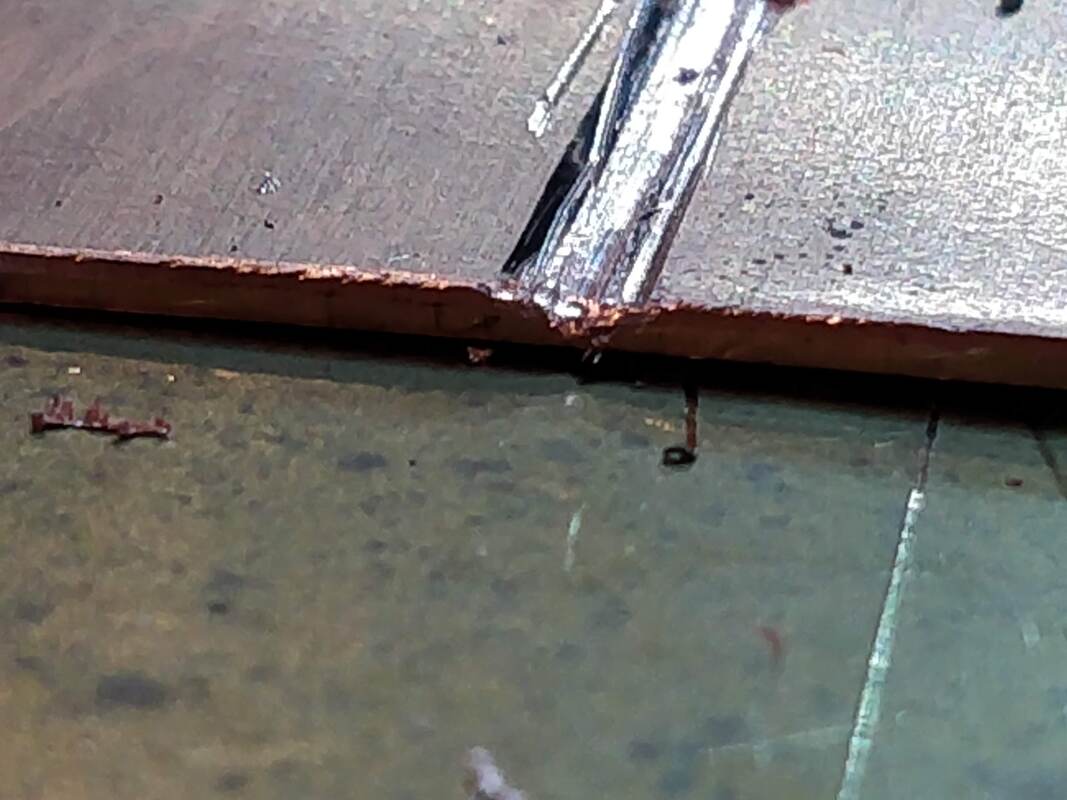
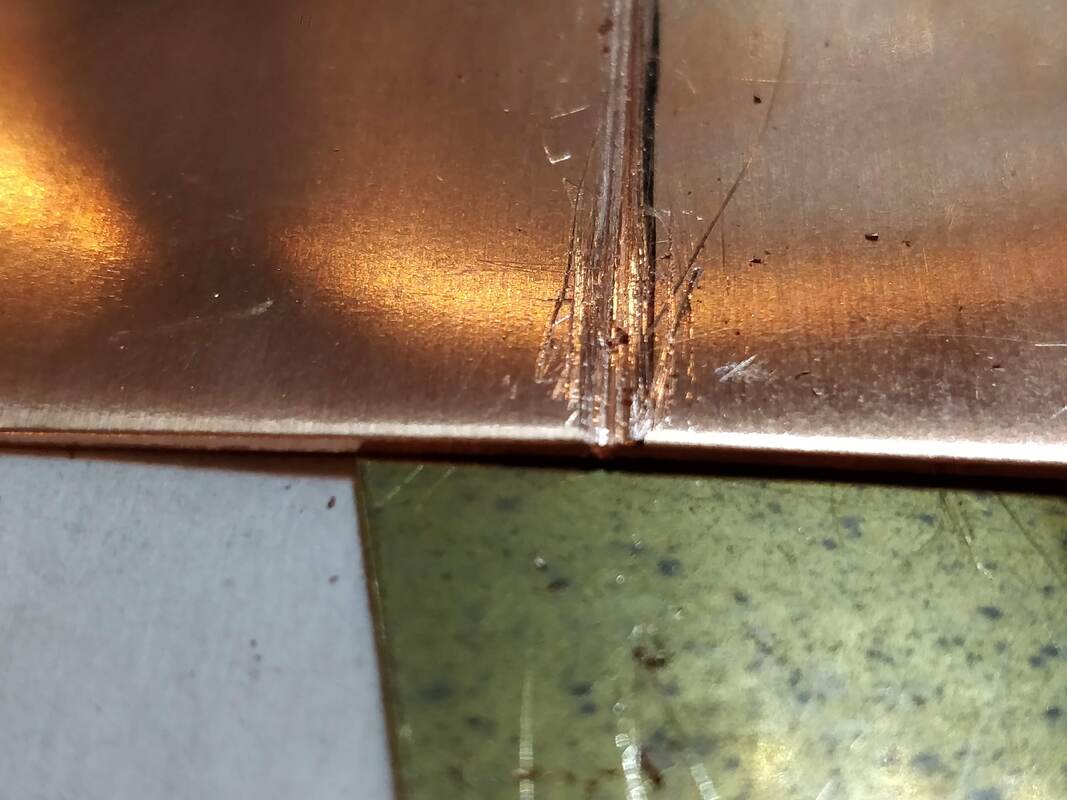
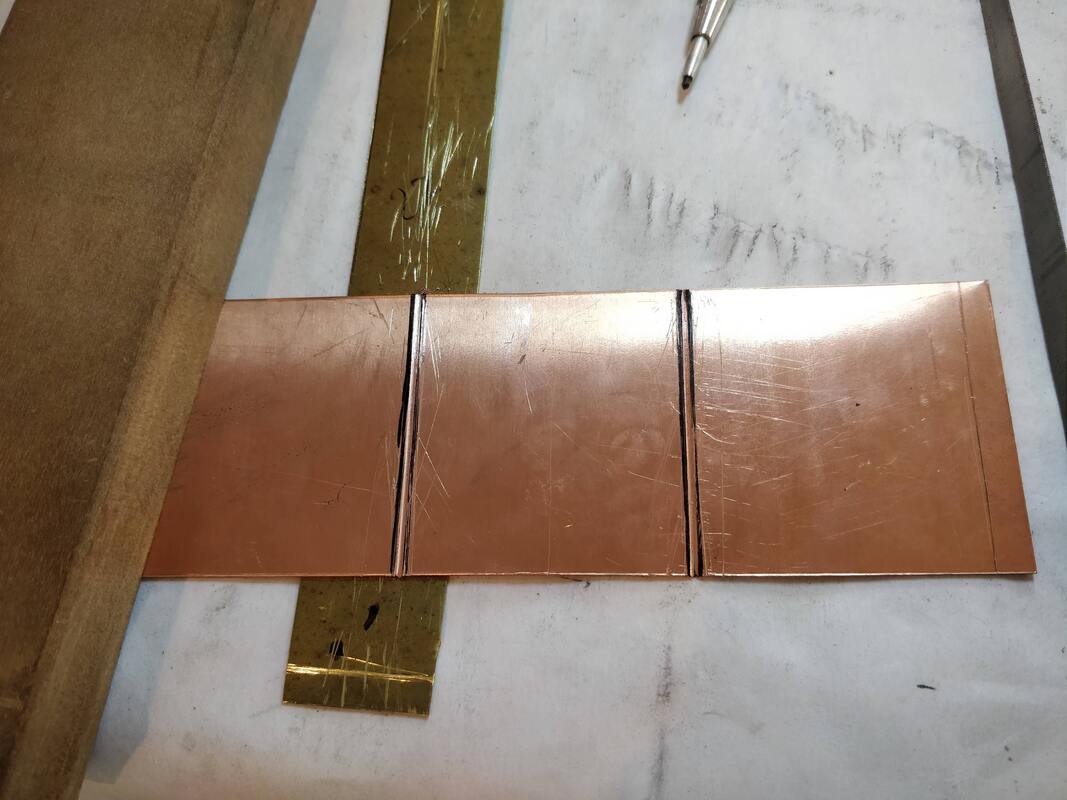
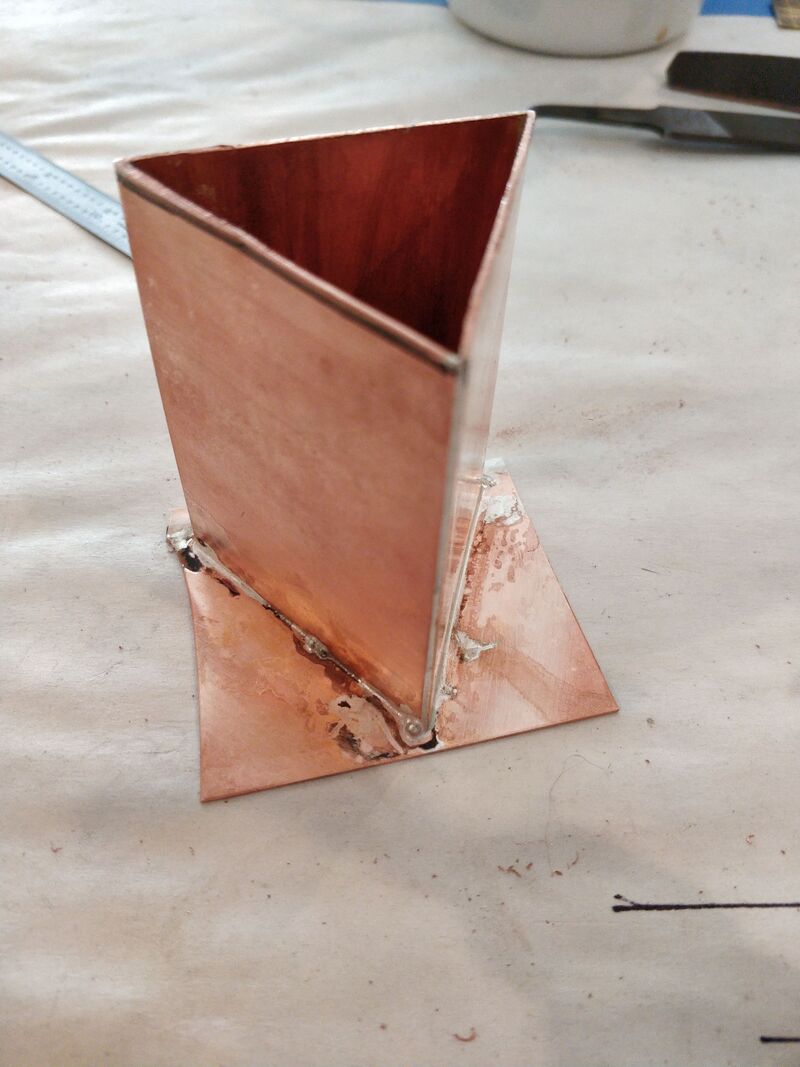
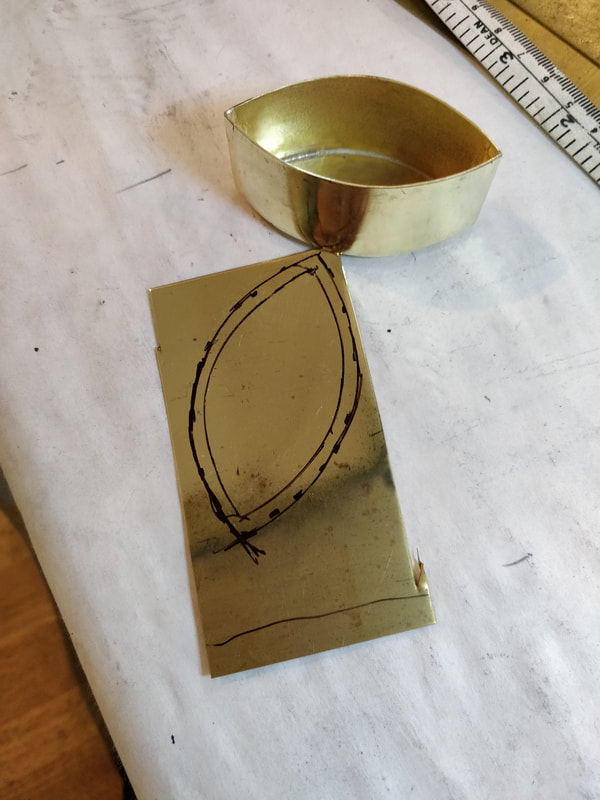
Well over an hour later the seat was complete. Then I had to cut the tubes for the knuckles. I decided on a 3 knuckle hinge. With the back being about 2" long, I could do a center knuckle of 1" and 2 outer knuckles of 1/2".  First I cut 2 1" pieces of tubing and then cut one of those in half. Using the miter jig, I filed and sanded all the ends square. 

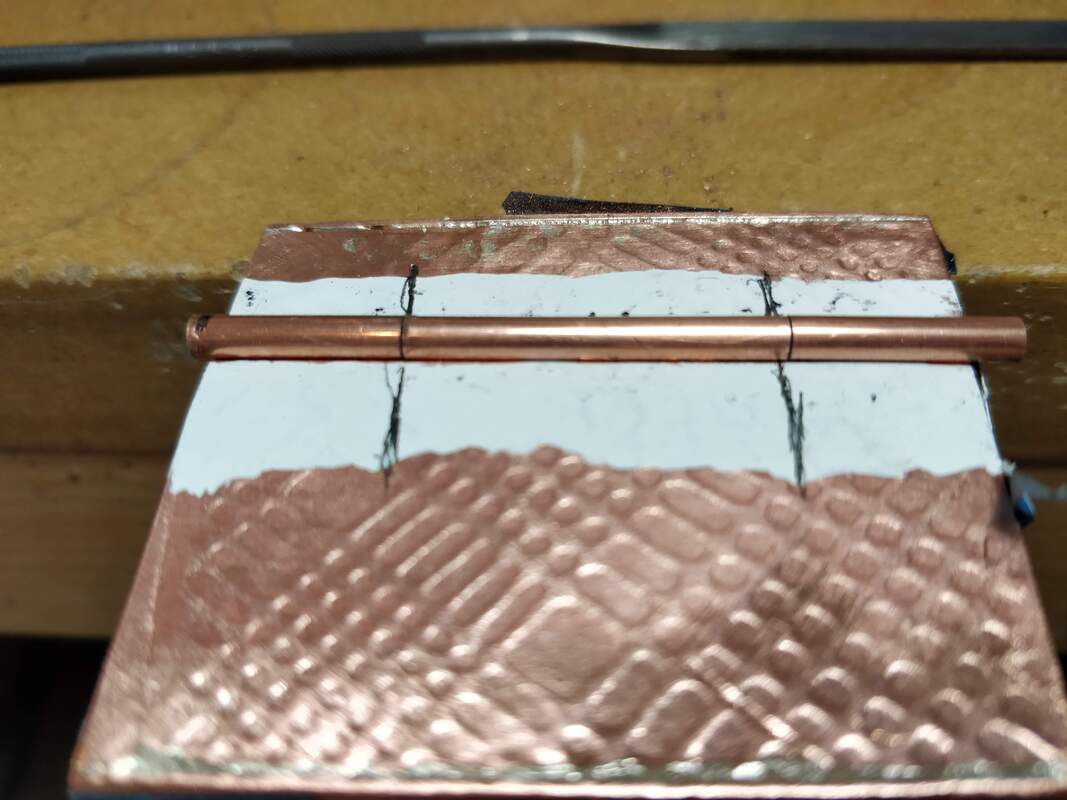
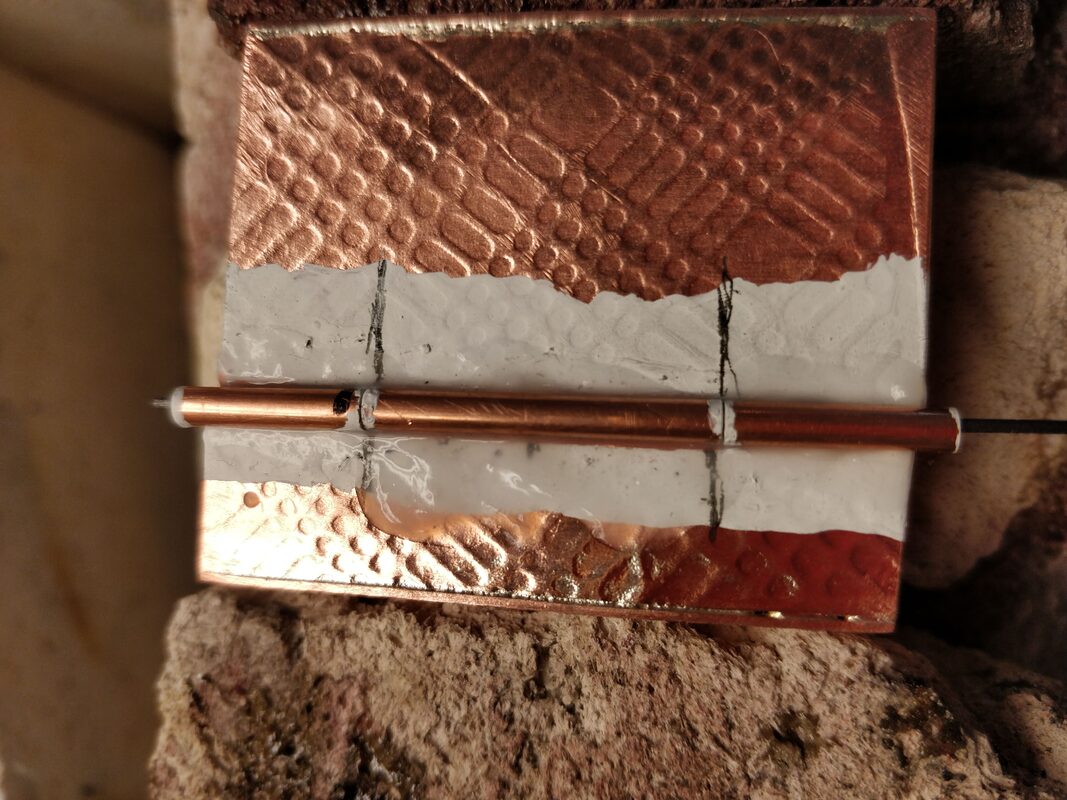
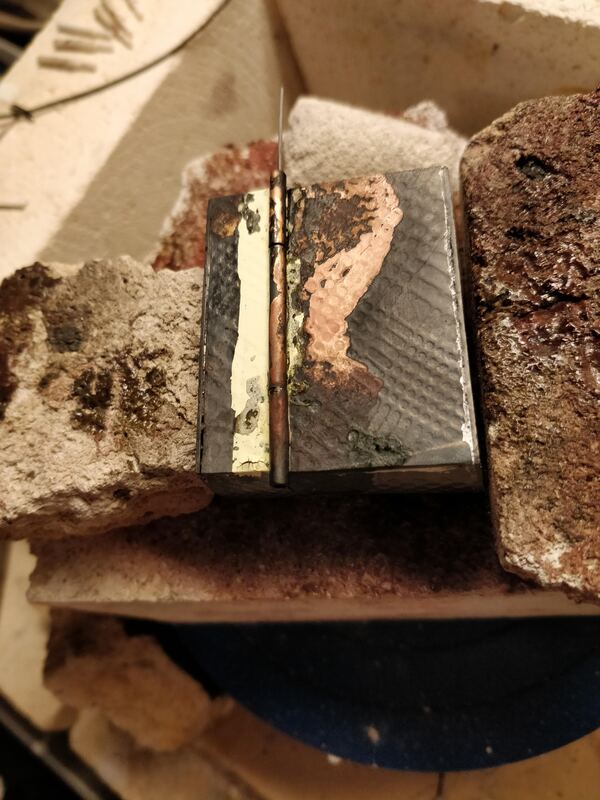
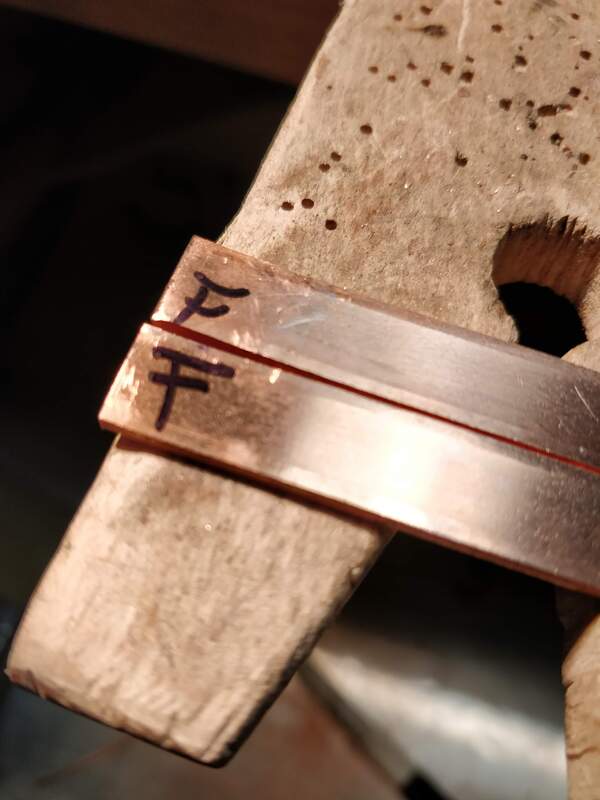
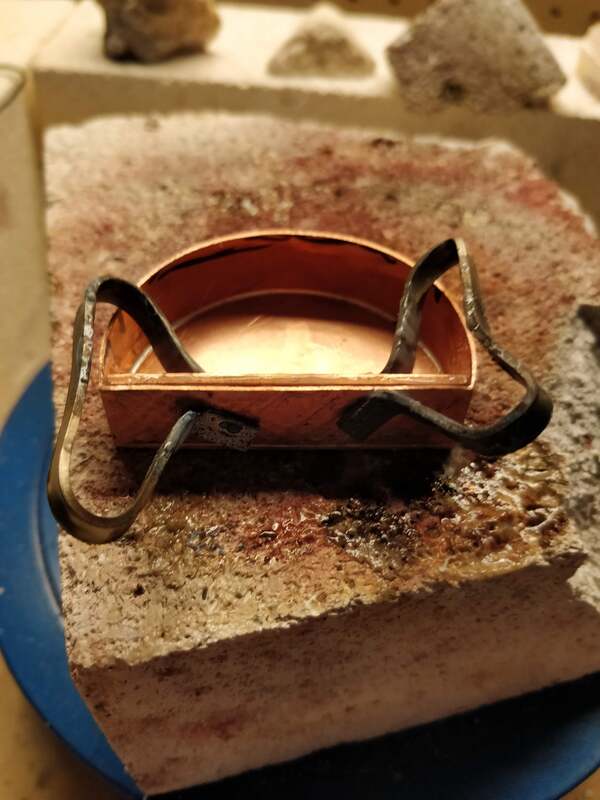
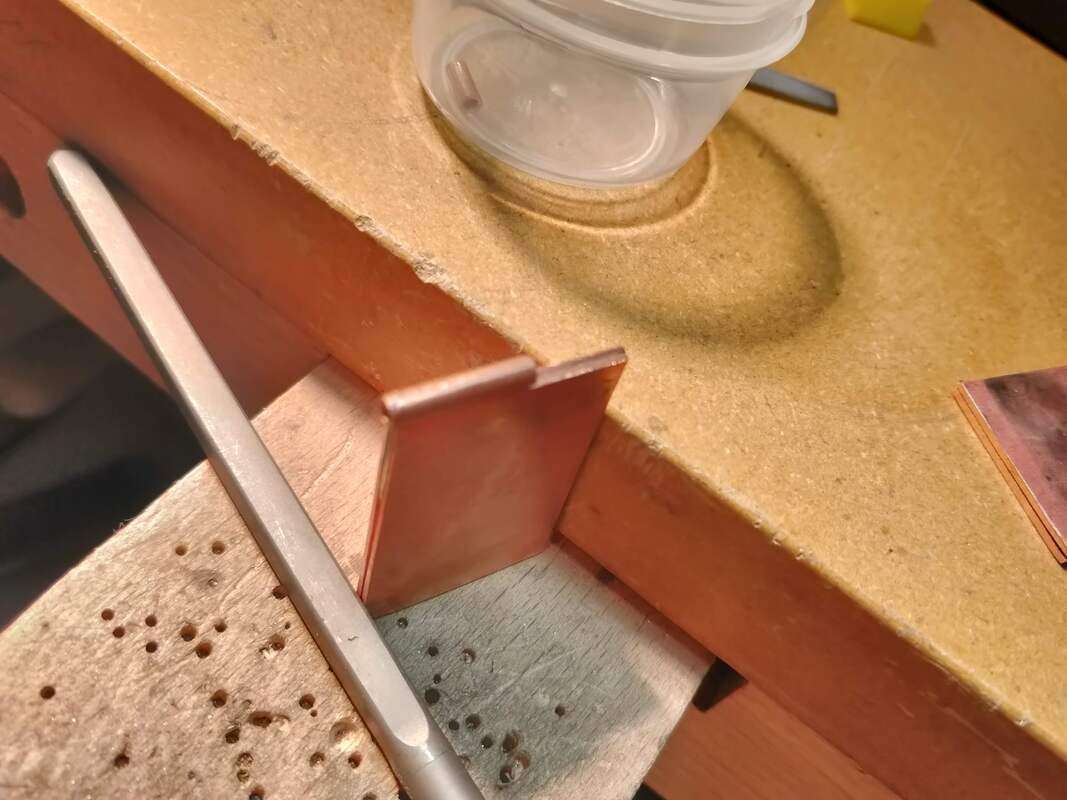
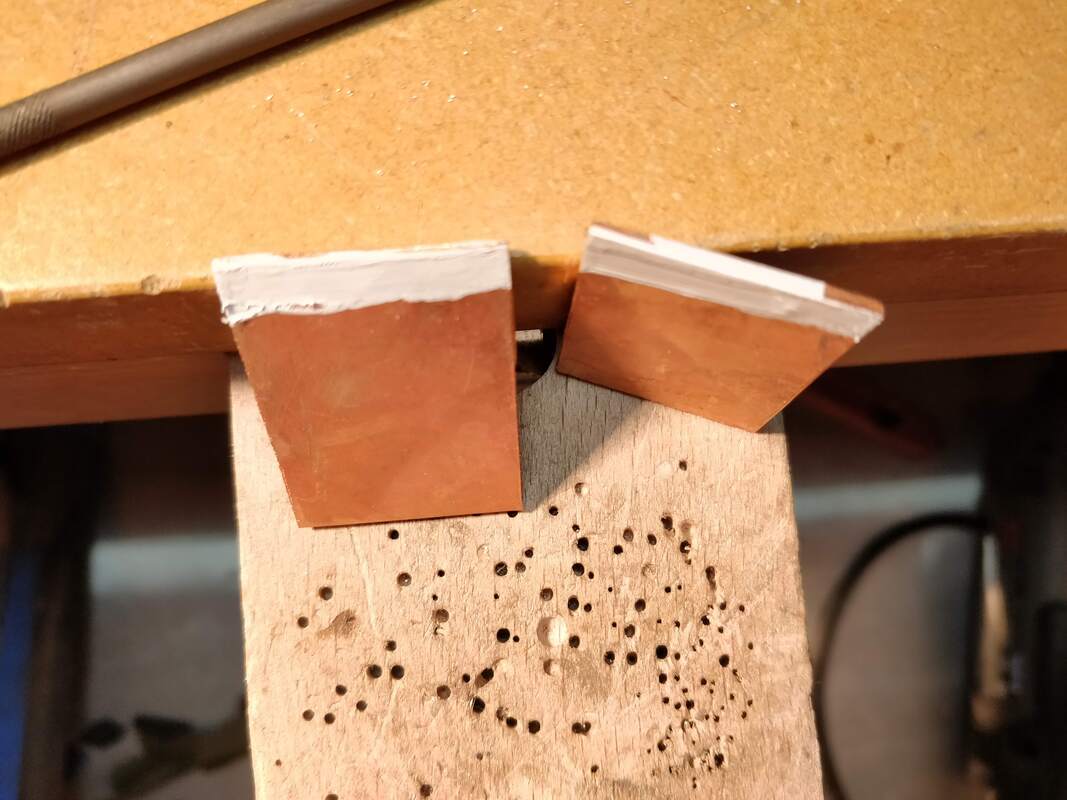
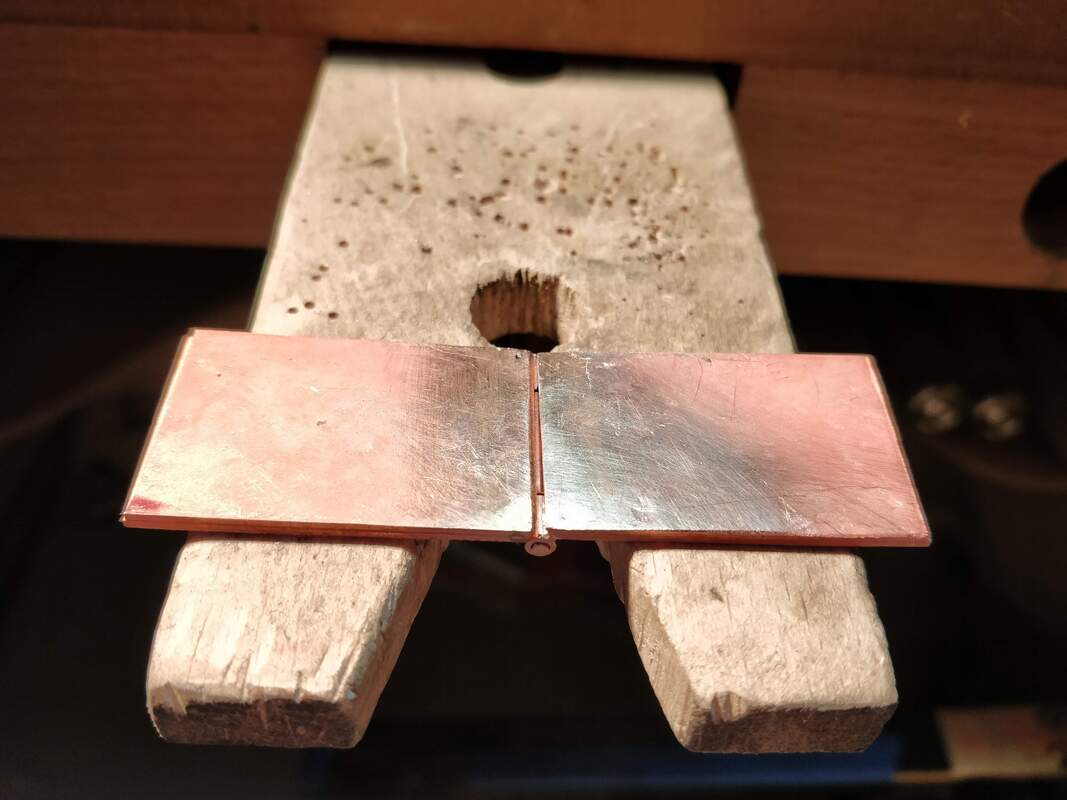
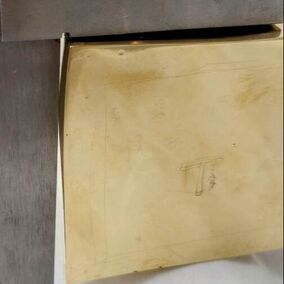
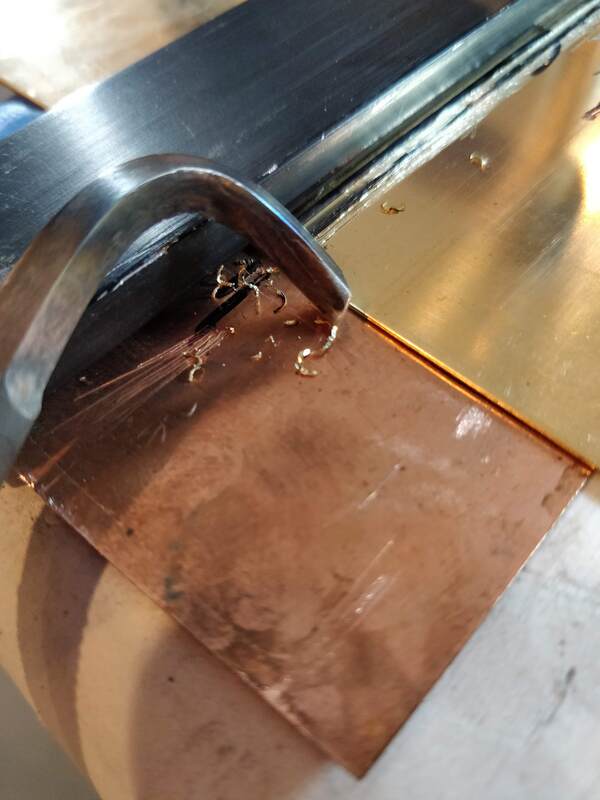
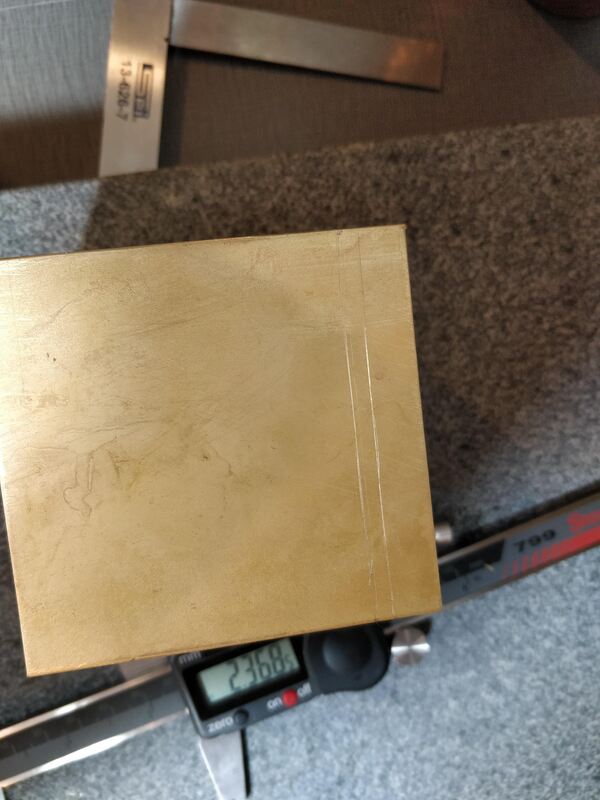
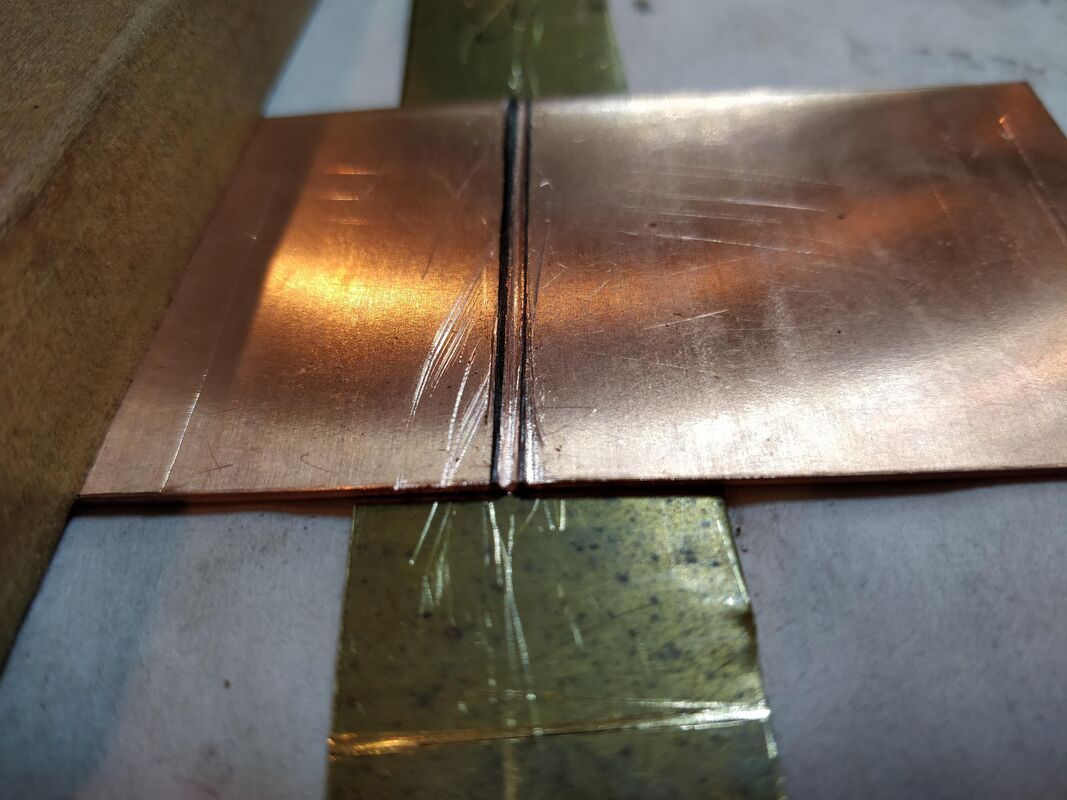
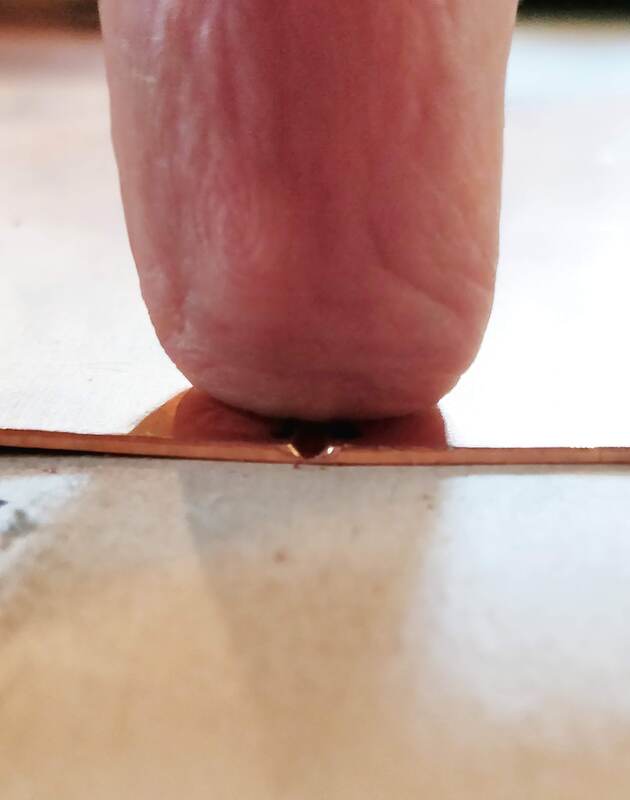
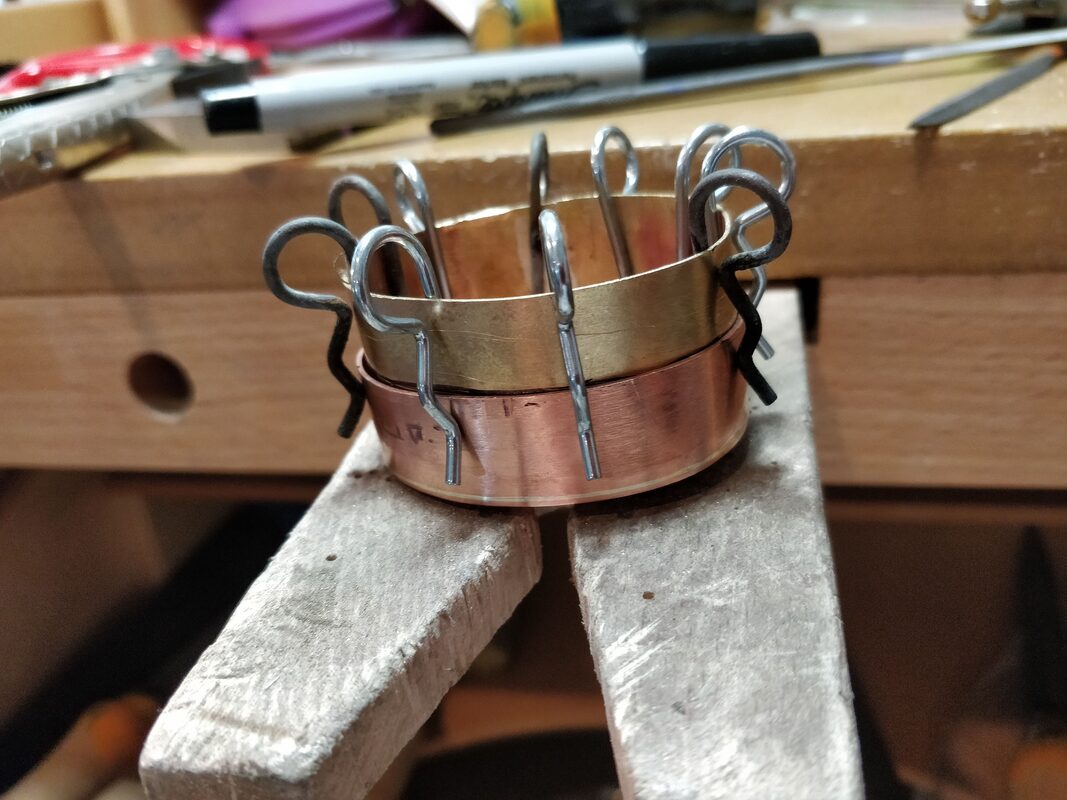
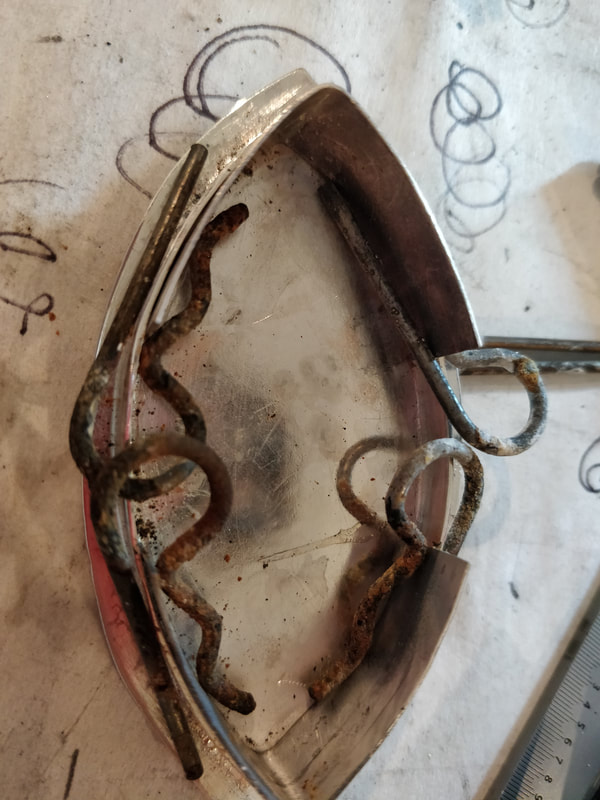
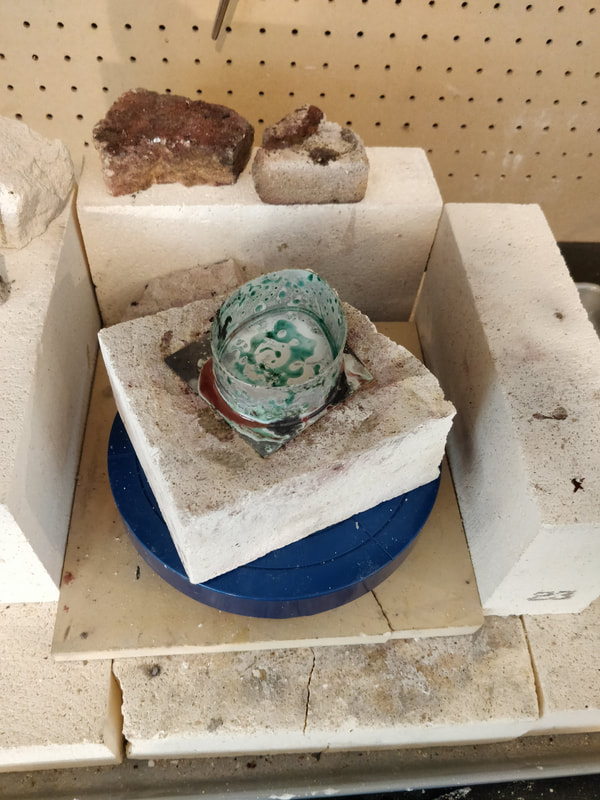
Then using a pencil and a steel ruler, I marked the center of the back and then the center 1" where the middle knuckle would be placed. I then used white out, as my solder flow preventer, on either the lid or the bottom where each knuckle would be placed. While that was drying I rolled some easy solder down and cut small snippets. 

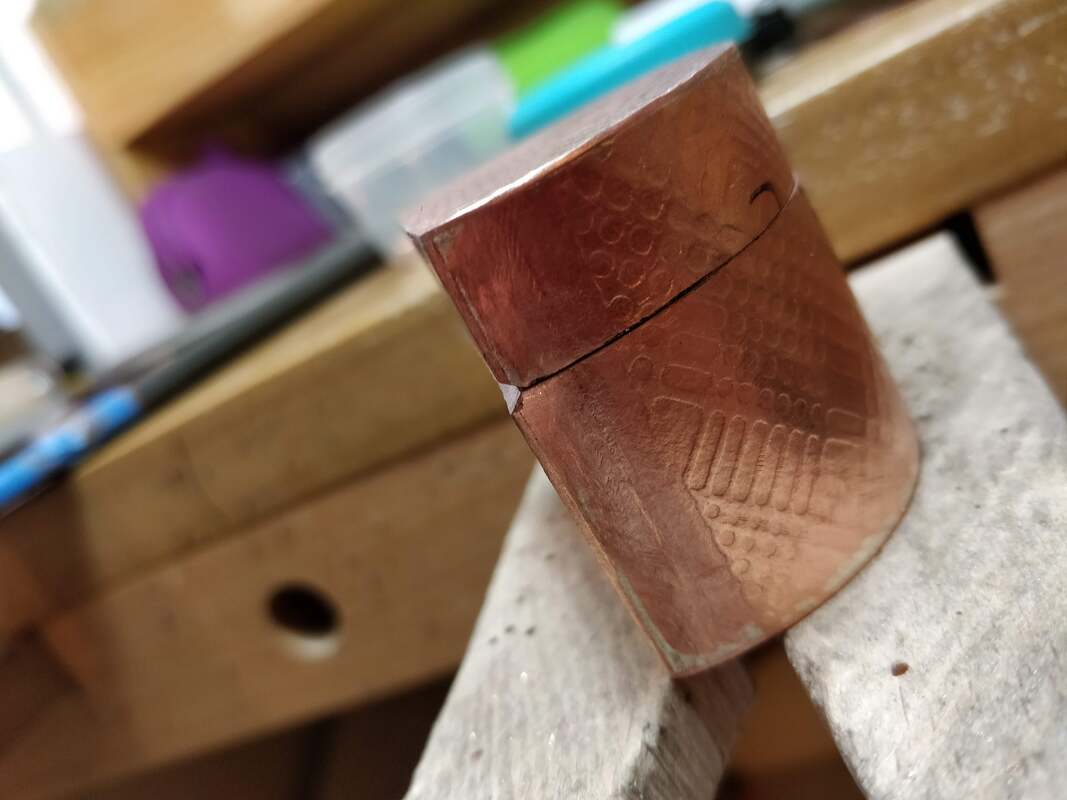
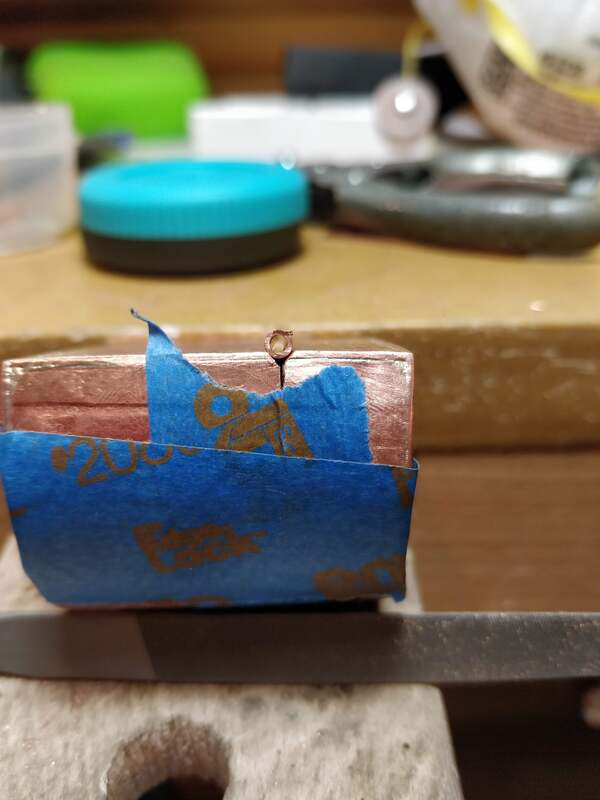
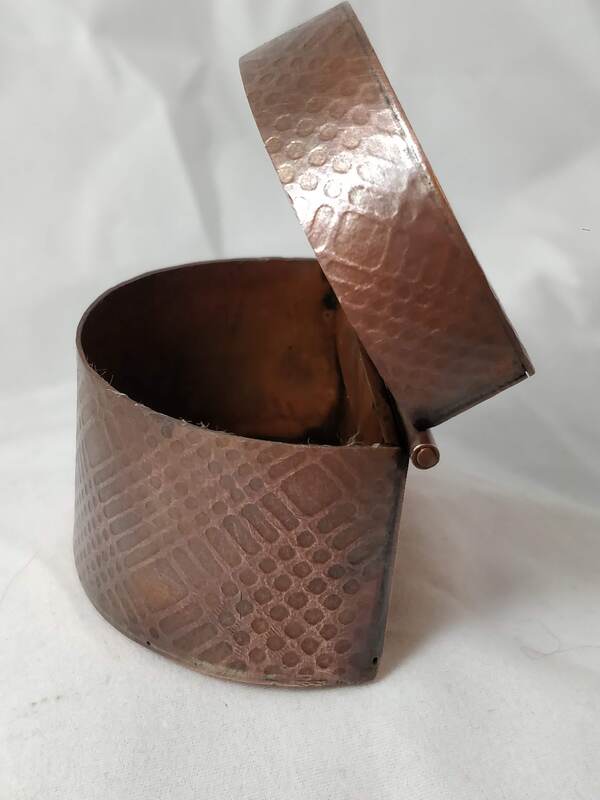
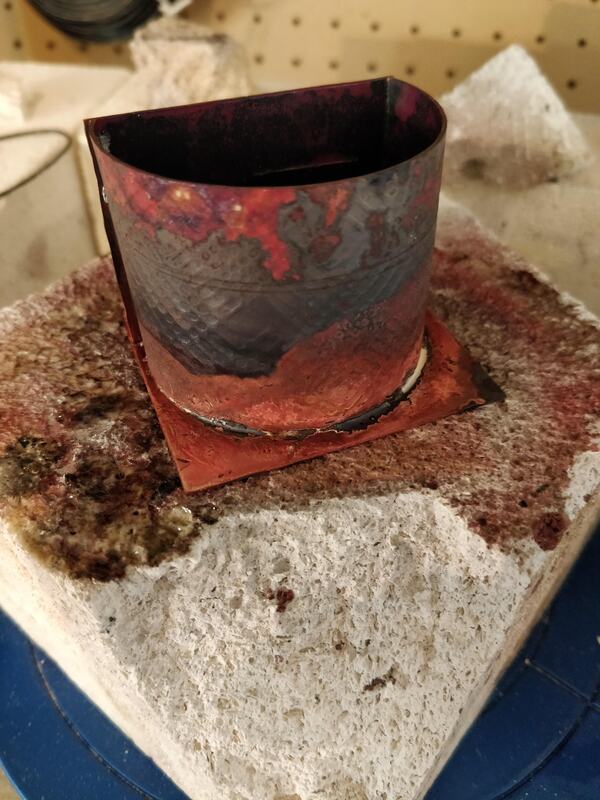
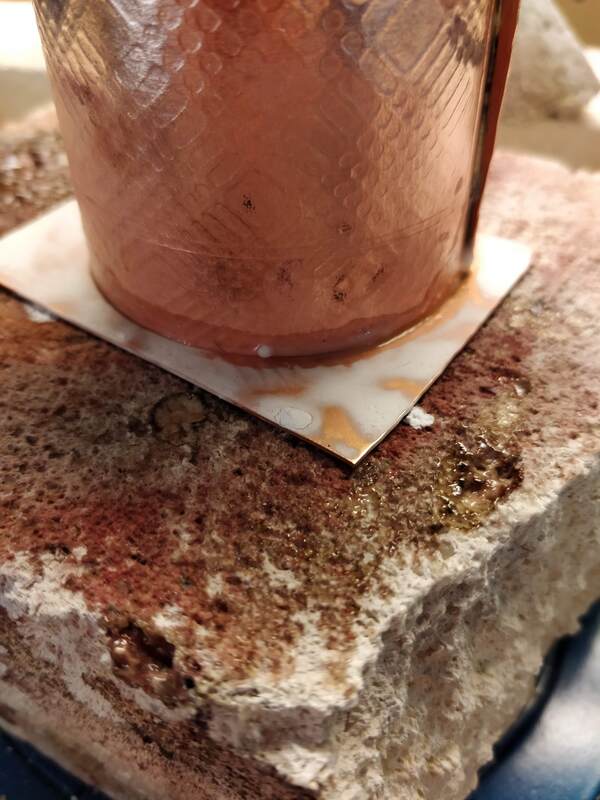
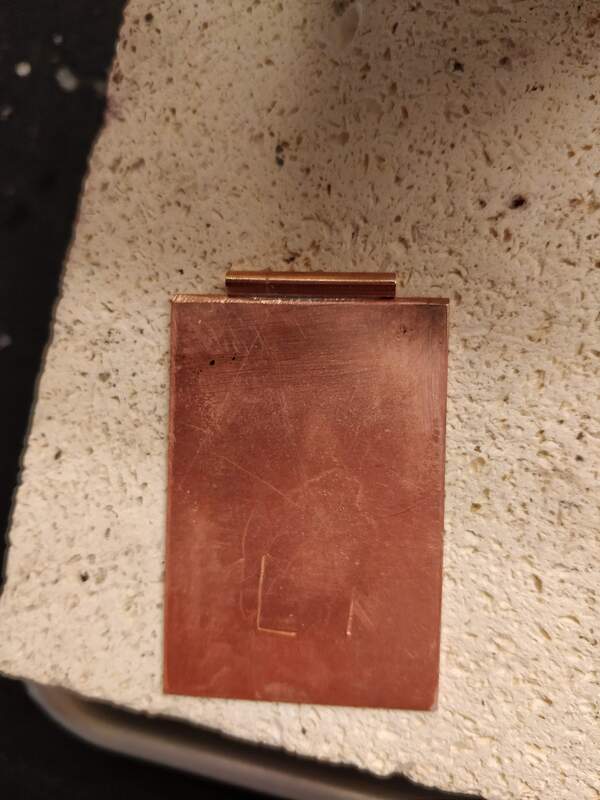
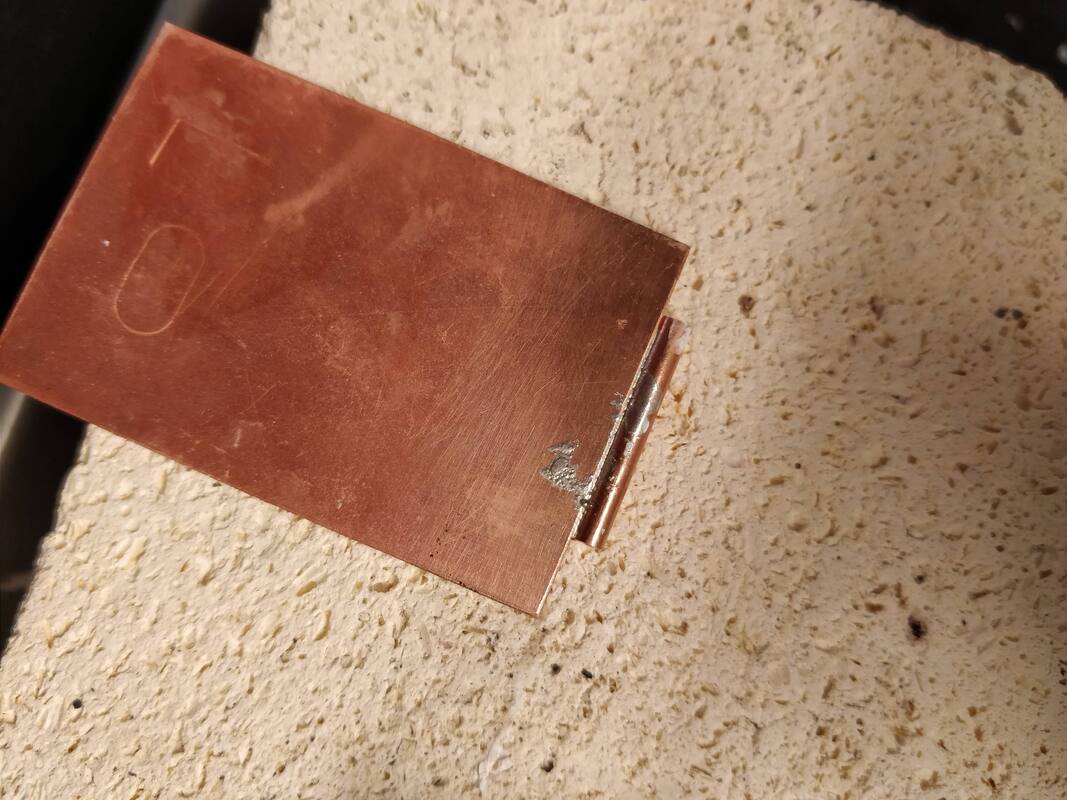
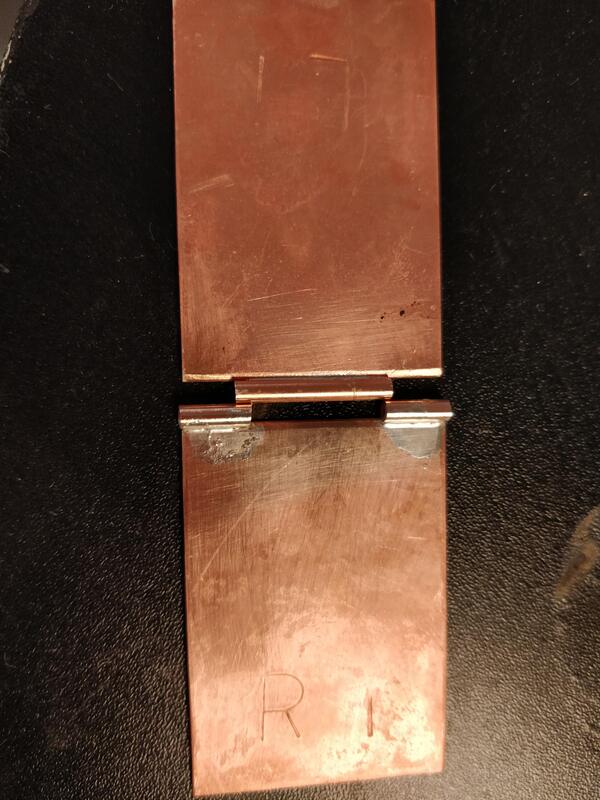
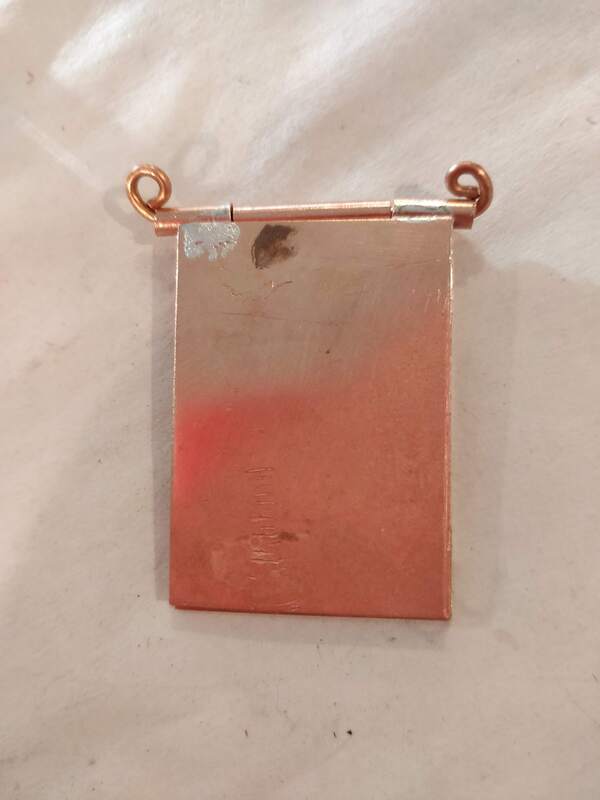
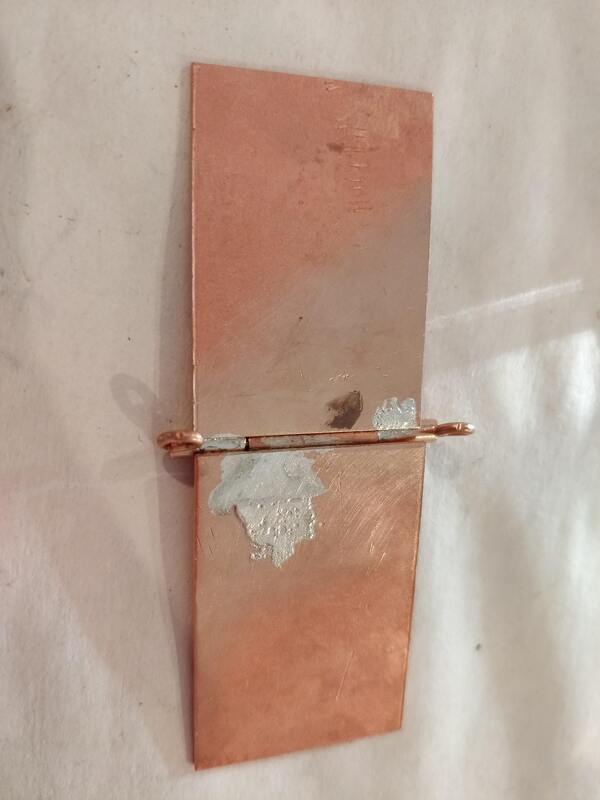
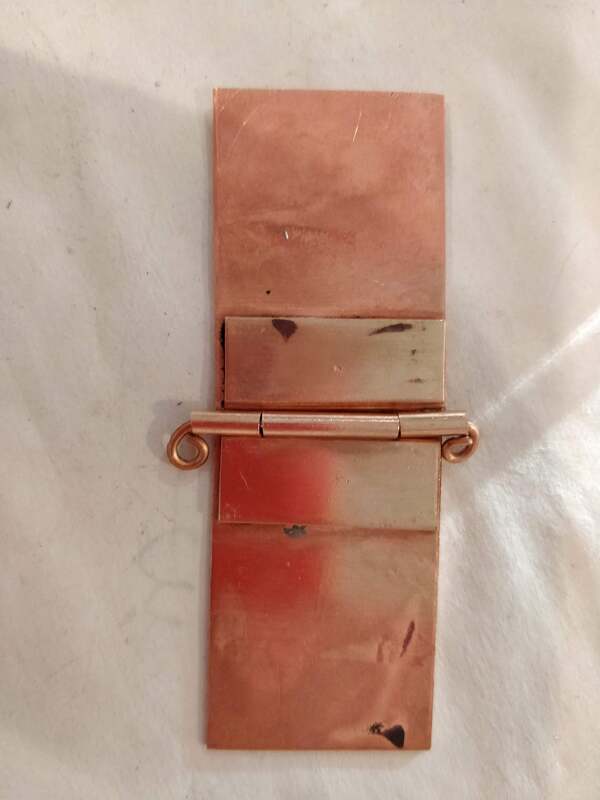
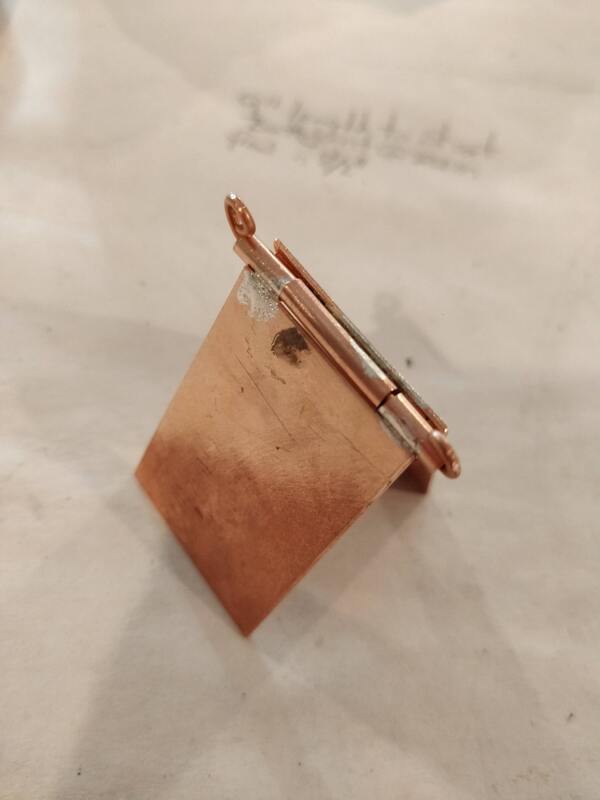
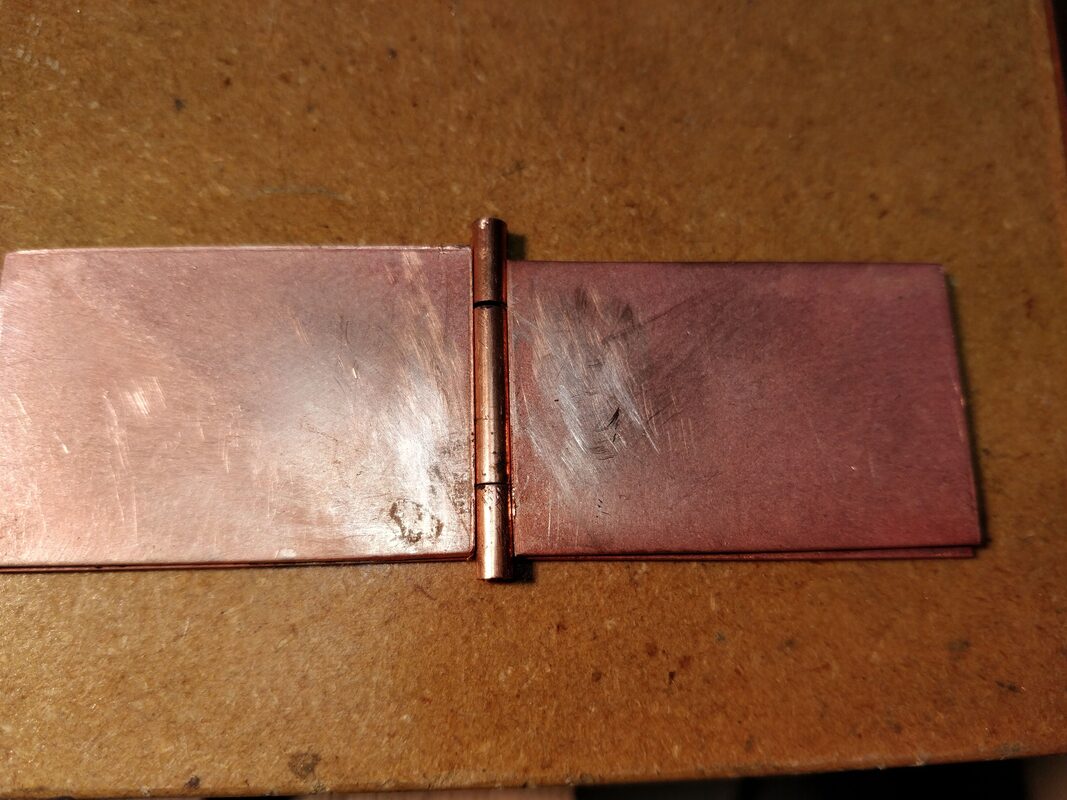
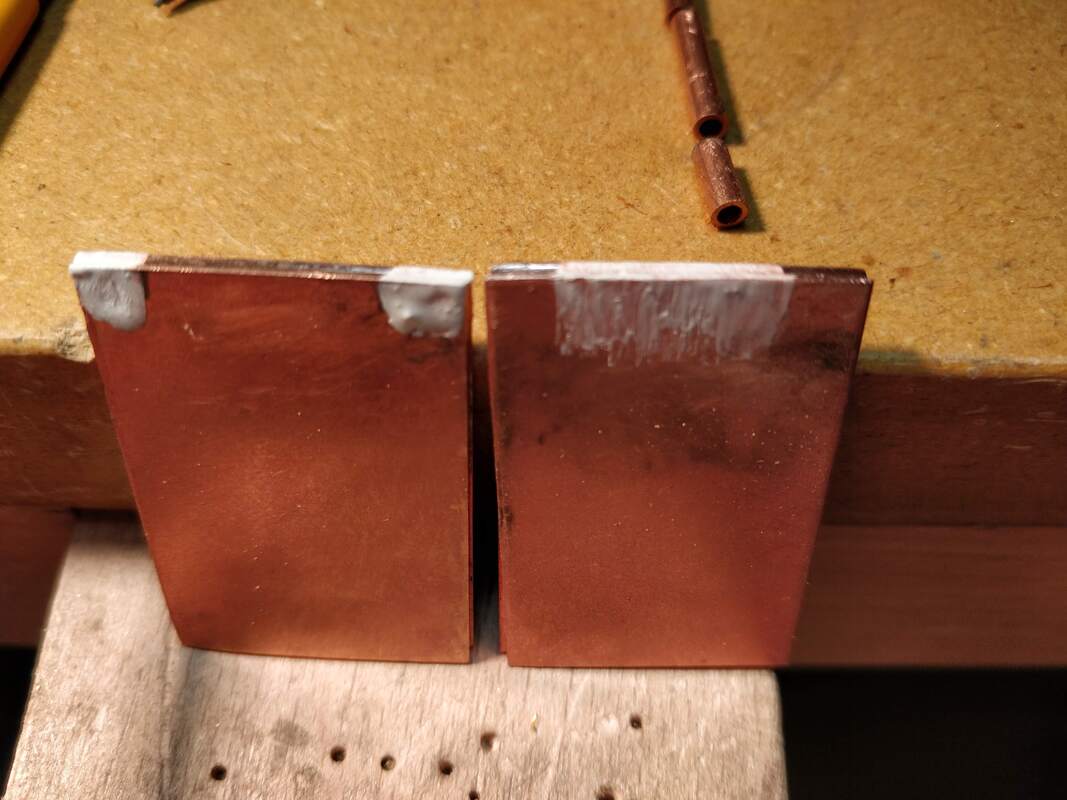
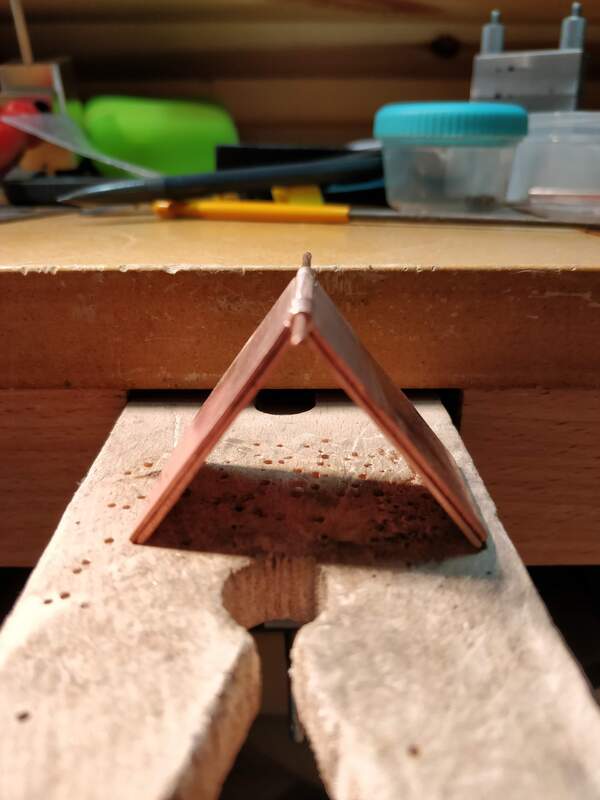
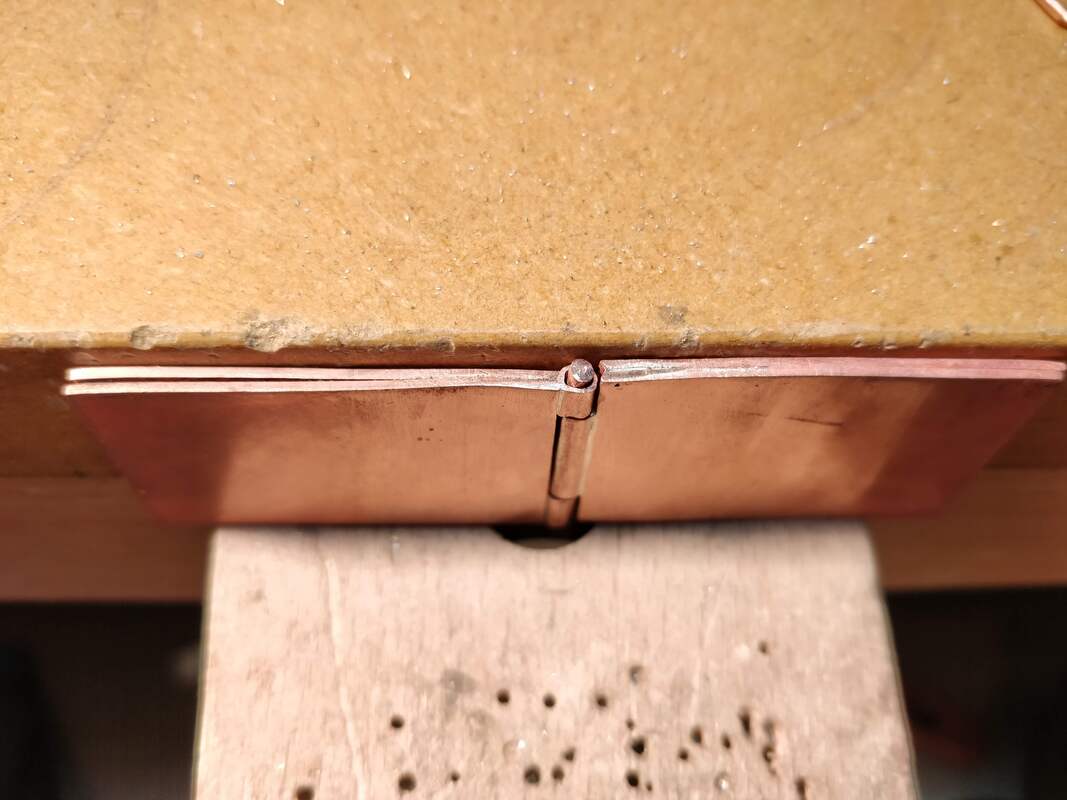
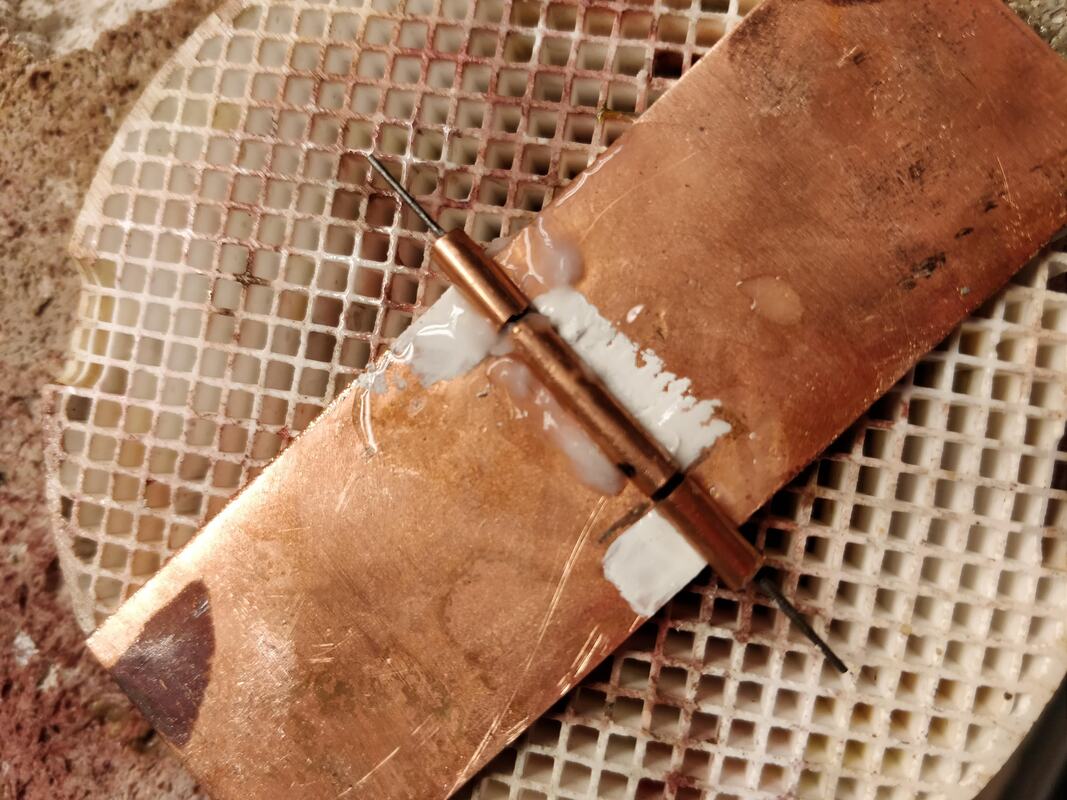
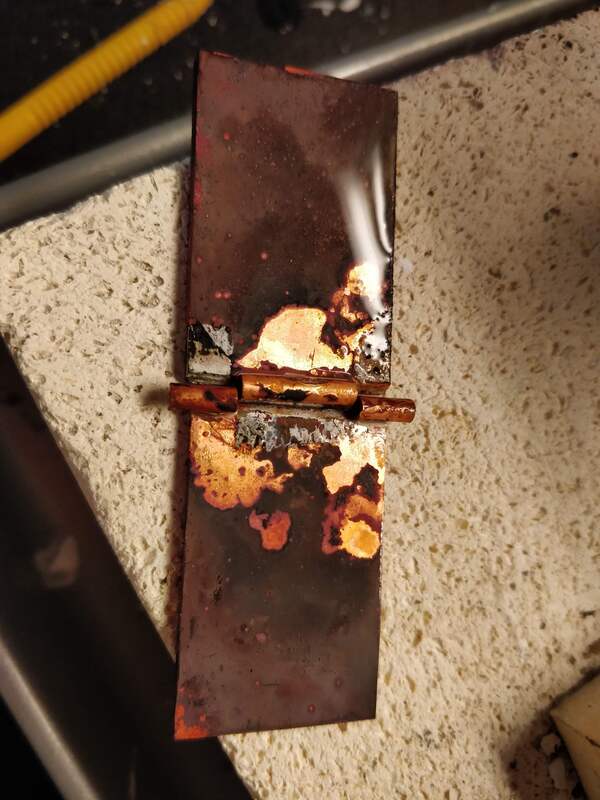
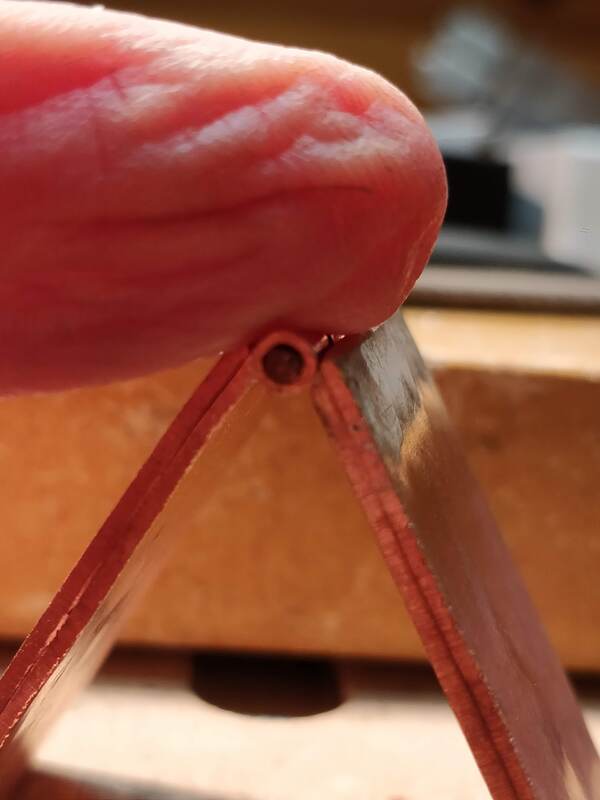
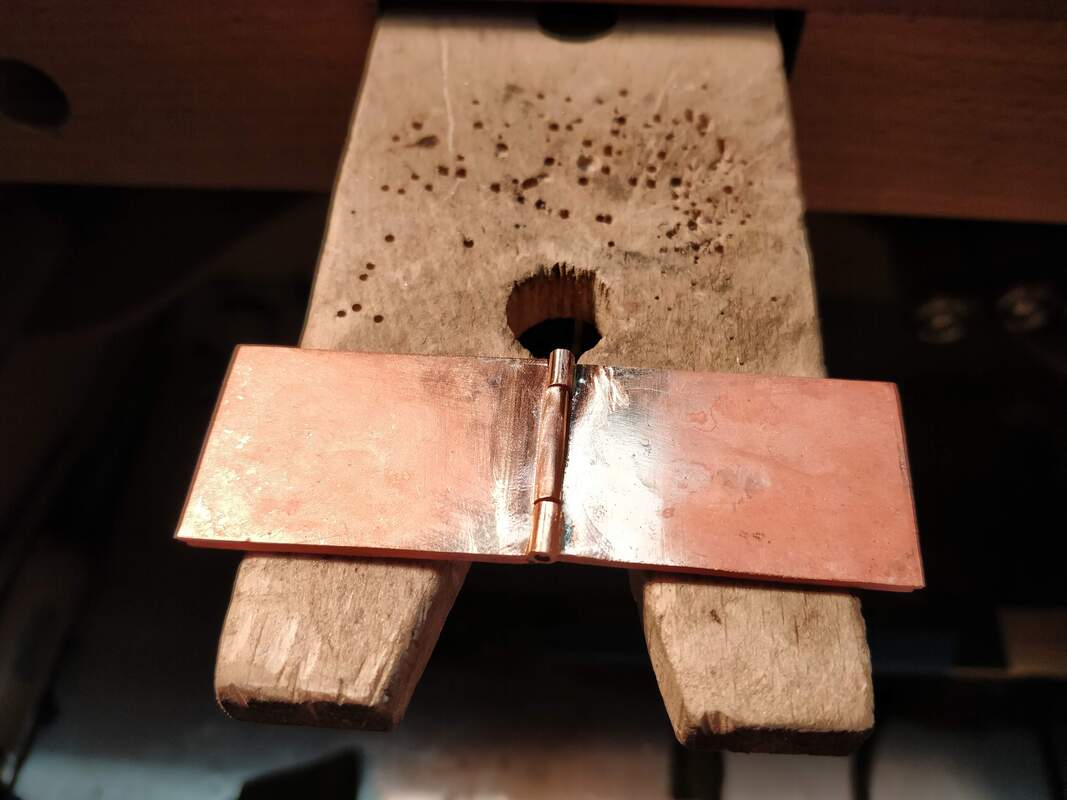
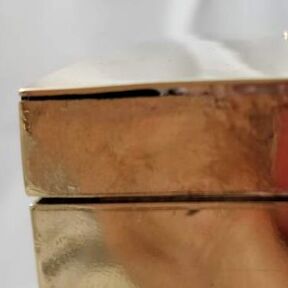
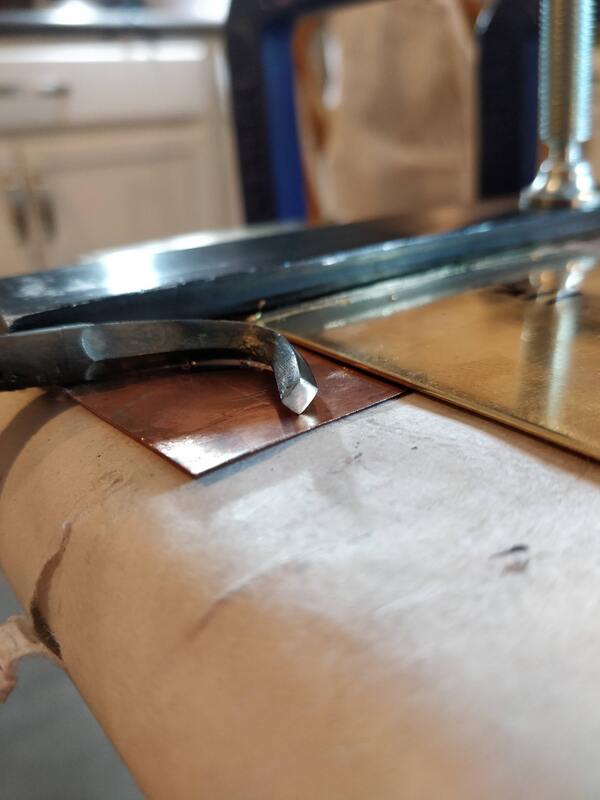
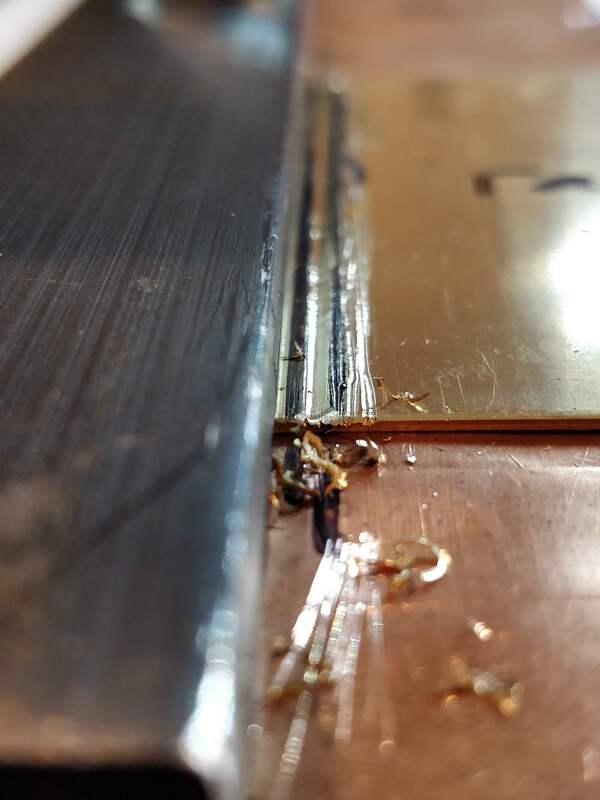
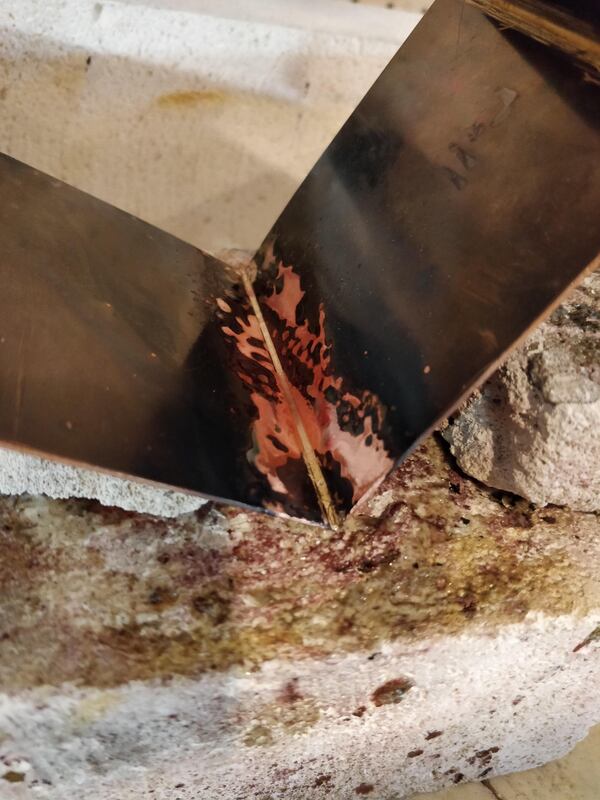
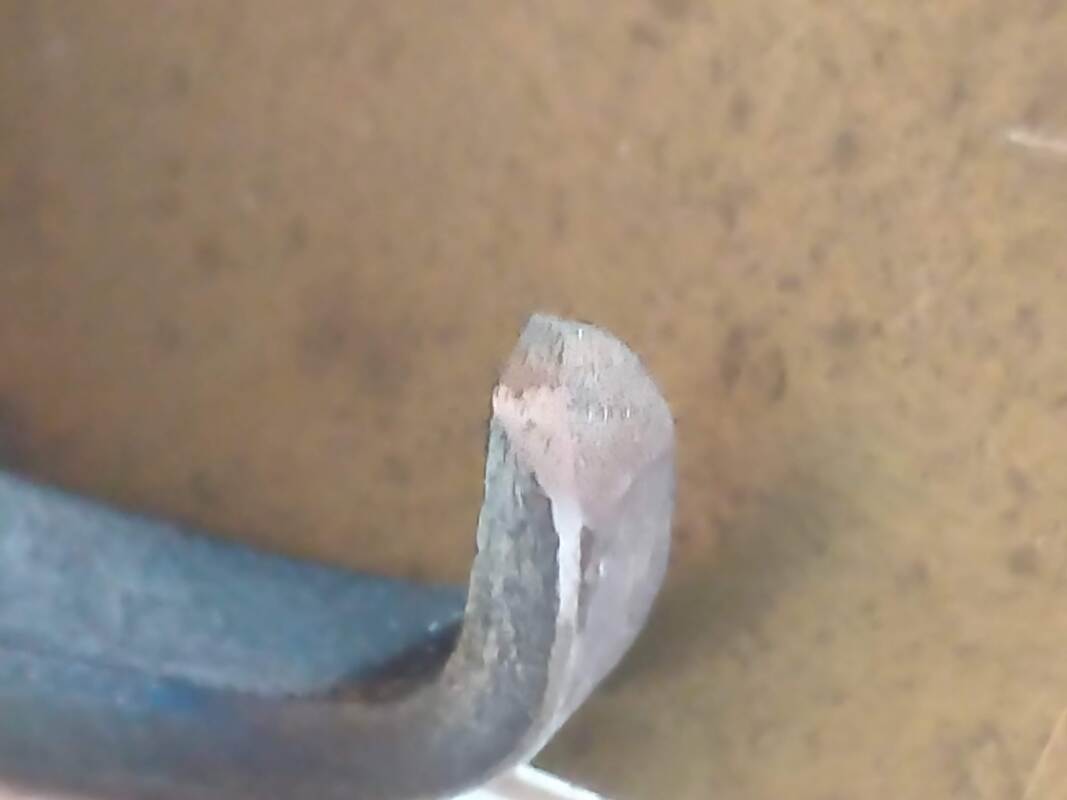
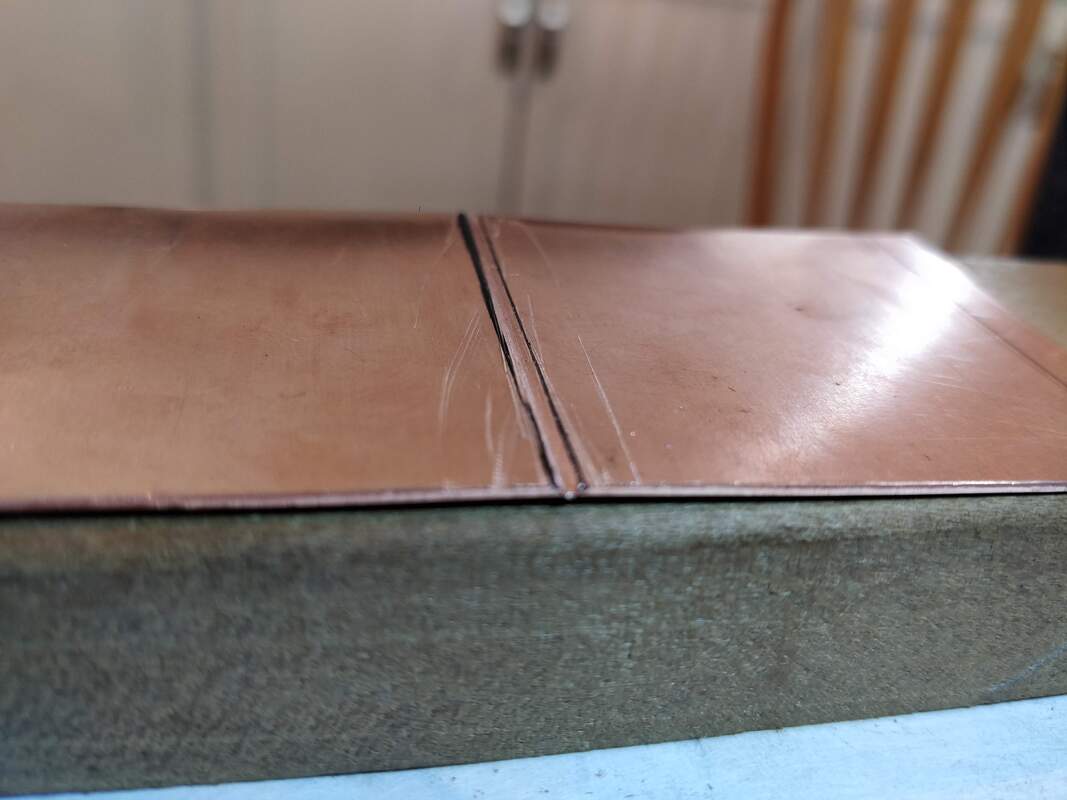
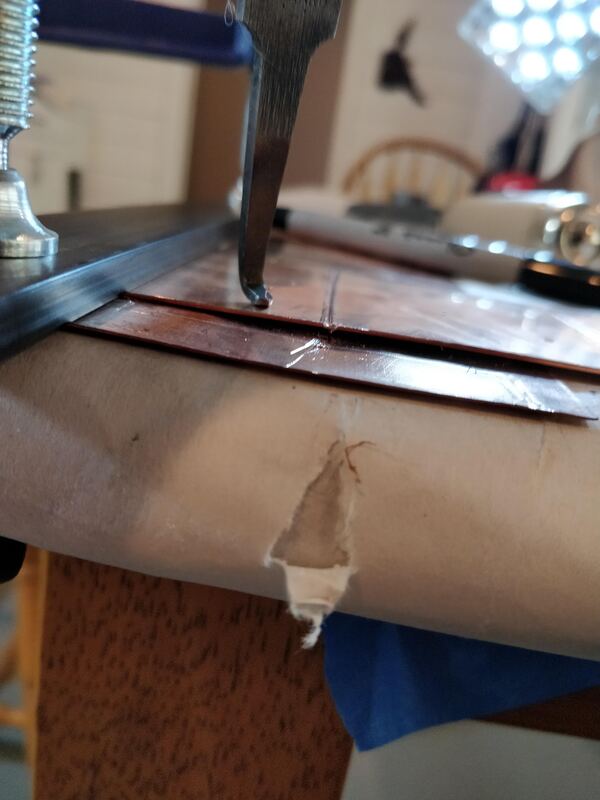
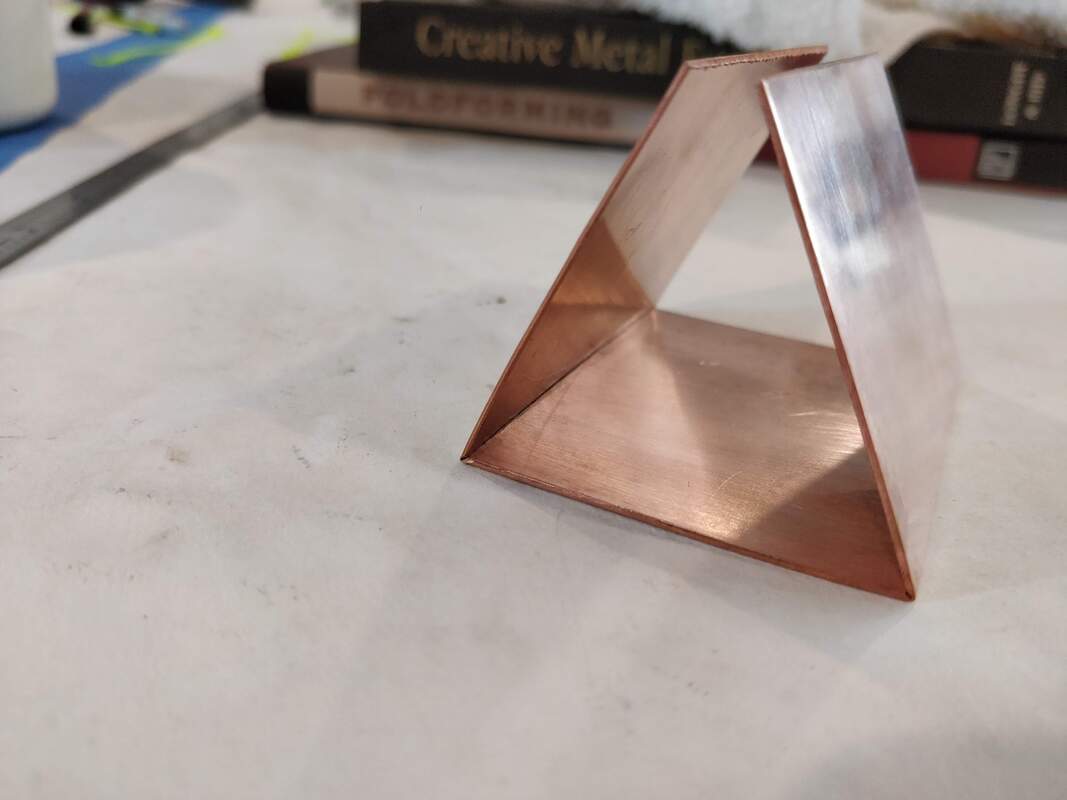
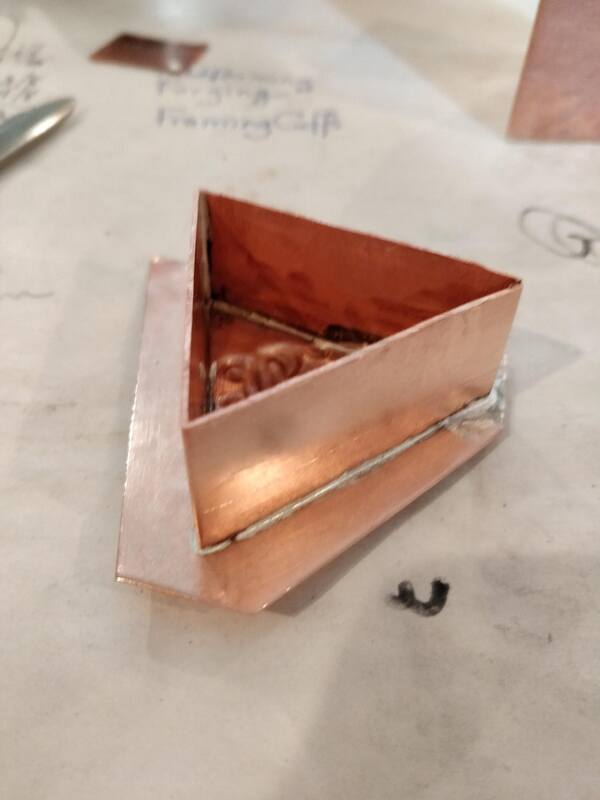
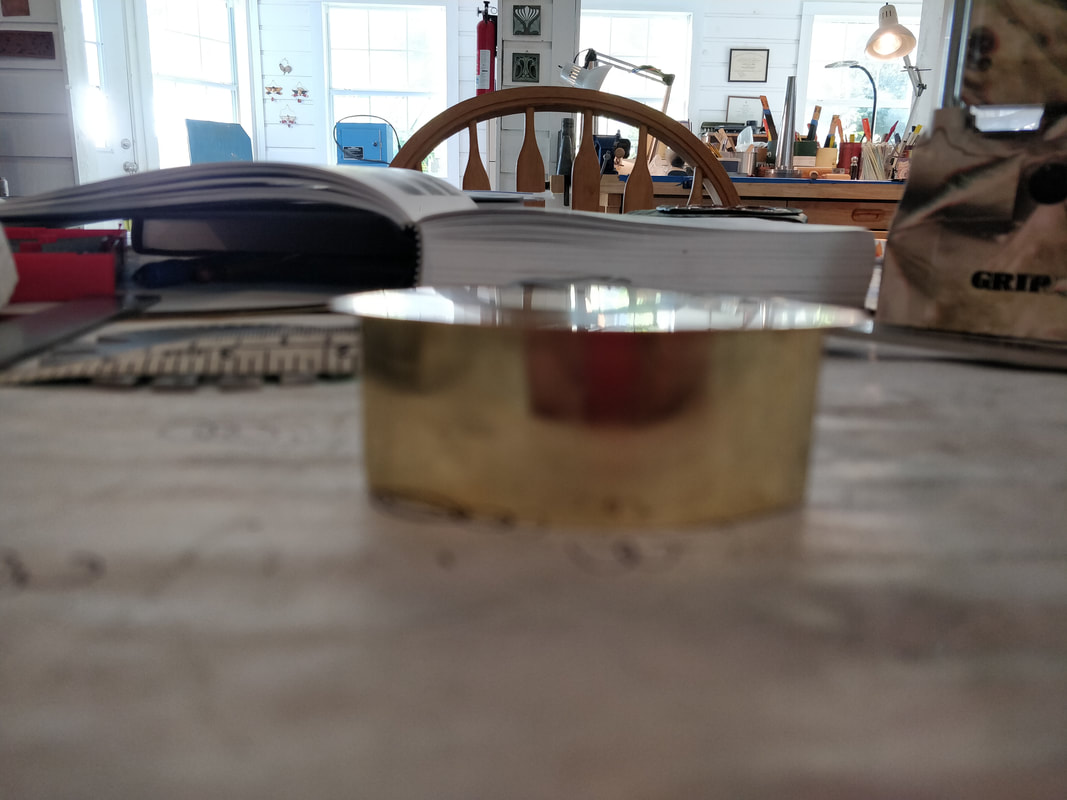
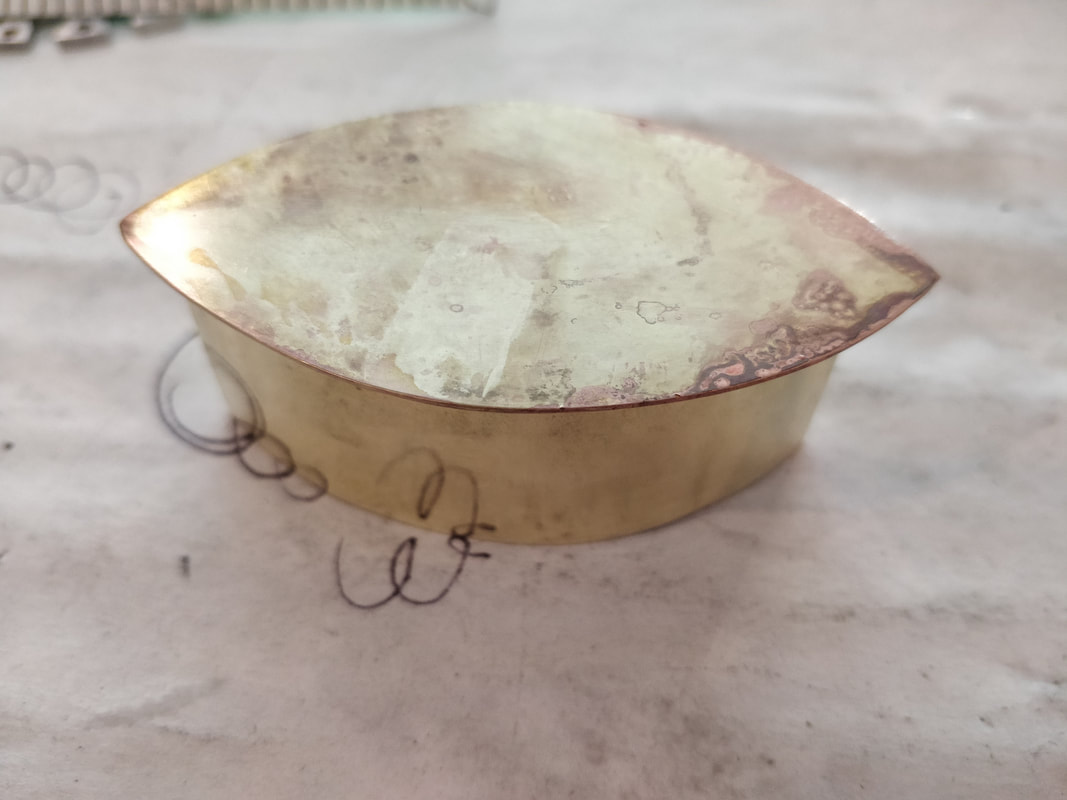
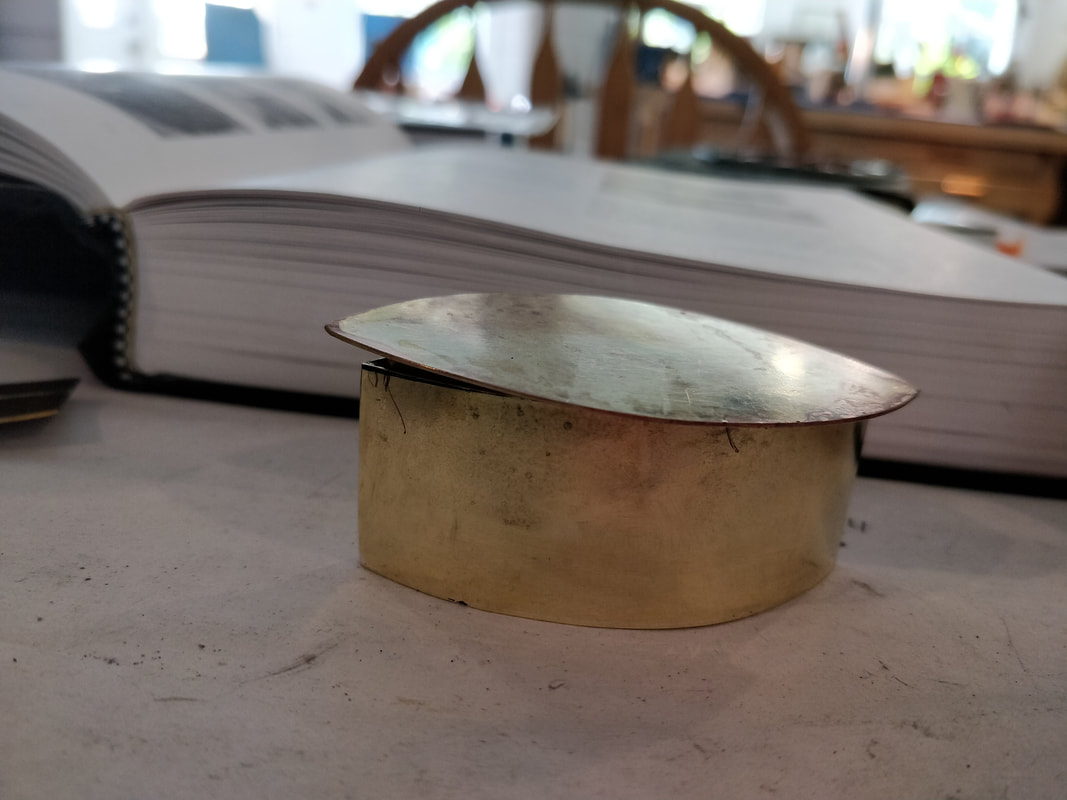
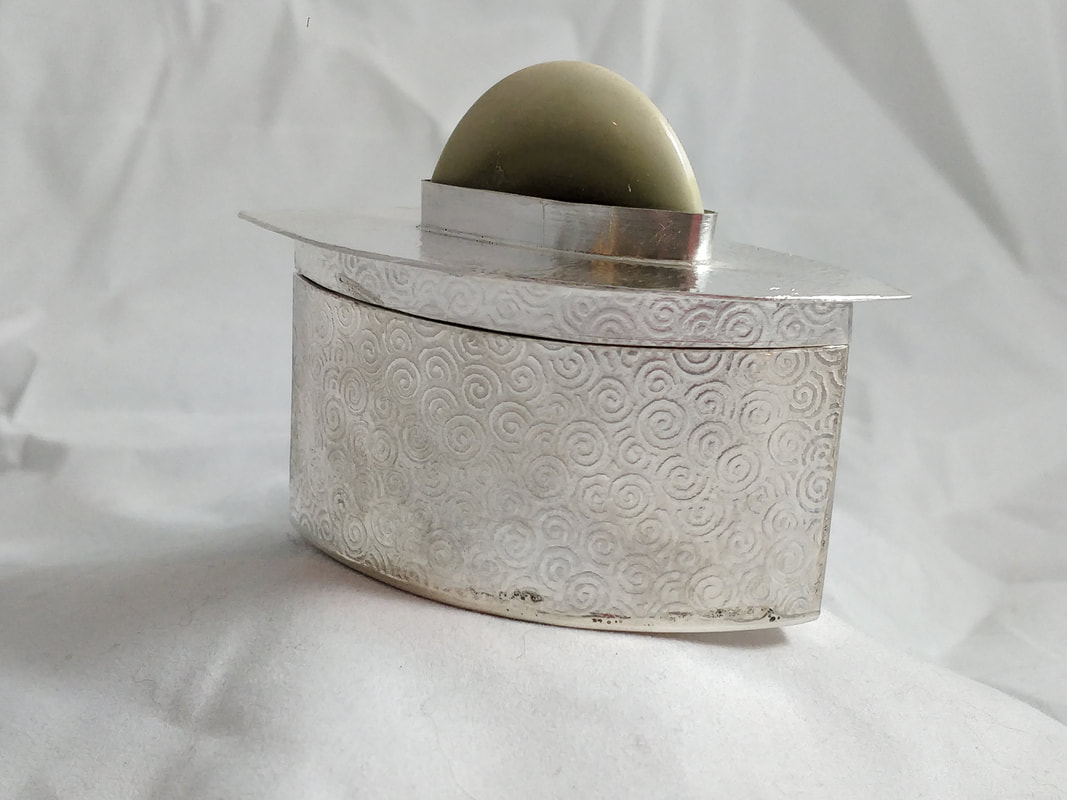
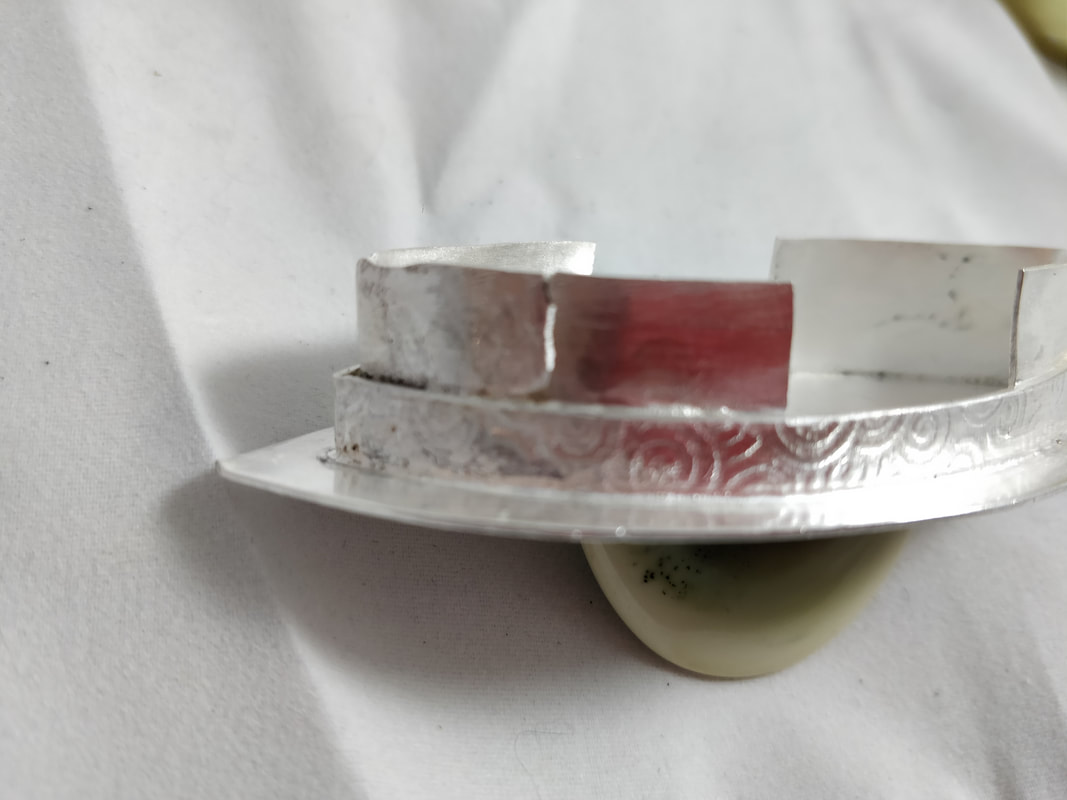
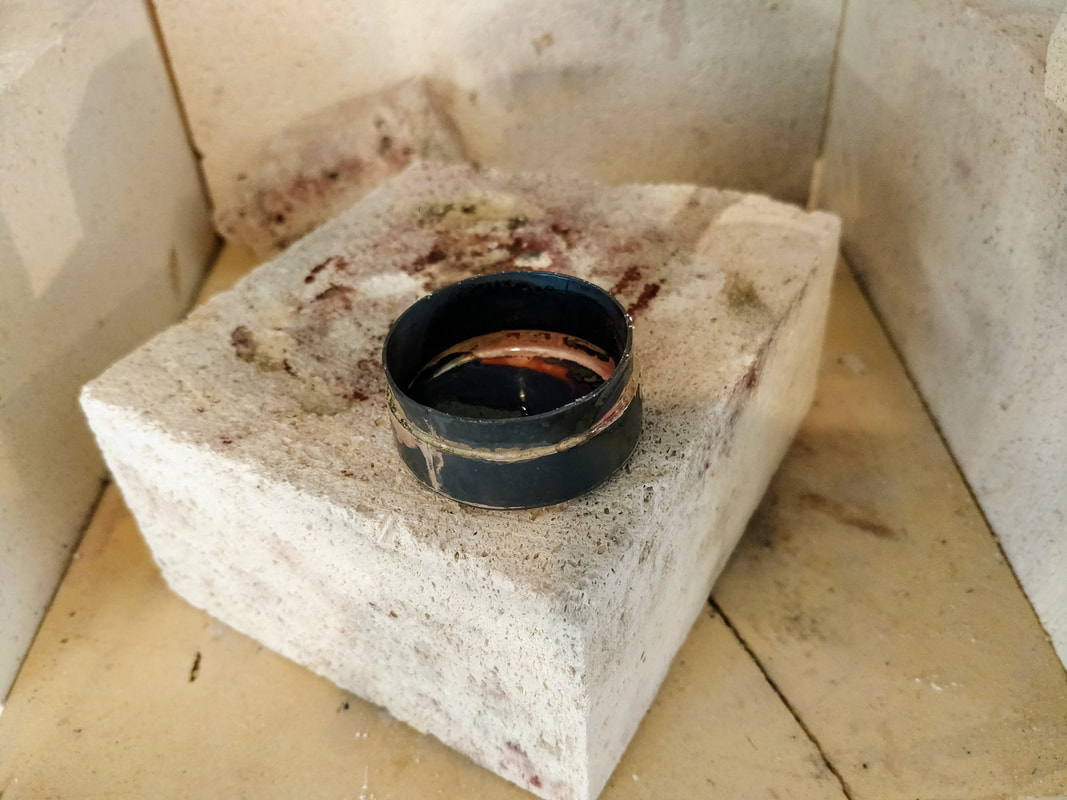
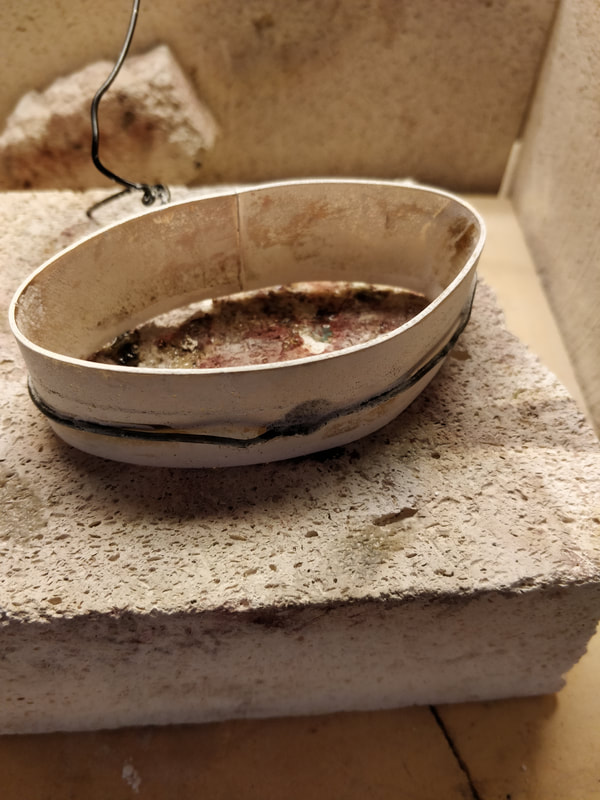
I went to the soldering station and placed the knuckles on graphite pencil lead and placed them on the back of the box which was being supported by fire brick ends to stabilize everything.  Time to flux, light the torch and solder away.  I was able to use one small piece of solder for each knuckle to tack them down. I then pickled it all to make sure everything was aligned and correct before putting it back together with more white out, flux and the final soldering.  Once again into the pickle it went. Then I work hardened some copper wire, inserted it into the hinge, as the pin, and "rivetted" the end to keep the pin in place.

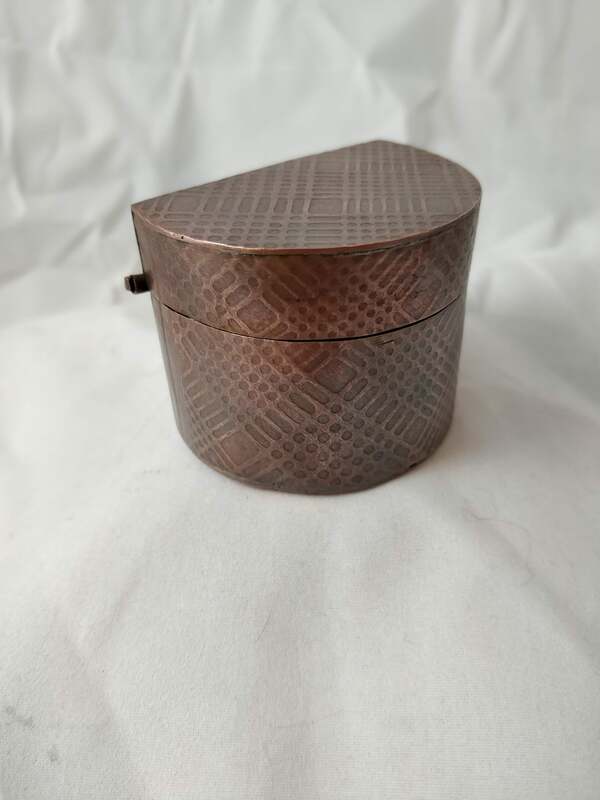
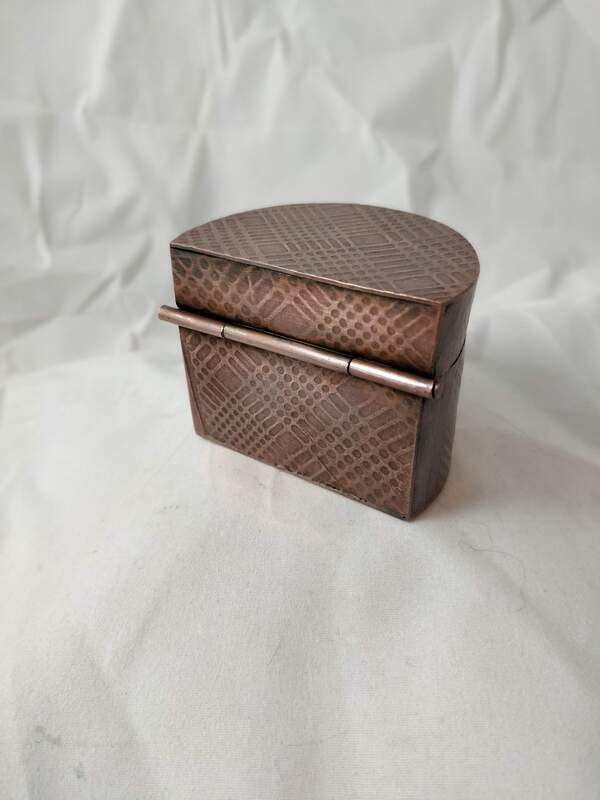
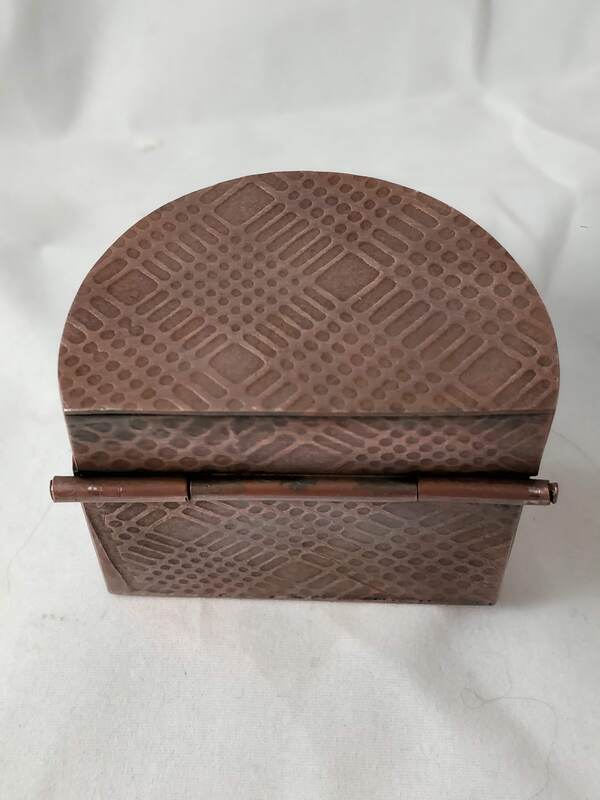
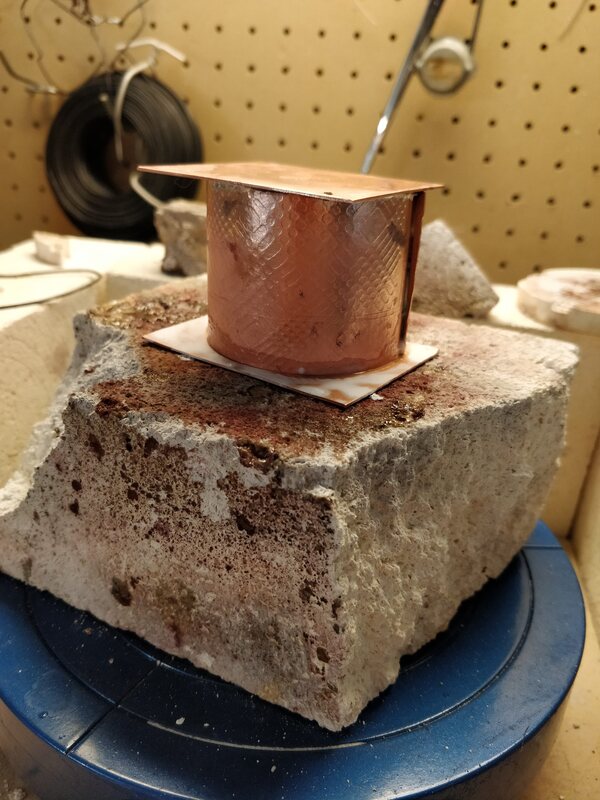
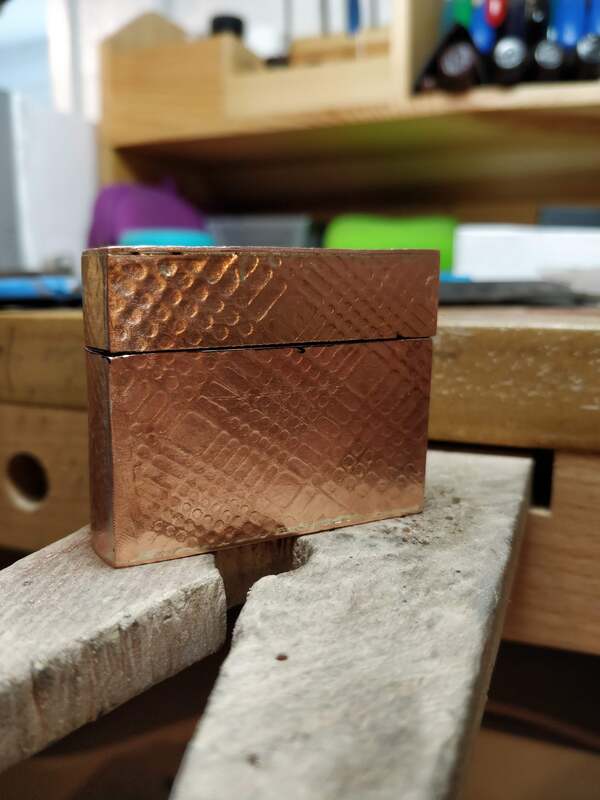
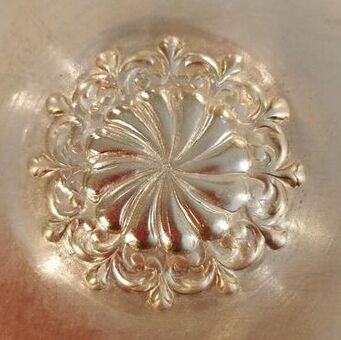
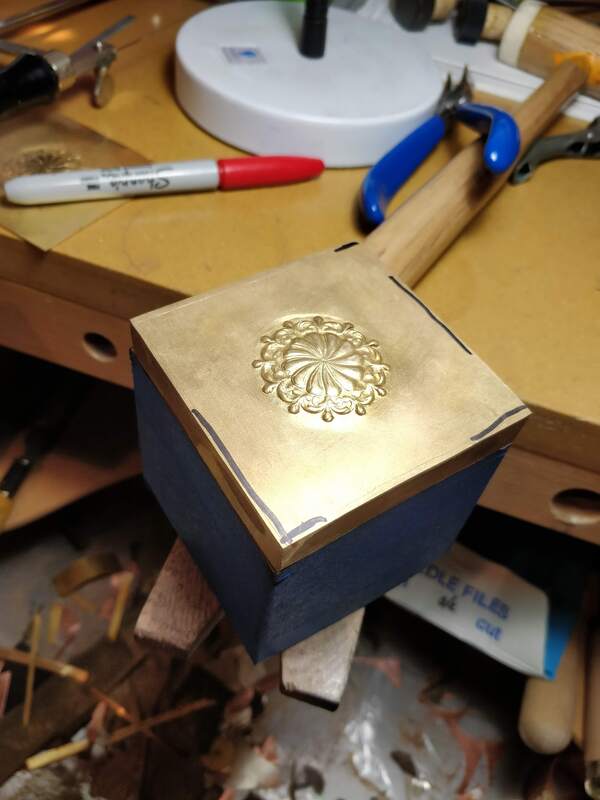
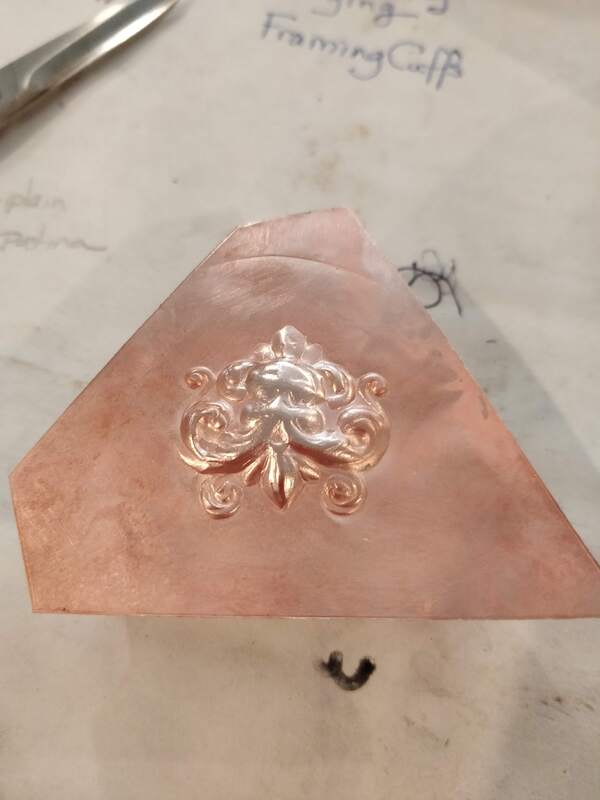
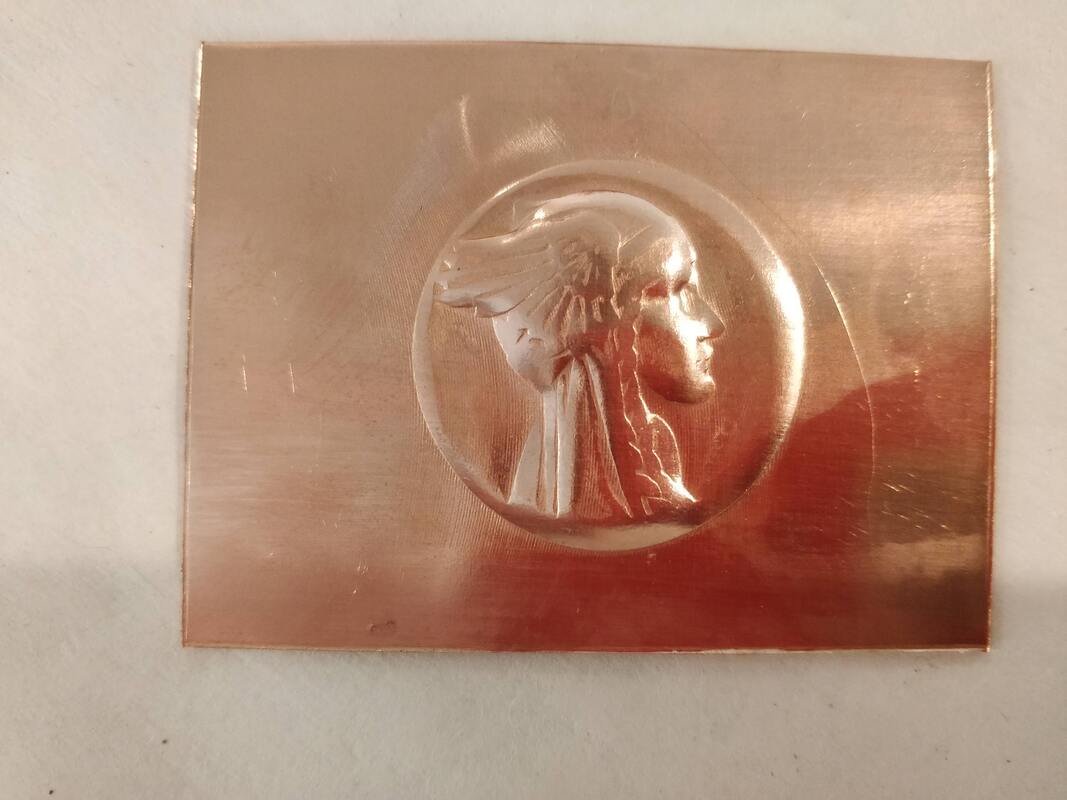
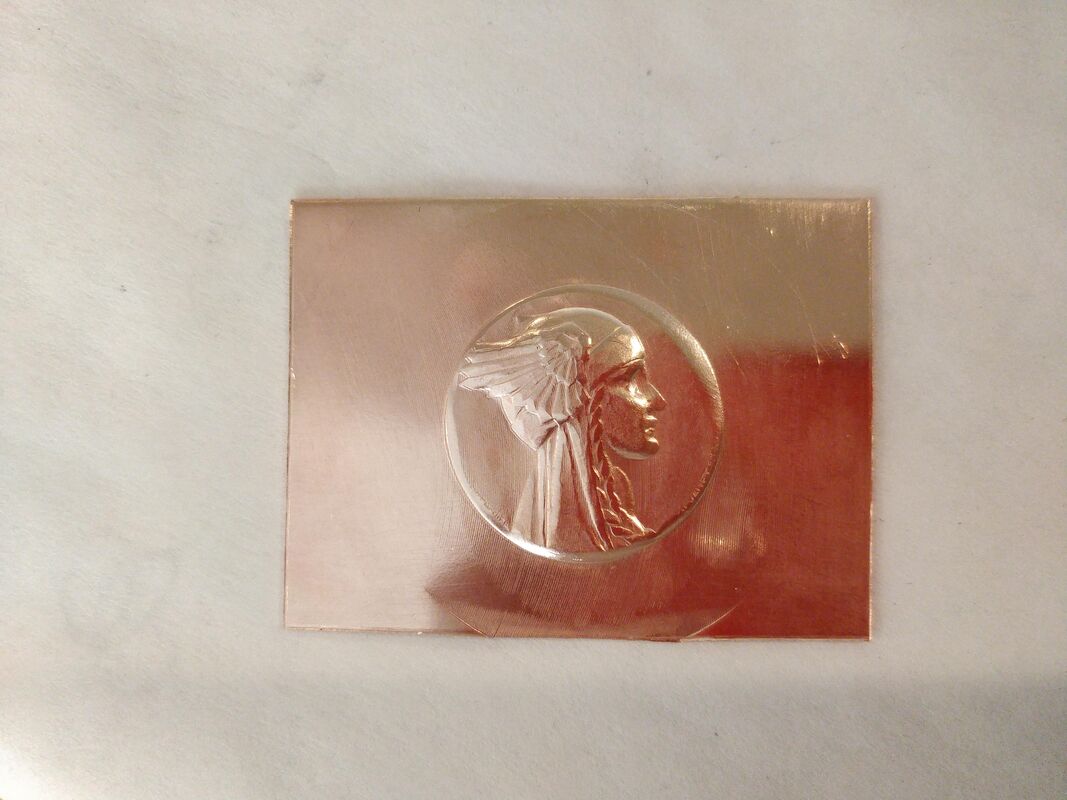
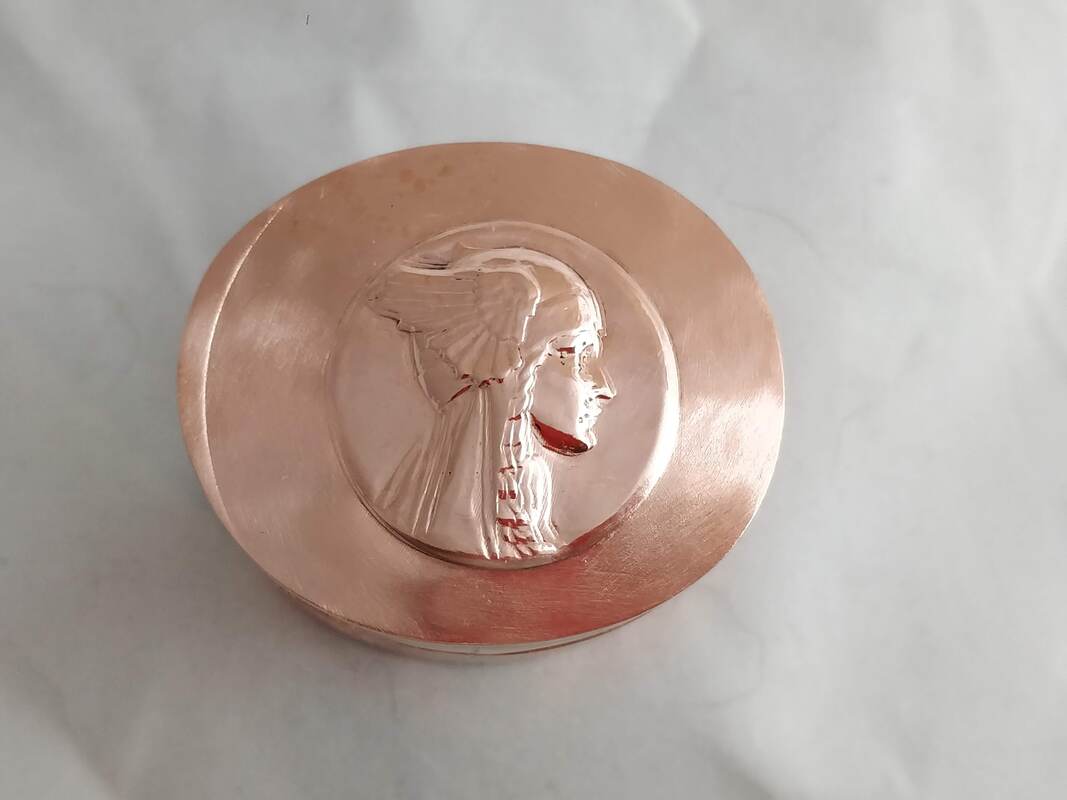
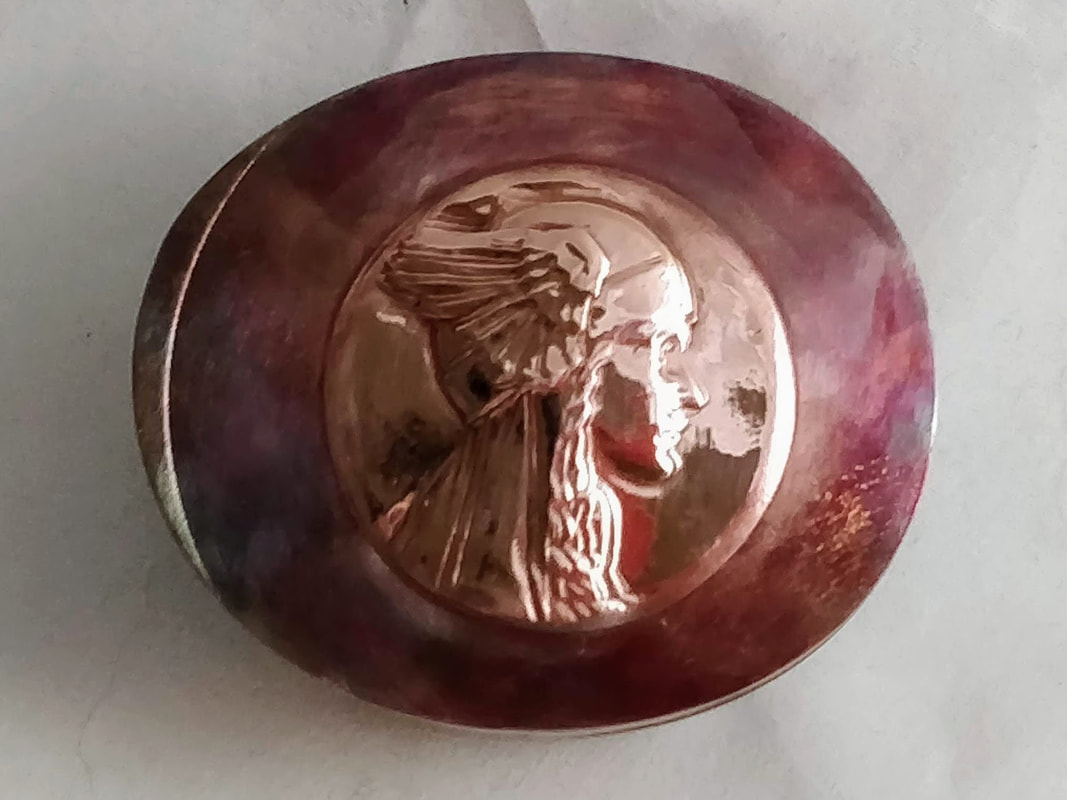
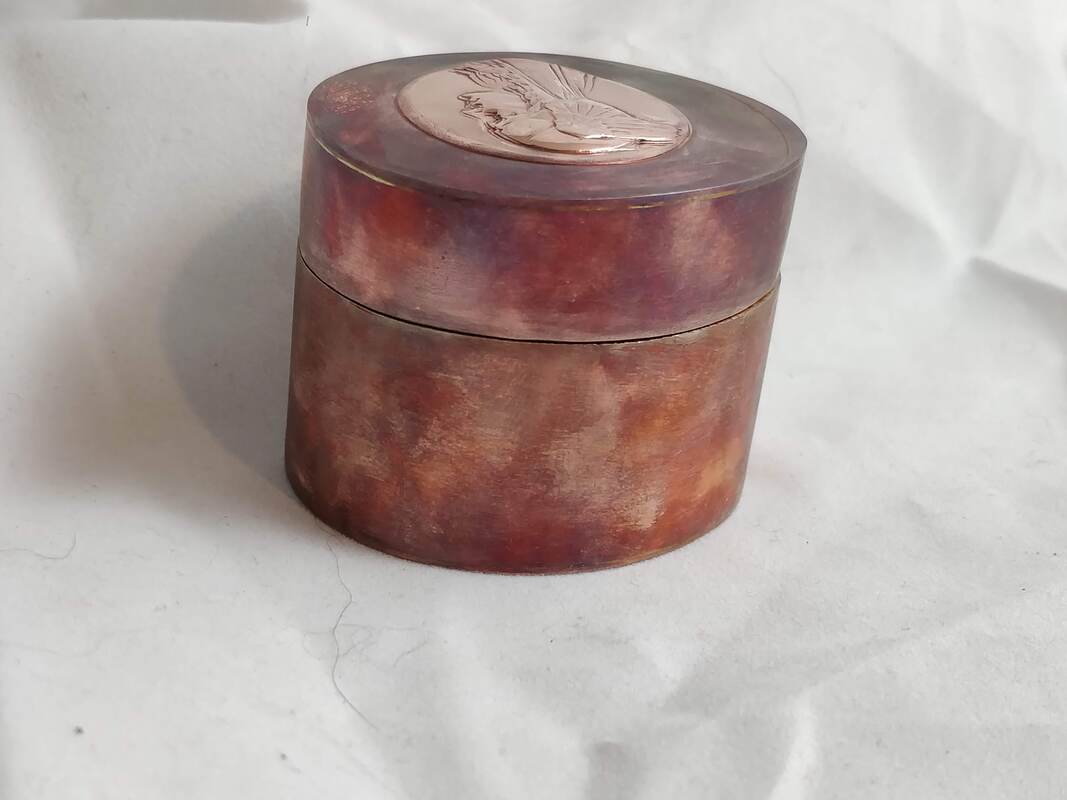
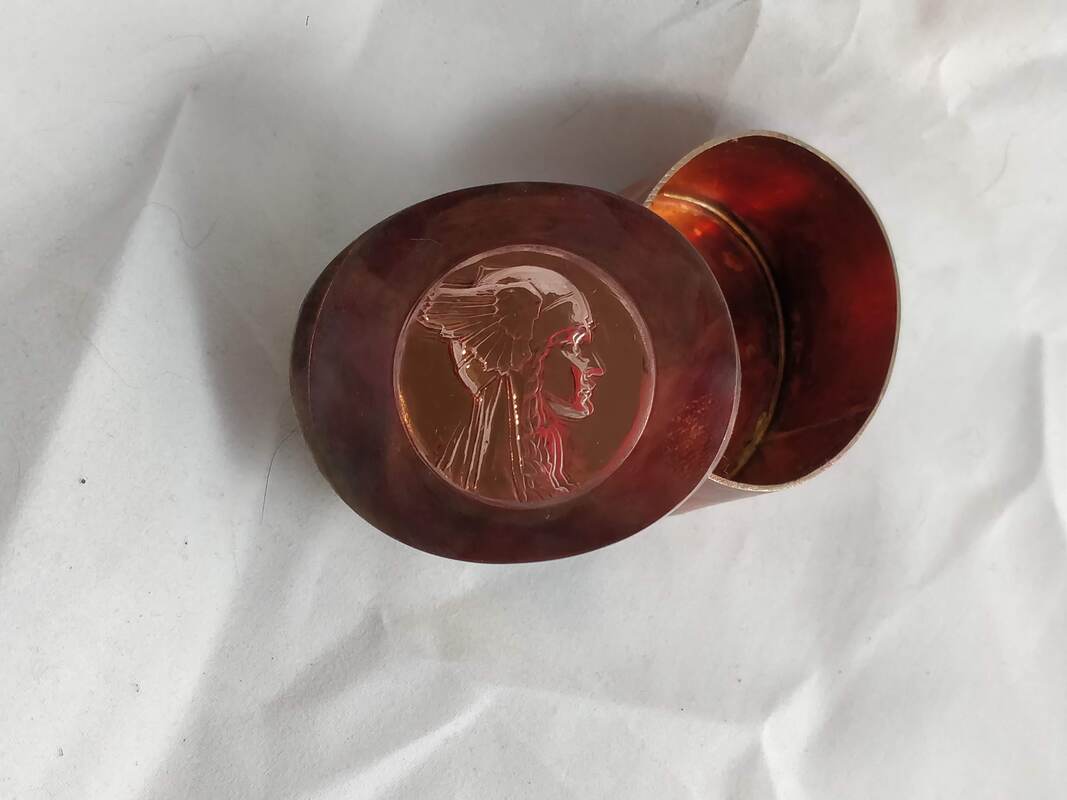
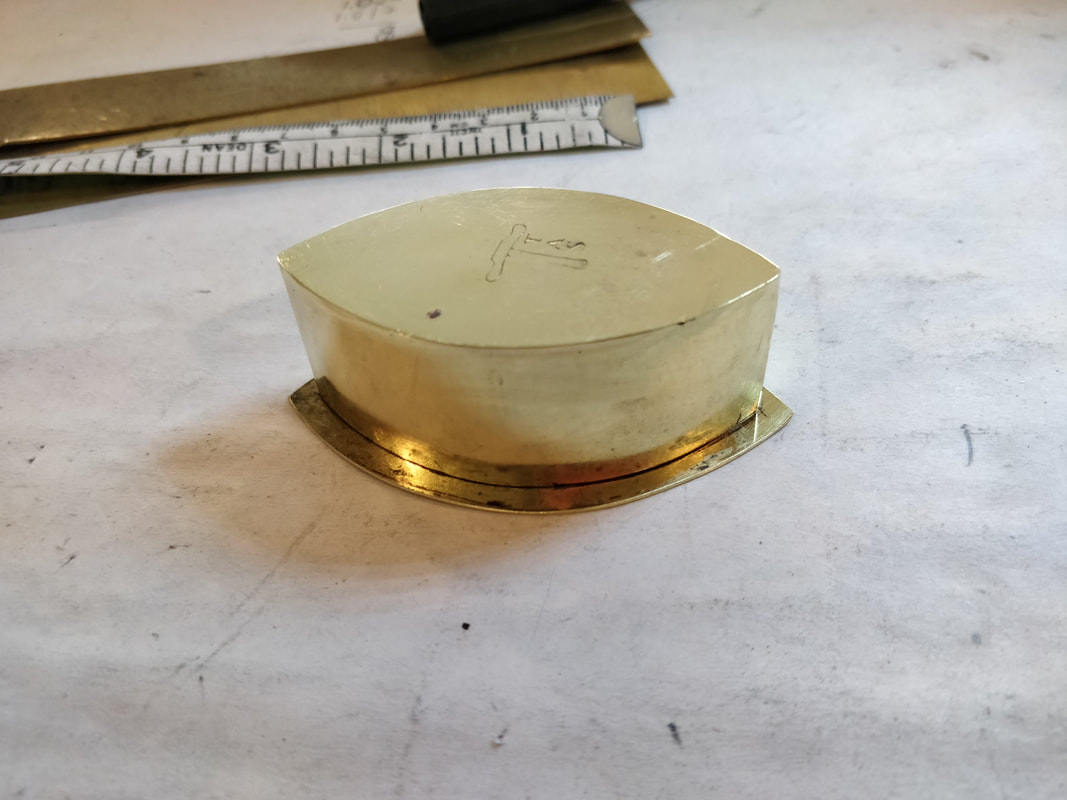
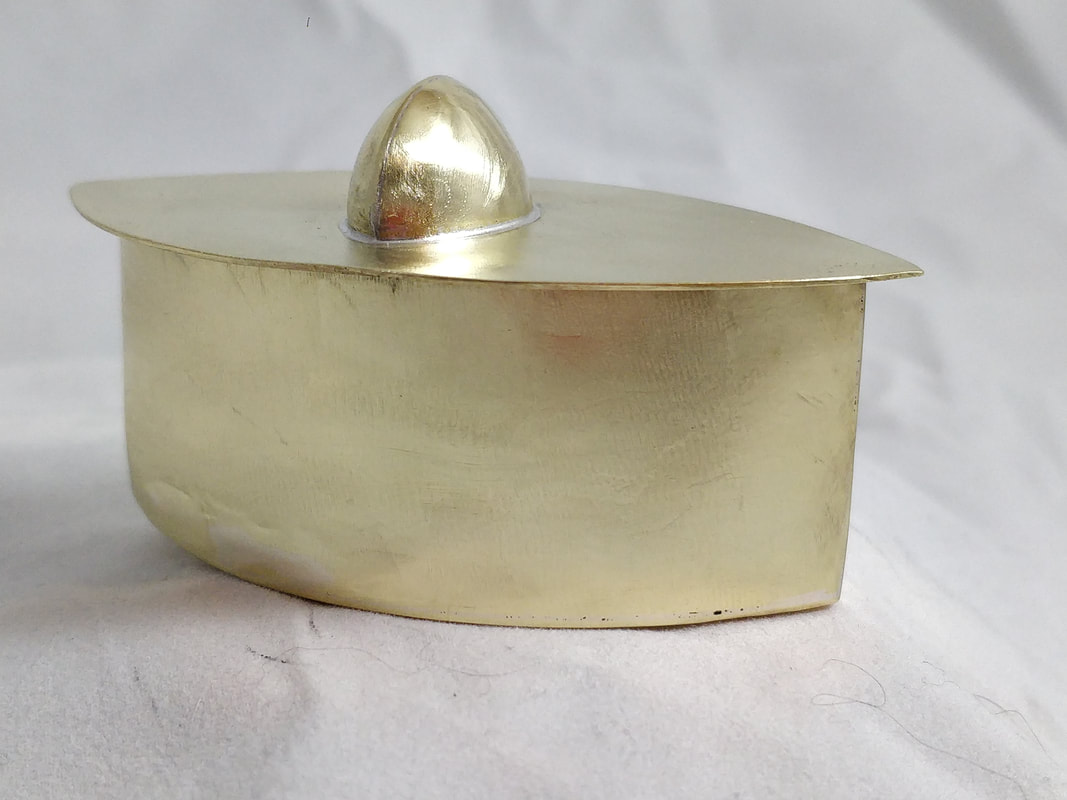
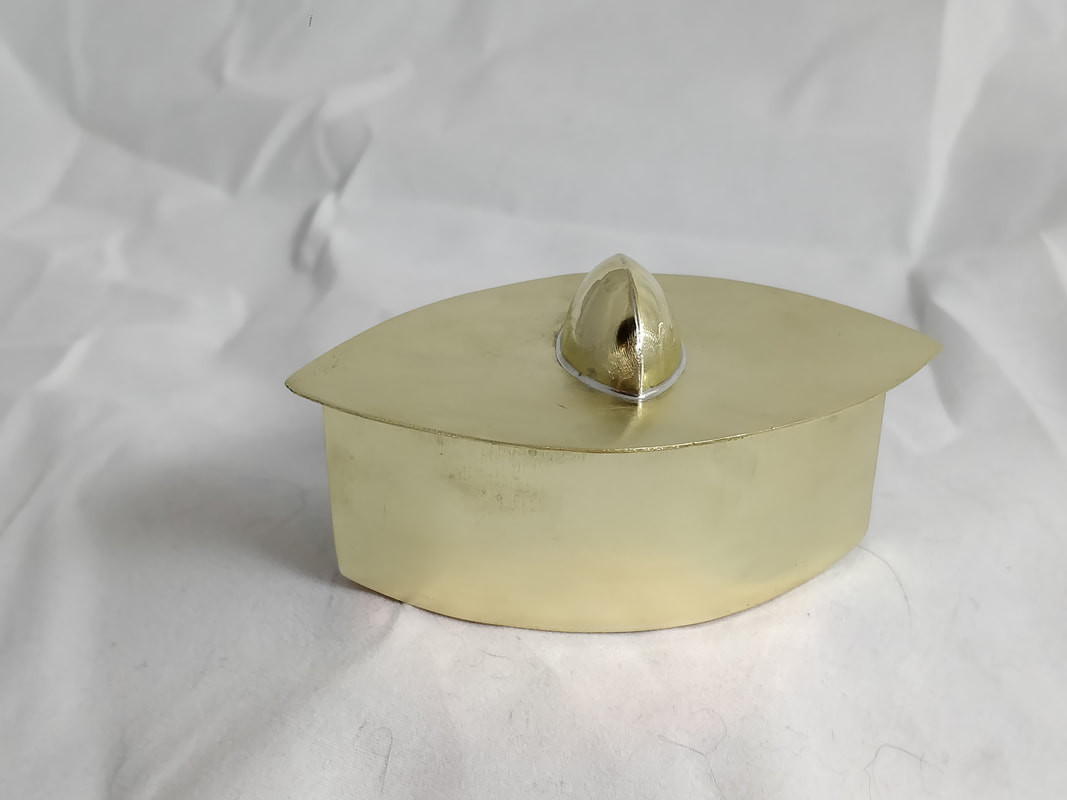
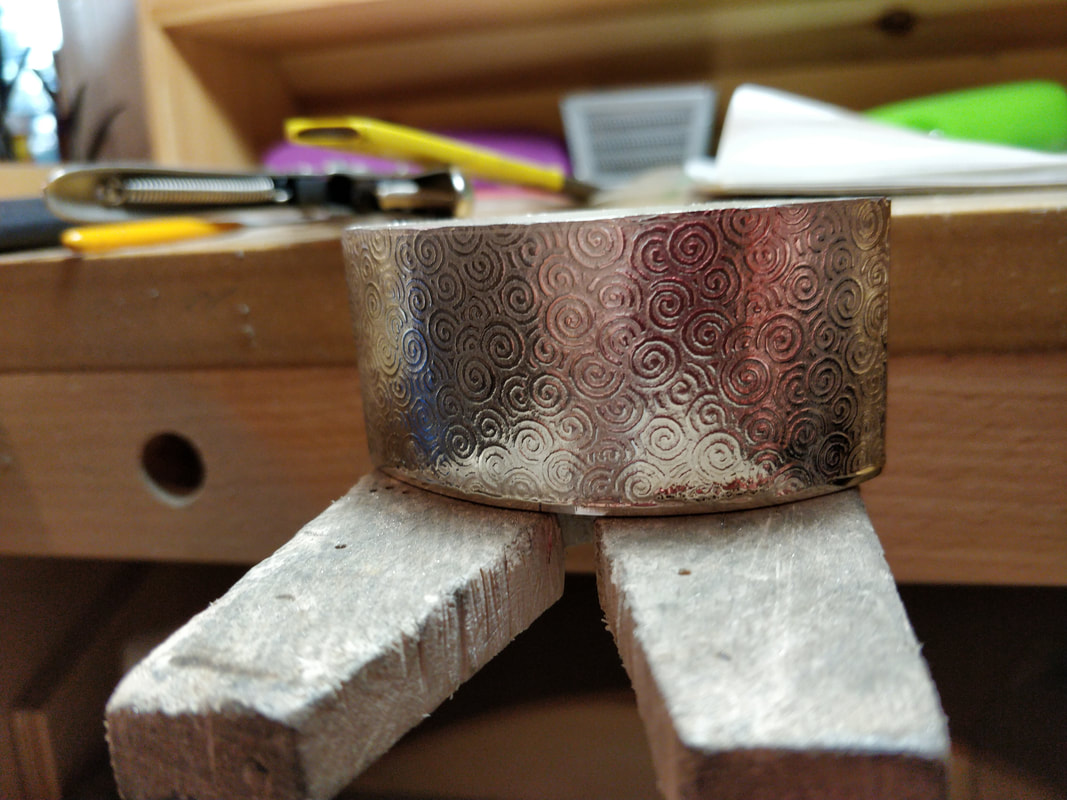
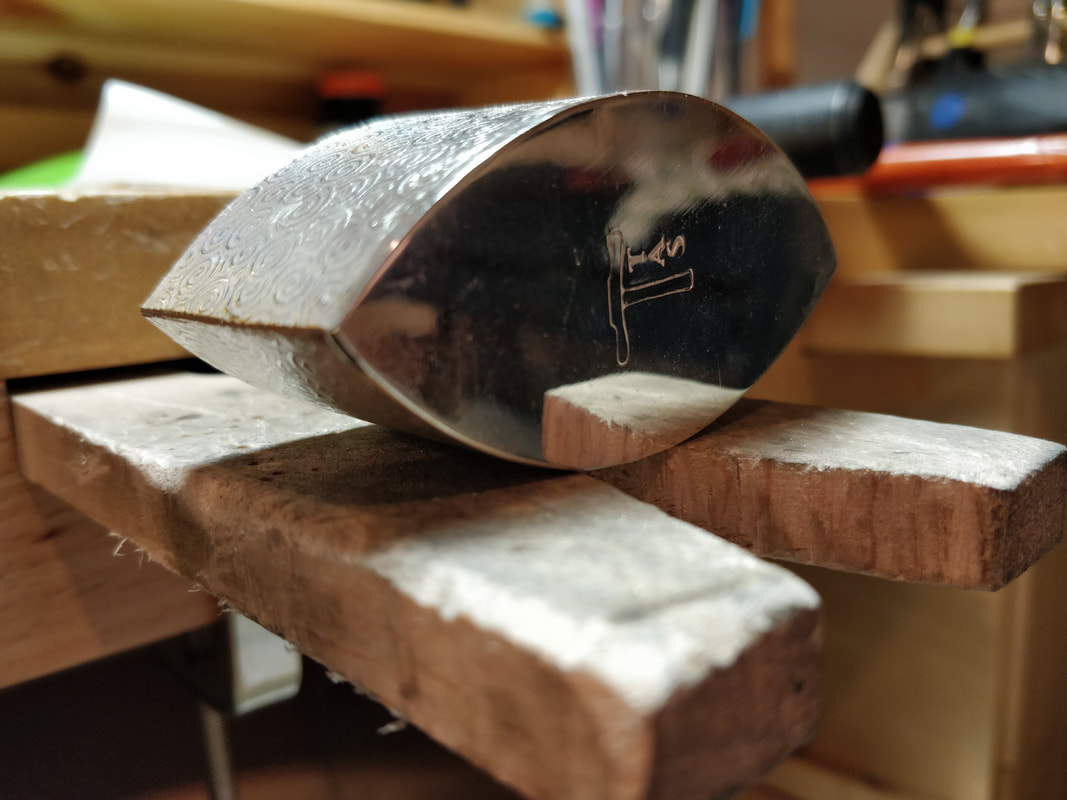
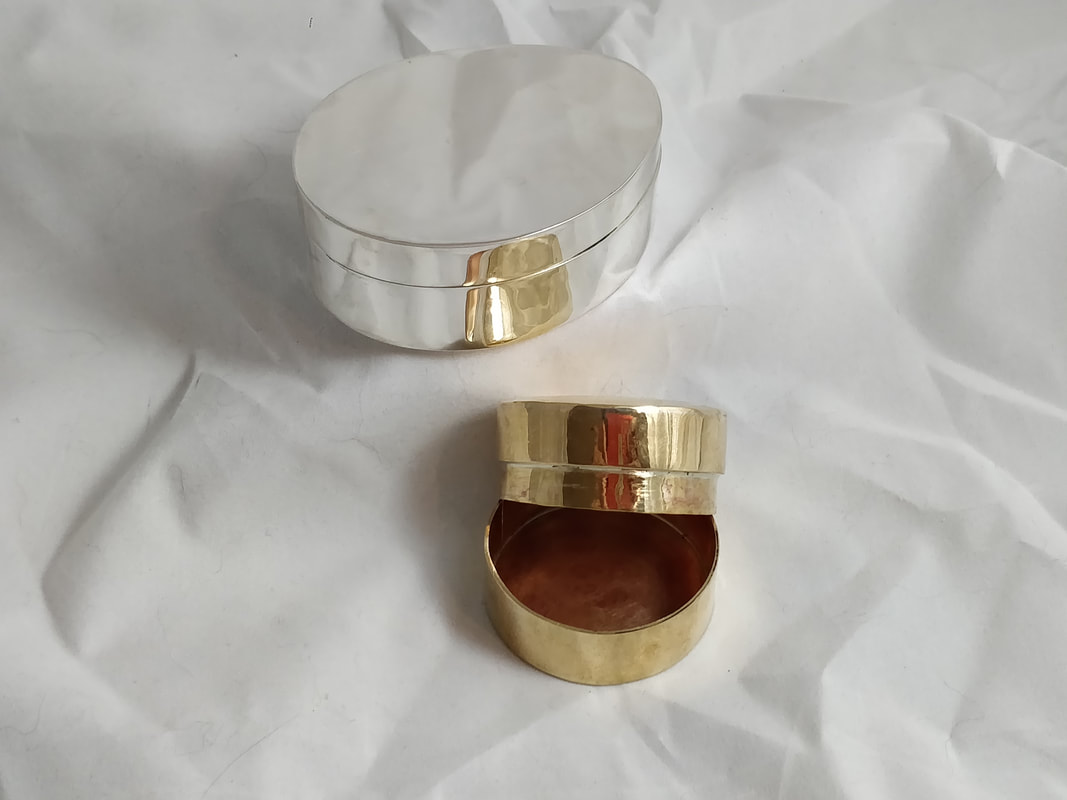
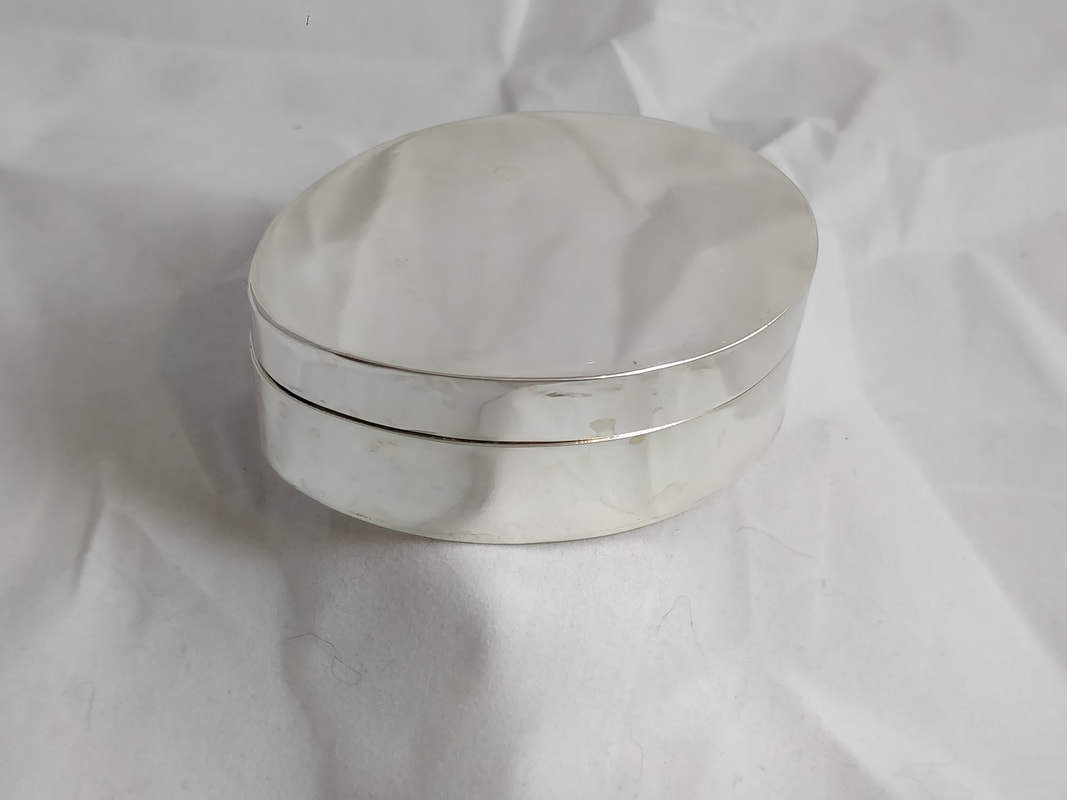
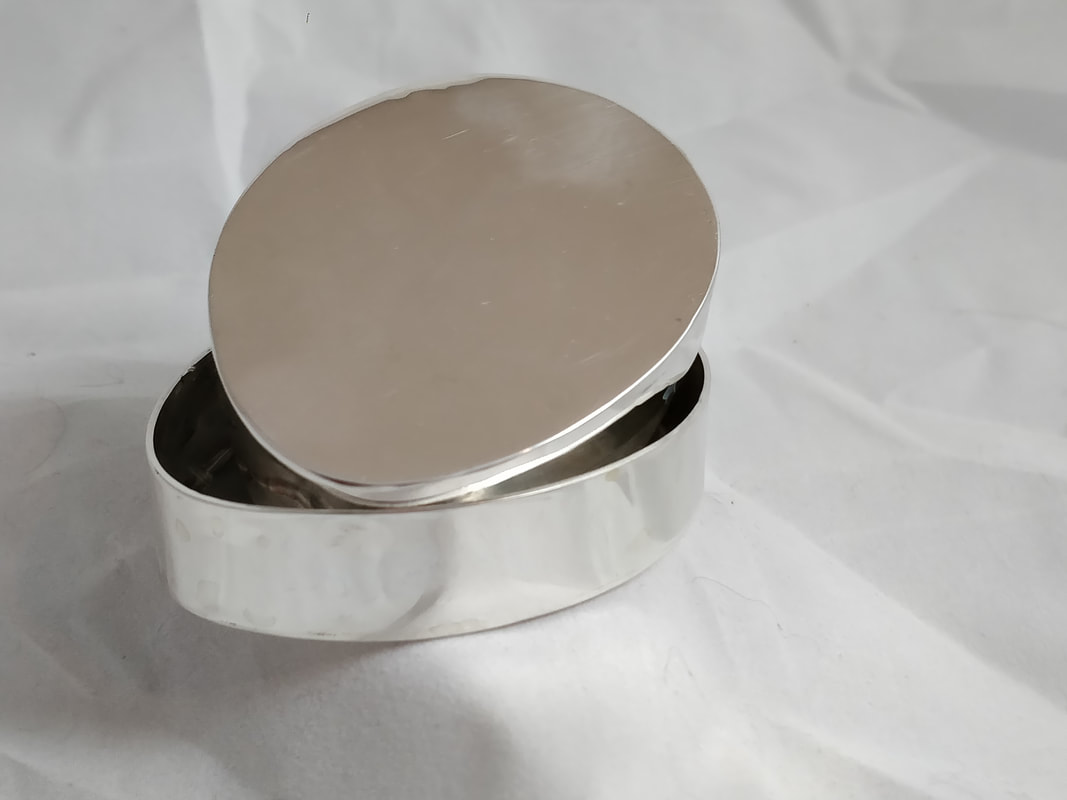
Lastly I had to clean it all up, give it a quick 'polish' with some pumice to matte the surface before adding a patina and a final buff polish to shine up the high points.
​ 
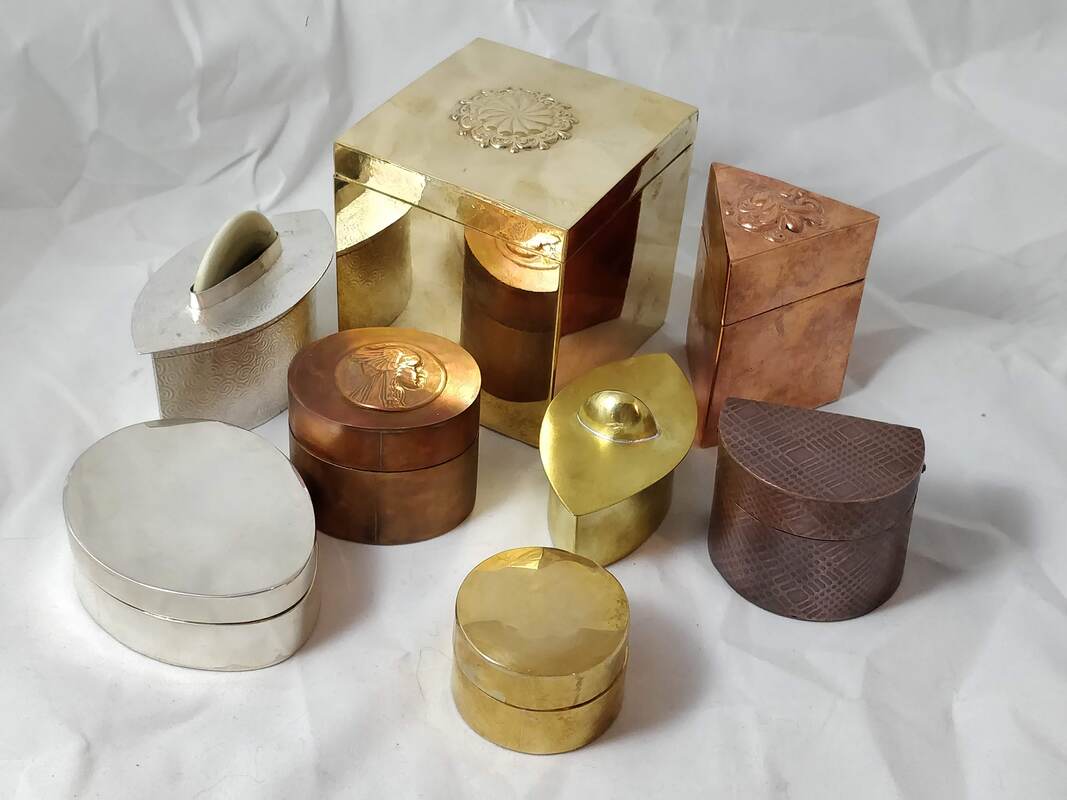
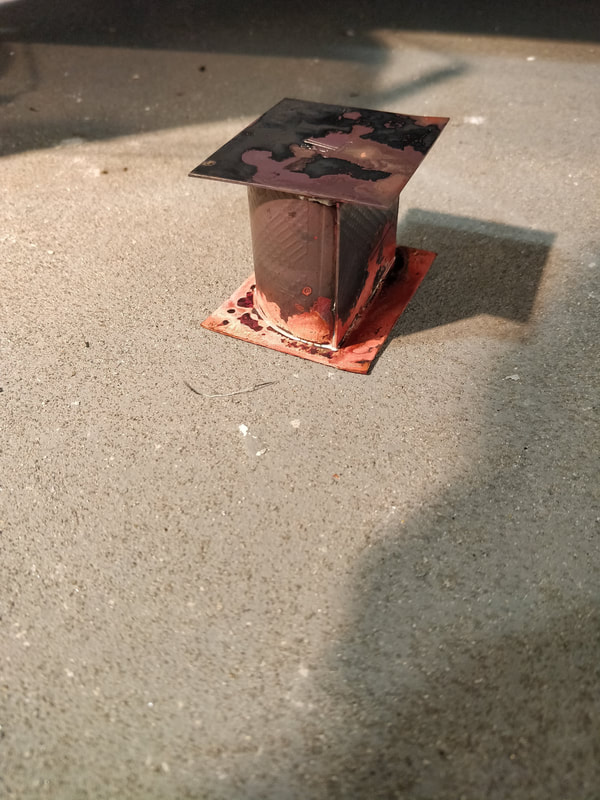
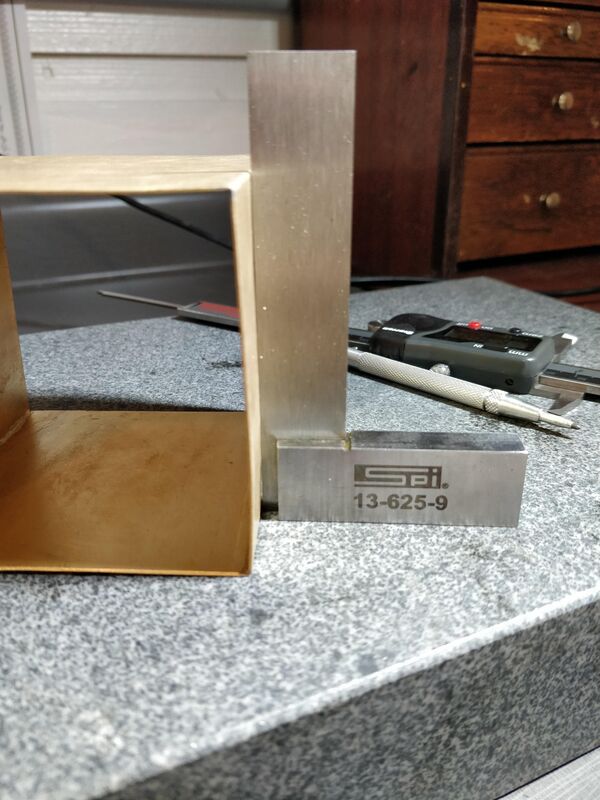
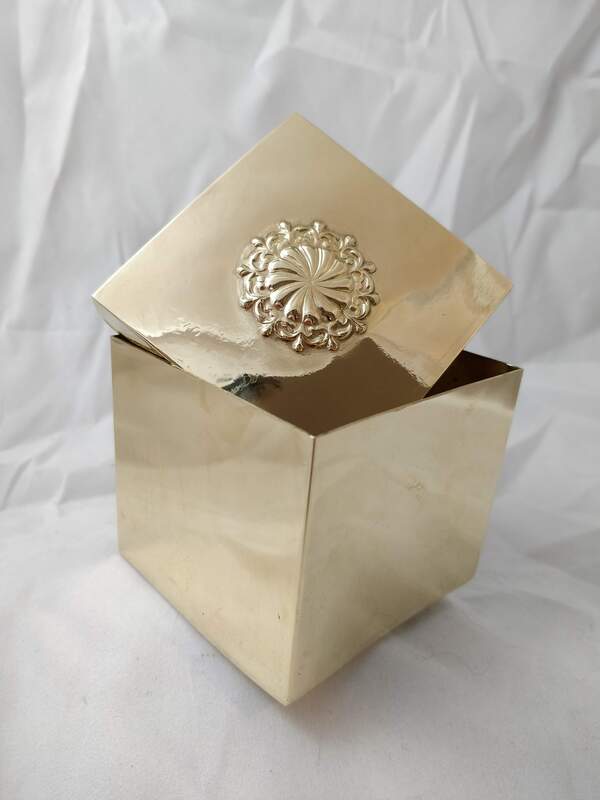
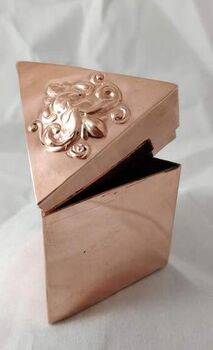
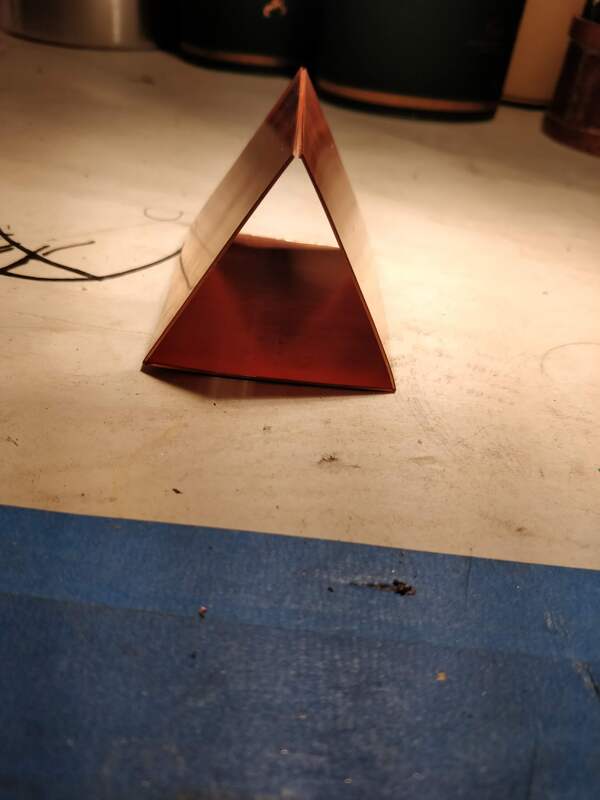
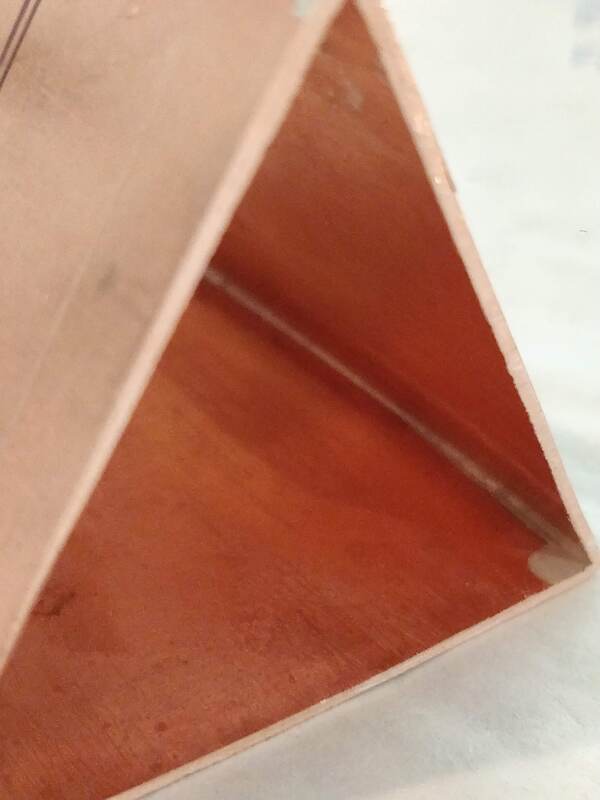
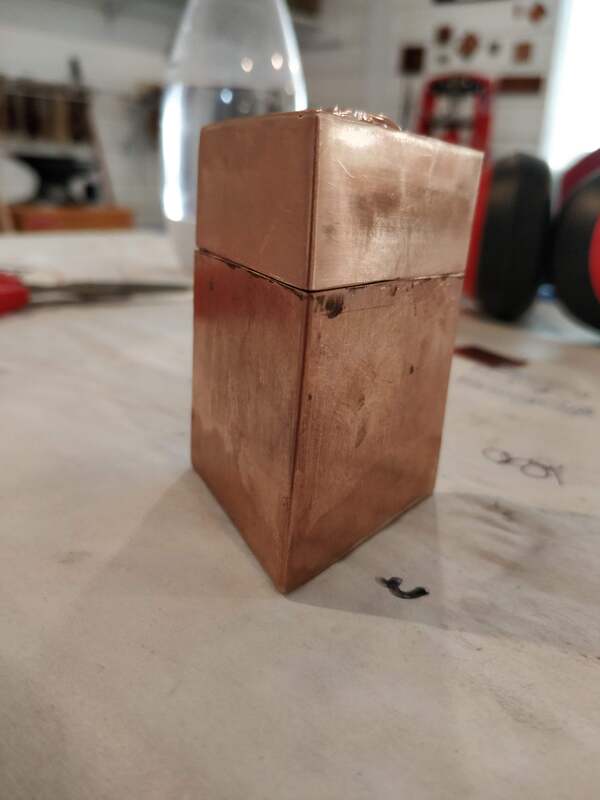
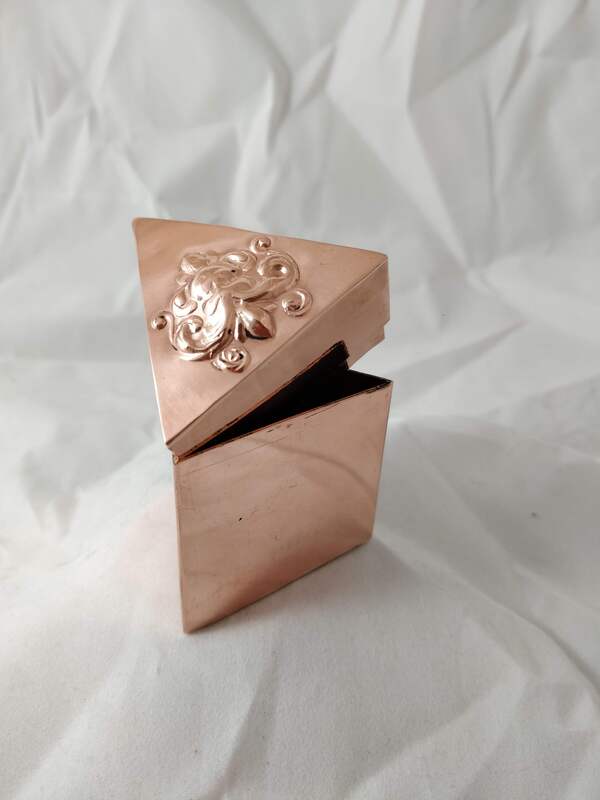
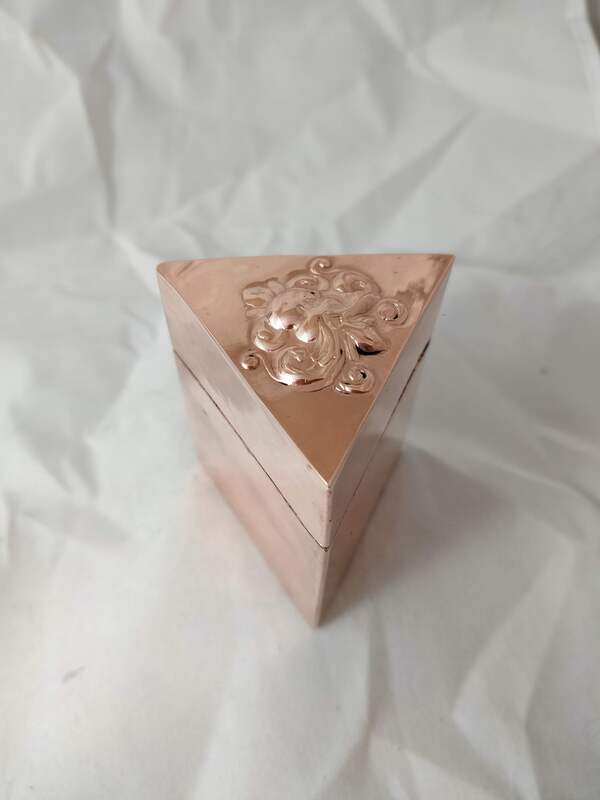
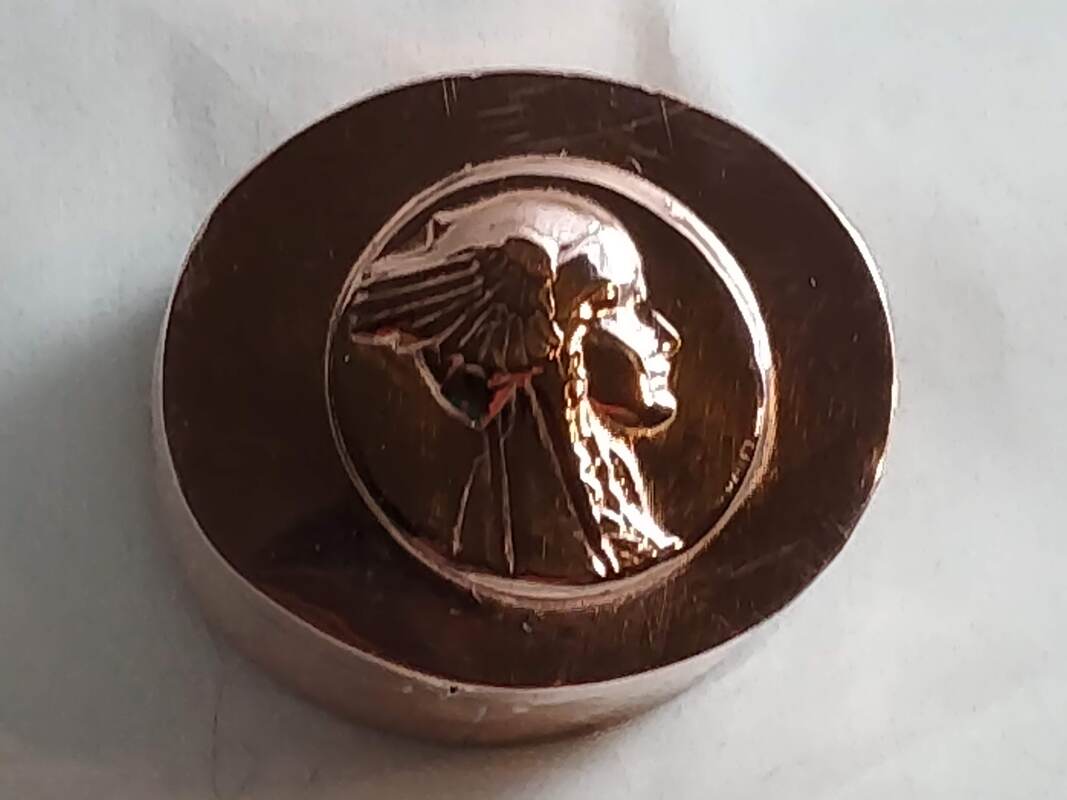
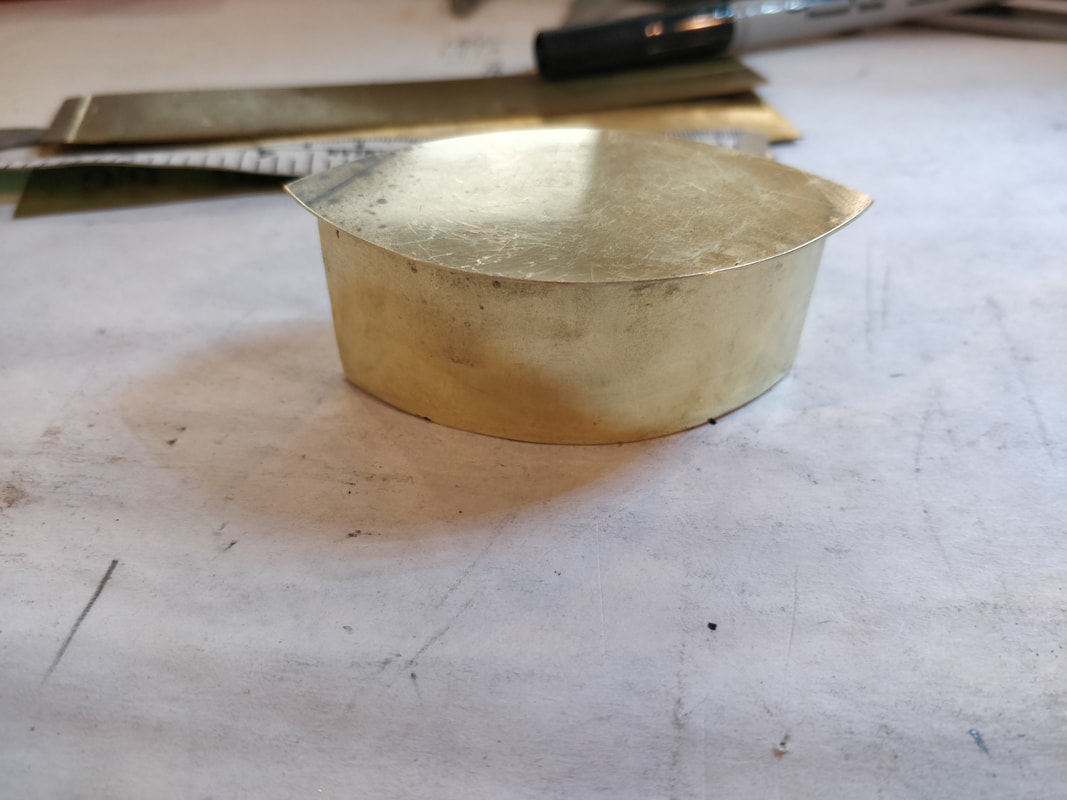
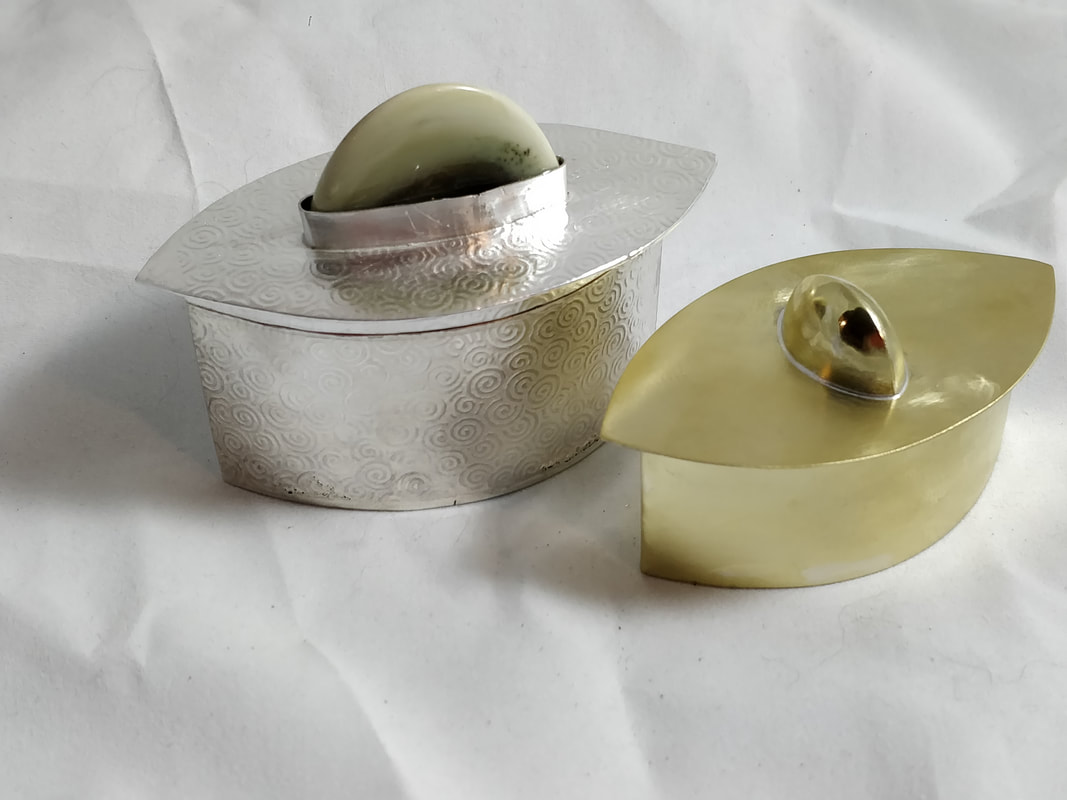
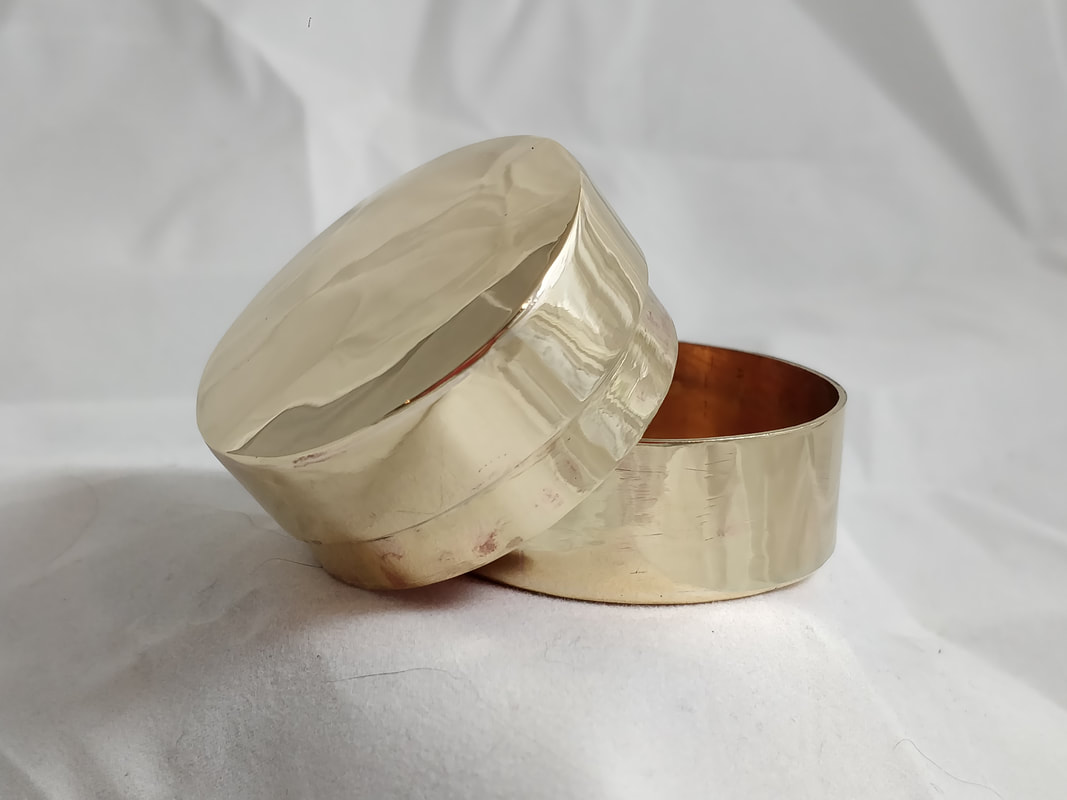
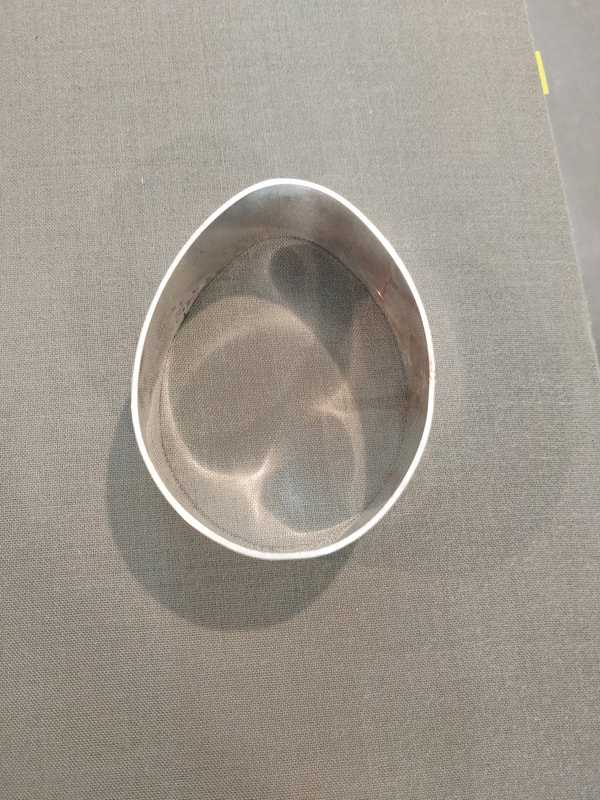
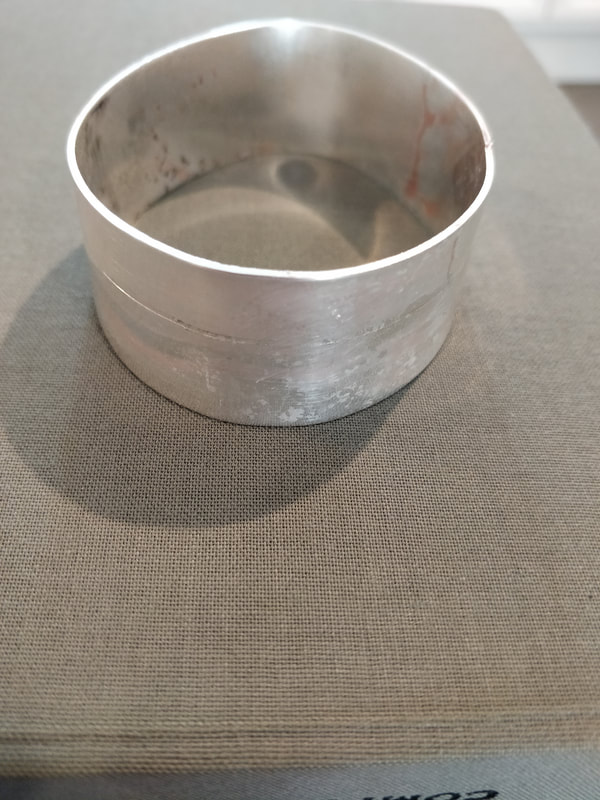
And here we are - a finished box!!!  And at the very bottom ALL the boxes!
Picture

The Box Project #6b - Making a box to put hinges on

12/24/2019

0 Comments

 
To read about learning to make hinges part a read this first
Monday (Day 3):
As part of learning to make boxes and boxes hinges, one eventually get to the point where you have to put a hinge on a box so obviously you have to make a box first which can be scaring because you want a good box, so will it will be a good one and then once you have made said box, and you put a hinge on it; well will the hinge work and if it does not can it all be saved?  This is how I spent Sunday evening while watching the T.V. and while trying to fall asleep. 

If you have been reading the other box project posts, you will be aware that I have been adding to the seam count with each subsequent box: #1 a round box with one seam; #2 an almond/eye shaped box with two seams; #3 a triangular box with 3 seams and then for #4 a square box with 4 seams. So what should I do for box #5? Ah, I cheated and decided to make a half circle box that had 2 side seams. 

I looked at what 20g copper I had and decided that the box would be about 1" tall and about 2" long on the straight side and the front would be round with a radius of about 1" (if the flat back is 2" wide, that is the diameter).  I went through my rolling mill textures and selected one which I would use for the walls and the lid. 

Using my round stepped bracelet mandrel, I formed the half round and then filed the ends flat and using hard solder, attached the front to the back wall. I then stamped my maker's mark on the bottom plate and textured the top plate. I then scribed where I would cut the lid from the bottom and using a separating disk, cut an air slot for when I solder the top and the bottom on. I write inside bottom and inside top on each piece so I don't put them on the wrong end or on "inside out".  Everything was fluxed and using medium solder, I attached the top and the bottom.

I put the whole assembly on the concrete floor to cool as quenching it can cause it to warp. I also don't put it in the pickle at this point as the that air hole is too small for pickle to get in or out of easily so now is when I cut the box apart and then pickle it. 

After pickling it is time to trim all the extra copper off the top and bottom and to even up the making surfaces where the lid is cut from the body. This takes time as you want it all even with no gaps.  After that I made bearing plates to fit inside the box. The are soldered to the back wall so there is extra material to support the hinge. 

The box is done and now comes the scary part of making and soldering on the hinge. That's going to be the next post.
0 Comments

The Box Project #6a - Learning Hinges

12/24/2019

0 Comments

 
I was going to work on this two weeks ago but getting the flu put a kink in that idea but with the holiday and an extra day of vacation,  I gave myself 5 days in the studio to learn hinges and to make a box with a hinge. This post is about learning to make a hinge
​
Saturday morning: 
​
I reviewed the 5 silversmithing books that had information on hinges. I would start with a butt joint and then a book joint.  I selected some scrap 18 gauge copper and cut it to be 1" wide and then cut copper tubing 1.25" wide; these would be my joint knuckles.  Per the instructions, I beveled the ends of the copper and then used my chenier file to create the seat for the hinge knuckles. I cut the tube into 3 sections with the largest being half the length, for the center knuckle and the remaining amount in half for the outer two knuckles.  I marked the copper with a lead pencil while placing the center knuckle, I then soldered down the two outer knuckles and when I went to place the center knuckle, I saw that I had pushed the outer knuckles inward thus making the space for the center knuckle too small. 

Hinge #1 was done and wrong. I should have soldered the center knuckle first and then the outside ones. 

For Hinge #2, I started again; bevel and cut tubing. Place the knuckles on a piece of graphite pencil lead to keep the knuckles aligned on the metal and solder. 

Hinge #2 was done and wrong again! I had all three knuckles soldered but now two; a outer and the center knuckle were soldered to one side; I should have used white out to prevent errant solder flow. 

I cut more 18 g copper and tubing. I placed everything flat on the solder block an fluxed and moved the outer knuckles out of the way but kept them on the lead. Then using very tiny solder chips, just to tack the knuckles, I soldered the center knuckle. Then I moved the outer knuckles back into position and soldered them into place.  I let it all cool and put everything into the pickle. 

After removing the sample from the pickle and cleaning the joint, I put the hinge back on the solder block, reinserted the graphite lead, fluxed and finished the soldering of the knuckles. Yes I got  the knuckles fully soldered down but I also got some on the copper along the hinge seat. 

Hinge #3 was done and almost correct -  I need to use smaller solder chips!!!
Hinge #4 was a full repeat and much better but still not perfect.

I inserted some copper wire into the hinges, as a pin, to prove the hinges worked, without trimming the outer knuckles and called it a night as it was now 5pm,  but I decided to reread the chapters on hinges, again, after dinner.
Sunday morning:
Time for Hinge #5 - This one would be a butt hinge and following the instructions EXACTLY, used the chenier files to cut a groove in each half, I cut and filed the ends of my tubes square using my miter jig;  I used white out, in lieu of yellow ochre, to work as a mask on the copper where the knuckles would be placed; I aligned my knuckles on graphite lead.  It was time to solder; I ran the solder wire though my rolling mill to thing it and then cut very, VERY tiny chips. I then fluxed the hinge seat and placed the knuckles on the graphite, in the seat and turned on the torch. Working slowly with the flame, I warmed everything up and when the flux was glassy, I placed the solder chips and used the heat to pull the solder into the seat of the center knuckle. I then focused the heat on the first outer knuckle and proceeded to solder it in place and moved on to the second outer knuckle.  Into the pickle it went. Afterwards I trimmed the outer knuckles and inserted some copper wire for the pin and filed the ends flat.  SUCCESS, I had a good hinge with almost NO solder to clean up. 

 
​Time for Hinge #6 which is a book joint - this is the type of hinge that would be on a box between the lid and the body.  I worked really slowly and carefully; repeating everything I did for #5 - file, sand, place, check and check again, masking with white out, cutting tiny solder chips, fluxing and checking placement again before turning on the torch.  I soldered again in two phases the first being to tack the knuckles and the second fully attach them. And... I had a successful book hinge!!! 

It was now 6pm and I was done for the day having been at hinge making for 6+ hours. 
​
Next up would be to make a box and put a hinge on it, starting tomorrow.
0 Comments

The Box Project - Hinges Introduction

12/7/2019

0 Comments

 
Picture
This weekend I am continuing my quest of learning to make boxes by adding hinges to them; of all the boxes I have made so far, they are slip fit.

I have been told that certain boxes don’t need hinges – ones that are smaller in size are more decoration than functional such that they are not opened very often)

And hinges don’t appear on just boxes they are on lockets (which are small and are certainly decoration), bracelets, and other jewelry as connections between elements.

Then there is other hollowware like the lids for tea and coffee pot, lids on salt cellars or mustard pots, tea caddies and infusers

But unlike hinges in our house, we can’t go to a store and just buy premade hinges – they must be made specifically for each object. And the object has to be modified for the hing

I have looked at a lot of books old and new about hinges. The older ones describe the process but don’t illustrate it as printing images in books use to be very expensive. The newer books have pictures with captions and text but not many give you an exact step by step probably because each item you put hinges on is different. The picture at the top of this post is of all the books I have which discuss hinge making and I read each at least 2 times before it started to make sense (doing this when one is tired does not help and might make understanding it worse).

I am now ready to start constructing some sample hinges which is best as you don’t want to spend hours making a box only for a hinge and then have the hinge incorrect or soldered solid.

I have copper sheet, various sizes of copper tubing for the hinges, copper wire for the hinge pin, solder, a tube cutting jig jewelers saw, and small files specifically for cutting grooves foe the hinge tube to sit in.

There are several types of hinges and I will be making samples of each if not more than one of each before i ever put one on a box.  This is what I will be working on during the rest of the month. When I feel that I can make them well, I will then construct a box and add a hinge.
0 Comments

The Box Project #5

11/30/2019

0 Comments

 
Picture
This being Thanksgiving weekend and I could have 4 days in the studio, I planned on my biggest box to date and the next step in this journey - 4 corners. 

The box would be 3" wide by 3" long by about 3" tall. 

I set up my metal last weekend, a 12" by 6" of 20 gauge brass by drawing the scoring lines and clamping it to the table with my guide.   And then I went to the day job for three days....

Thursday, I woke up at 6:00 am with the shop cat (Boots) announcing her presence at the bedroom door (the shop elf was fast asleep) so I got up and went to have my cuppa coffee. I went in to the studio and turned on the lights and the heater as it was about 65 and a wee bit nippy.  Then it was to the kitchen to brew my cuppa and feet the cat. While having my cuppa, I read a sci-fi book I started on Monday was getting rather disappointed with how the author was ending it. By now it was 9:00 am and it was time to go to the studio which was a comfortable temp.

I took off my wedding ring and my good glasses and put on my safety glasses; sat down at the work table and started to work on the first of three scored joints. After a few minutes I realized I was not staying on the line and was making a real mess of it as the scoring tool for 90 degree had a very shot arm and my cutting point really wasn't 90 degrees. I tried to fix it and decided it was just easier to make a new one from another old rat tail file I had. That took over an hour and finally I was away and scoring and creating lots of nice brass curls. I did a check of my cutting and found I was a hair under 2" from the end so all my other scores would have to be moved to the left and a sliver of brass cut off one end.  I stopped scoring at 5pm, as I knew I would not get the third one done and I was very tired.  It was time to make dinner and relax for the evening.

Friday morning, a certain cat announced her presence not only at 7am but at 2 am.  I was able to roll over and go back to sleep for a bit but when a cat walks on you and purrs in your ear it it rather impossible to go back to sleep. Once again I went downstairs, fed the cat and coffee-d myself. I headed into the studio around 9 am and sat down to finish the scoring and beveling of the outer ends. 

I will mention that when scoring, which is done on the inside, you watch the outside for a line to appear. This is from the pressure the tool puts on the metal because it is so much thinner having been scored. When you see this line you go very slow as removing too much will result in the joint giving out resulting in one part separating from the rest. The scoring continues until you can just begin to bend it by hand.

Finally it was time to solder. I started with the center joint, then doing each of the other two. I then cleaned it and then using binding wire, closed up that last corner nice and tight. 

After soldering and cleaning it, I drew a line at the top as to where I would cut the lid from the bottom body. I also cut the top and bottom plates. After I soldered the bottom plate and the bottom was in the pickle, I took the top piece; annealed it and used the hydraulic press to form a design.  The design, having lots of little details required me to anneal the brass three times and to use lots of little pressure pieces to push it all out.    

Using a cut off wheel I cut the lid from the bottom and soldered the top, with the design, on.  It was now time to file and mate the two parts; fit the bezel and polish it. 

Of course, along the way I had a few unintentional learning experiences (documented below) which I am a bit disappointed with but now I can see that doing something this big is not easy... It may not be perfect but I did make a box with FOUR corners and lots of soldering, filing, sanding, measuring.  The next one will be sooo much better. 

For the next part of the box project, I will continue to make a box but this one will have a hinge which will require me to make many samples of hinges before I add one to a box. That starts next weekend!! 

Picture
Big Learning Experience Number 1: 
That is a machinist square so that is a true 90 degrees.
I have a side wall that is bowed inwards, this happened while soldering the base on and I didn't see it until I cut the lid off! And my walls were square when I was done soldering the joints because I did this with the square, hanging off the side to check. 

The silversmithing books warn of walls warping either when quenching or while soldering. The book makes mention of getting it up to temperature and clamping it and letting it air cool but since it was soldered I don't know what could have been done except to start over. 


Picture
Big Learning Experience Number 2: 
There is another warp along one of the other sides but it one bows outward.

Picture
Big Learning Experience Number 3:
Yes, the top seperated from the wall; this happened while soldering in the bezel. Originally, it was just at the corner and as I tried to fix it but it opened more which is what you see here. I stopped while I was a head. 

Picture
0 Comments

The Box Project #4

11/24/2019

2 Comments

 
Picture
There are two parts to this installment of the box project

Part A was 2 weeks ago and B was finished today.

PART A
This box is a triangular box with corners; I figured doing 3 corners was easier than 4 which is why this box is triangular.
Before starting this phase, I pulled out my silversmithing books, again and read up on this subject.  Some of the books say to file a bevel on each edge of the corners where the angle depends on how many corers you will have; 45 degrees for 4 corners (45 times 2 equaling 90 degrees) and 30 degrees for 3 corners as the total of all the angles is 180 degrees, yes geometry comes into play here. Then using binding wire and supports, you solder all the corners together.  Other books say to scribe the angle into the metal such that the metal is still all connected, for n-1 corners and then you only have to bevel the 2 outside edges. The scribes/grooves are then bent to close up the box and it is easier to solder them all closed.  I asked my mentor what is best and she said to scribe but to do that, I had to make a tool to do the scribing cause no one makes them for you to purchase; welcome to silversmithing!!

Time to make TWO tools one with a 60 degree and another with 90 degrees.  One of my books gave information on how to make these tools out of old files or other tool steel and the shop elf sacrificed (handed over) two files he no longer used for the cause.  First you bend the handle down, as this will be scribe and the file become the handle. Then you file and grind in the angles and taper it so there is a very sharp edge right at the tip. I then hardened and tempered the tip.  After a few starts, trials and restarts I had my tools and sat down to scribe some lines.   

Let's just say it was a bit of a learning experience (not a failure!). I measured a 6" by 1" wide brass piece and drew lines for where the joints would be and then used a tungsten carbide tipped tool to do a shallow scribe using a machinists square. Using some C-clamps and a piece of wood I held the brass to my work table and started to scribe pulling towards me.  My tip was not sharp enough to actually pull off metal so I had to keep going back to the bench to refine the point. I also kept popping out of the groove and really scratched up the brass. Eventually I was able to bend the join and form the metal. Then I realized that my measurements were off and the sides were all different lengths and would not meet. 

Again, it's a learning experience and the next one would be, damn it, correct!  Here are pictures of my tools and my first trial at scribing 60 degree joints.  
PART B
Yesterday I started another piece of metal, this time copper, for a triangular box. I measured 3 or 4 times and this time I used a piece of steel as my clamp and guide which I could hold the scribing tool against to get a straight line. I also used a "three square" file to get a good 60 degree groove. I went slow and careful to get the two grooves and when that was done, I then used my belt sander to put 30 degree bevels on each edge and then it was time to bend; and YES! they met up and when I measure, only one side was 1/32" off.   

It was now time to solder. I fluxed the inside two joins and the inside and outside joint that was actually open. Then I heated and using hard solder just put a small ball at each open end and using heat, from the outside, I was able to pull the solder to the other open end  - isn't it wonderful when things go as they are supposed to. 

Now to put on a base. I found some scrap 20 g copper that was just the right side and so I soldered on the base and I took another piece to the hydraulic press to another impression for the lid.  After trimming up the base, I cut off the lid wall with a separating disk and soldered up the top for the lid.

Once the base and top were cleaned up, I tackled the mating edges and added a bezel and just a little bit of sanding to make sure the lid slid into the body; then did a quick polish and I was done! 

Next up, over the 4 day Thanksgiving weekend, a square box. 
2 Comments

The Box Project #3

11/10/2019

 
This project is from 2 weeks ago, I thought I posted it but I guess not.

This is an oval box (1 seam) but I put a hydraulic pressed stamping on the lid.  I did the stamping twice just to practice getting a good impression. Actually this is the second oval box too; the first was out of 24g copper which is just too soft and this one was made with 20g which is still a bit too thin, for copper but these are all about practice.

I spent a good amount of time working on the bezel for the lid and I am getting better at fitting it and soldering as I am not doing as much clean up.  This box is about 1.25" tall and a 6" circumference resulting in about 1.25" wide on the short axis and 1.5" on the long axis.

​Next up scribing corners, I am starting with a triangular box.

The ​Box Project #2

11/4/2019

 
... and reflections.

This weekend I tackled another box shape - a leaf which has 2 seams. As with last week’s boxes, I first made one in brass, on Saturday, and then I made one in silver on Sunday.

The brass box, with its two end seams requires beveling so the edges line up properly. The beveling is done using sand paper after the wall curve is formed. I used a large tapered mandrel that is oval in shape to form the sheet and then gently held on to the pieces and used 220 sand paper to create the bevels, checking every few minutes to see how the edges match up. Once that was done, I used a small amount of binding wire to keep everything together, which I then fluxed and soldered. After I pickled the brass, I then placed it in super pickle to remove the copper layer; I mixed up a small plastic tub of the super pickle, to just cover the brass.

Time to measure the base, stamp my makers mark, solder it to the walls and file/sand all the edges flush.

The design of the box, which was based upon an article I have from long, long ago, has the lid sitting on top of the base walls, with the bezels for the slip fit, soldered directly to the top plate which also over hangs the box by a scant 1/8”. It was now time for me to make the lid of the box. I traced the box outline on some more brass, then marked 1/8” outside of the lid outline to mark the edge of the lid. From there I cut the lid out and did a pre-polish on it. Then I had to mark where the bezels would be soldered – 1/8” (0.125”) in from the outside edge of the lid PLUS the thickness of the wall which was 20g (0.032’ ) totaling 0.157”. I then used extra brass rolled to 22g to form the bezels, which were fluxed and soldered to the lid. After cleaning it up, I then tested fitting to lid to the box base – at that was a problem, the bezels must have shifted on the lid or my math was off because it would not seat. This was solved by a little bit of sanding on the bezel and the inside of the wall in the box base but eventually I did get them to fit AND because the box is not perfectly symmetrical, the lid only fits on in one orientation.

Next up was the little “handle” which is on top of the lid. I used a 1” disk which, because it is polished to a high shine, can’t be gripped such that you can pull the lid off the box.

But the brass box was done and for Sunday it was time for a silver version.

On Sunday morning, I started the silver box with a few executive changes:
  • I decided to take a small amount of the bottom wall and add it to the lid;
  • I would to use my rolling mill to add a texture to the walls and the lid;
  • A tongue shaped agate cabochon would be used for the lid accent/handle.

It was all going very well – walls soldered, base soldered, lid wall cut off, lid and lid wall soldered and then I fit the bezels into the wall that was attached to the lid and I went to solder them in – and this is where it went horribly wrong.
One of the bezels split; it must not have been fitted properly and when I applied heat, it gave way.
Then one of my solder clips got soldered to the wall which I was able to eventually remove but it left a solder blob on the texture.

While waiting for the various pieces to get clean in the pickle, I made a bezel to set the agate in the lid. Despite the problems that occurred with the bezel for the slip fit, I was still going to mount the stone to finish the project. This bezel soldered on perfectly and that is when I realized the bezel was a little too big (another learning experience!) , I mixed some epoxy to help set the stone and then pushed in the bezel to complete the box.

Yes, there are pictures of these issues, below. I am more mad at myself than embarrassed; remember making these boxes is for learning and I certainly am.

Observations and What’s next:
I will not use the tapered mandrel to form the walls, the taper makes the top opening slightly smaller than the bottom. I have stepped mandrels that I will use for the next one and I am also hoping that this makes the box more symmetrical and the lid can be put on easier.

I did not like the lid just sitting on top of the base, so I added a small amount of wall, to the lid which just looks a bit better as I did on the silver box.

The accent on the lid will no longer be a “handle” but just a decorative stone or maybe enameled dome. If I do make a handle, it has to be bigger and have some texture so your fingers don’t slip off while trying to grip. Also make a bezel and check it again and again, even again just before soldering so you know it is not too big or too small

I am still struggling with the bezel added to the inside of the wall for the slip fit, as evidenced by the mess I made in the silver box lid plus last week I did struggle a bit with the bezels on the oval/round boxes. I need more practice with technique/skill so this coming weekend, I will a few lids, only, and practice cutting, fitting and soldering bezels.

The Box Project #1

10/31/2019

0 Comments

 
Picture
As an adventurous silversmith, making boxes should be a part of my skill set; but was not up until this past weekend.

Two weeks ago, I set about planning how I would accomplish that skill set via planned projects and every increasing difficulty.

Here is the progression of projects done in bras as brass is the closest to sterling silver in how it behaves so I can work out the process before committing to sterling.
  • Small round box with a flush seam and slip lid
  • Large/Tall “round” box with a keyed seam and slip lid. The taller the box, the harder it is to heat resulting in the flush seam possibly shifting where as a keyed seam locks it in place.
  • Square/Rectangular box with mitered corners and slip lid
  • Square/Rectangular box (mitered corners again) with a hinge and a small clasp which has yet to be determined if I can make – I have a book on various clasps
  • A round box with a hinge and small clasp

I will eventually do some chasing and repousse on the boxes, not these but others made for a C&R project but first, one must learn to make boxes. To that end, pulled out my silversmithing books and read up on box making. I also sent a list of questions I came up with after my reading, to my mentor Liza, the Silversmith.

Saturday morning, I went into the studio, pulled out some brass and got to work. I was in the studio about 8 hours though not all of it was making the box. First I had to design the box and figure out what I could make with the brass I had and cut it. Then as the box construction progressed - soldering, sawing, filing/sanding, and polishing, there was quite a bit of down time as I waited for the metal to have the oxides to be removed in the pickle, then washing and scrubbing; calculating the size and making of the bezel to fit the lid. I normally track my time but for this I did not since I knew that with all that thinking, the manufacturing time would not be valid. At 5 pm I was done and I was quite proud of what I had made and accomplished let alone not screwing it up! I was also so focused on making the box, I did not take any process pictures but here is the box finished. It is about 1.7” in diameter and just over 1” tall, with a slightly domed top.

With my first box under my belt, I decided to make another “round” box, on Sunday, using sterling. My brass box was made with 20 g but the silver box would be from 18 g and I would have to coat all the silver pieces, with borax when I did any heating or soldering to prevent fire stain. When I first went into the studio at 9 am, the first thing I did was turn on the hot plate with my enamel pot filled borax water to re-dissolve the super saturated solution as the borax which had precipitated, as crystals and fallen out of the solution over the past few weeks as it had cooled. I found a good piece of silver and made my measurements and cut the pieces for the walls, top and bottom plate, and the bezel. I stamped my makers mark on the top and bottom plates marking that for the bottom, the mark was on the outside but for the lid, the mark was on the inside; and I marked the material as “sterling”.

First up was borax-ing and then annealing the piece that would be the walls, pickling and cleaning. I filed the edges where the side seam would be, formed a tube and used binding wire to hold it tight, against heat expansion; I then coated it in borax, soldered the seam, and put it back in the pickle. I formed the shape of my tube, into an ovoid so there was only one way to put the lid on. Next up was soldering the base plate with more borax coating of course. I then cut what would be the wall for the top, from the part that was the bottom of the box followed by borax coating the top plate and soldering it to the wall for the top. Then everything was cleaned, again.

Now that both parts of the box were soldered to their respected plates and separated it was time to file and sand the mating edges to get them flat as and smooth as well as filing and sanding the plates flush with the walls – that took some time. After that was completed, I created and soldered the bezel into the top of the lid, again applying the borax coat and cleaning afterwards in pickle and finishing with warm soapy water.

The box construction was done, time to polish it all up BUT I had a problem, there was a lot of fire stain all over the box. This was rather annoying considering the care I took to coat my surfaces with borax and it then required me to do a “polish” with an aggressive compound to polish it out which removes the silver on top of the oxides and the oxide layer to get to un-oxidized silver below it. I probably spent almost an hour polishing, cleaning and verifying each surface until I had it all removed; then I could finally do a 3 step polish and be really really done.

Overall I was in the studio over 8 hours on Sunday, I remember to take some pictures and record the actual working time which was about 5 hours but I know that with every box I make, the time it takes will go down as I now know the basic process.
0 Comments

    RSS Feed

    How to Aquire Your Own Shop Elf

    Archives

    October 2020
    August 2020
    March 2020
    December 2019
    November 2019
    October 2019
    September 2019
    August 2019
    July 2019
    June 2019
    May 2019
    March 2019
    February 2019
    January 2019
    December 2018
    November 2018
    October 2018
    September 2018
    August 2018
    July 2018
    May 2018
    April 2018
    February 2018
    January 2018
    November 2017
    October 2017
    September 2017
    July 2017
    June 2017
    May 2017
    April 2017
    March 2017
    February 2017
    January 2017
    December 2016
    November 2016
    October 2016
    September 2016
    August 2016
    July 2016
    June 2016
    May 2016
    April 2016
    March 2016
    February 2016
    January 2016
    December 2015
    November 2015
    October 2015
    September 2015
    August 2015
    July 2015
    June 2015
    May 2015
    April 2015
    March 2015
    February 2015
    January 2015
    December 2014
    November 2014
    October 2014
    September 2014
    August 2014
    July 2014
    June 2014
    May 2014
    April 2014
    March 2014
    February 2014
    January 2014
    December 2013
    November 2013
    October 2013
    September 2013
    August 2013
    July 2013
    June 2013
    May 2013
    April 2013
    March 2013
    February 2013
    January 2013
    December 2012
    November 2012
    October 2012
    September 2012
    August 2012
    July 2012
    June 2012
    May 2012
    April 2012
    March 2012
    February 2012
    January 2012
    November 2011
    August 2011
    July 2011
    June 2011
    May 2011
    April 2011
    March 2011
    February 2011
    January 2011
    December 2010
    November 2010

    Jan - Nov 2010 History
    File Size: 2272 kb
    File Type: pdf
    Download File

    Jan - Dec 2009 History
    File Size: 2332 kb
    File Type: pdf
    Download File

    Categories

    All
    42
    A Year Of Repousse
    Blacksmithing
    Blogoversary
    Box Project
    Business
    Chasing & Repousse
    Commission
    Education
    Embroidery
    Enamel
    Entries
    Entry
    Exhibition
    Facebook
    Filing
    Fold Forming
    Gold
    Holloware
    Hot Forging
    Hydraulic Press
    Jewelry
    Keum-boo
    Learning
    Leather
    Market
    Metal
    Patina
    Photography
    Polishing
    Publications
    Raising
    Sanding
    Santa Fe Symposium
    Shop Elf
    Sinking
    Social Media
    Soldering
    Store
    Studio Visits
    Superbowl Challenge
    Teaching
    Teapot Project
    Technique
    Temari
    Tin
    Tools
    Vessels
    Visiting Workshops
    Weaving
    Website
    Workshop
    Yubinuki

Powered by Create your own unique website with customizable templates.