Follow Me On:
The Adventurous Silversmith
  • Home
  • Blog
  • Portfolio
    • Metal Work >
      • Chasing & Repousse
      • Holloware
      • Jewelry
      • Other Wonderful Items
    • Fiber Arts >
      • Temari
      • Yubinuki
  • Resources
    • Library
    • Tools & Equipment
    • Links
  • About
    • Artist Statement
    • Curriculum Vitae
    • How it is Made
    • Contact

Patina Workshop

3/14/2020

0 Comments

 
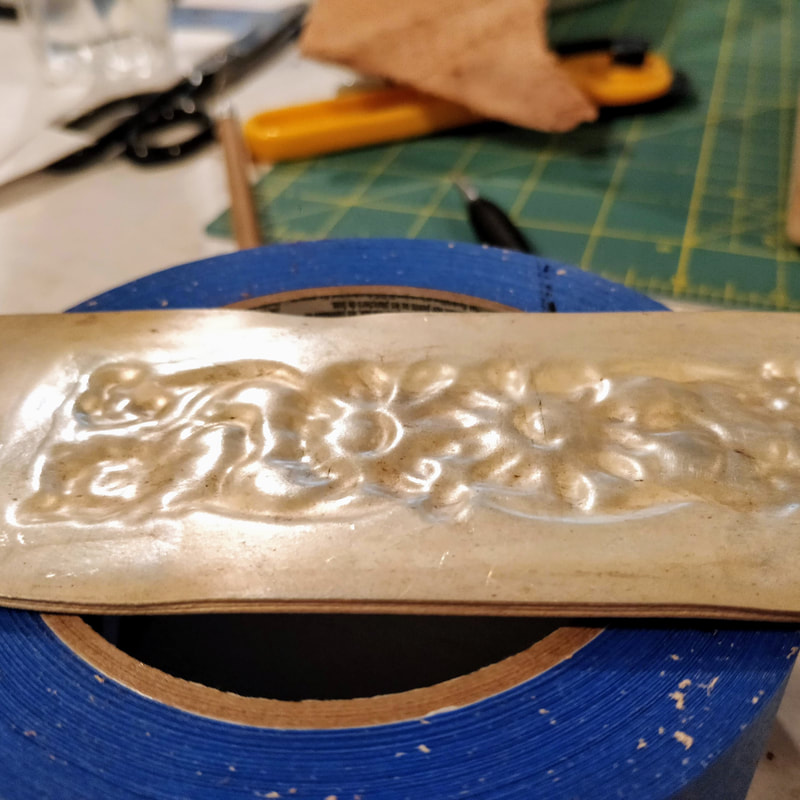
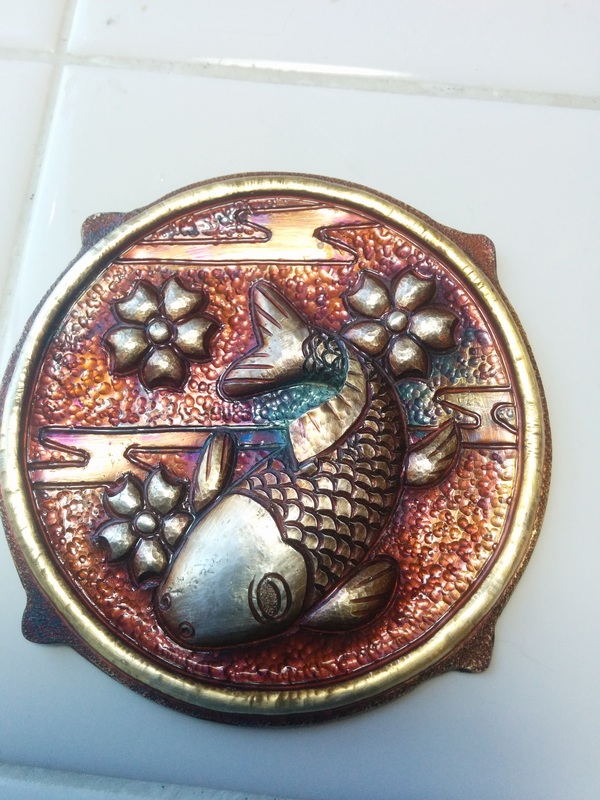
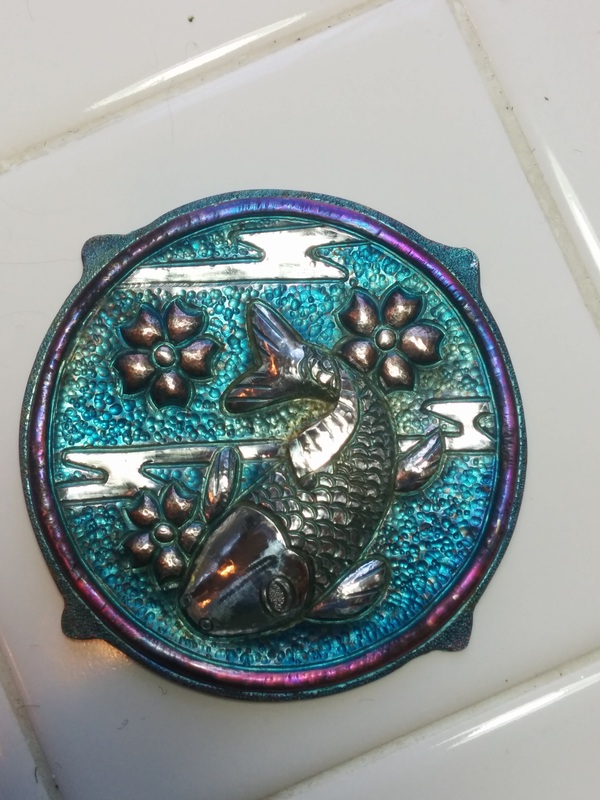
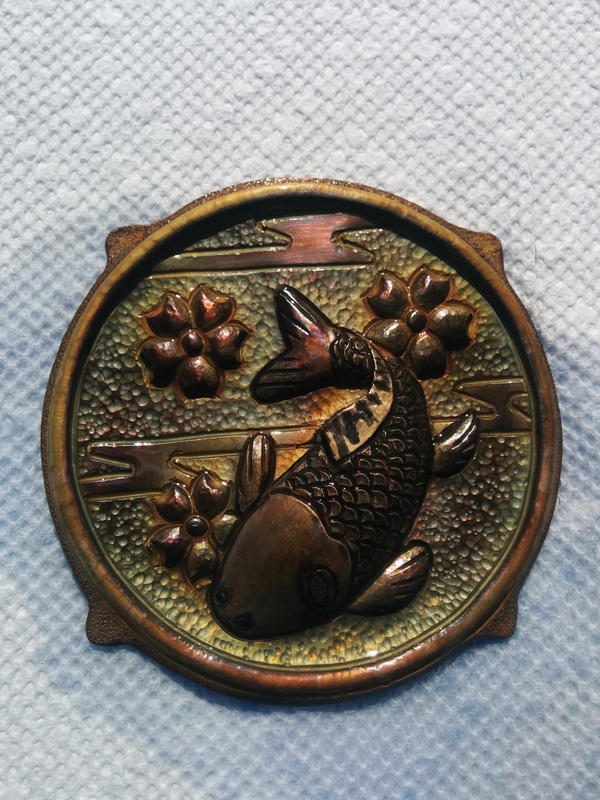
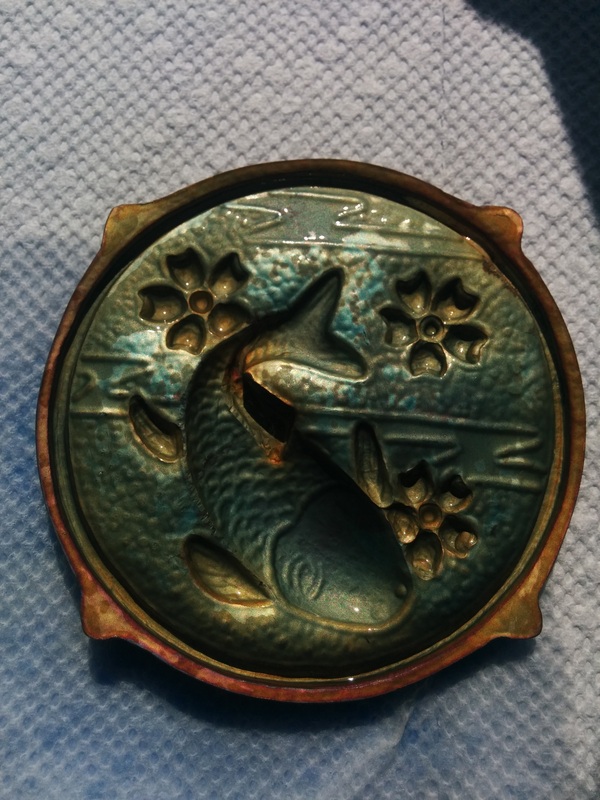
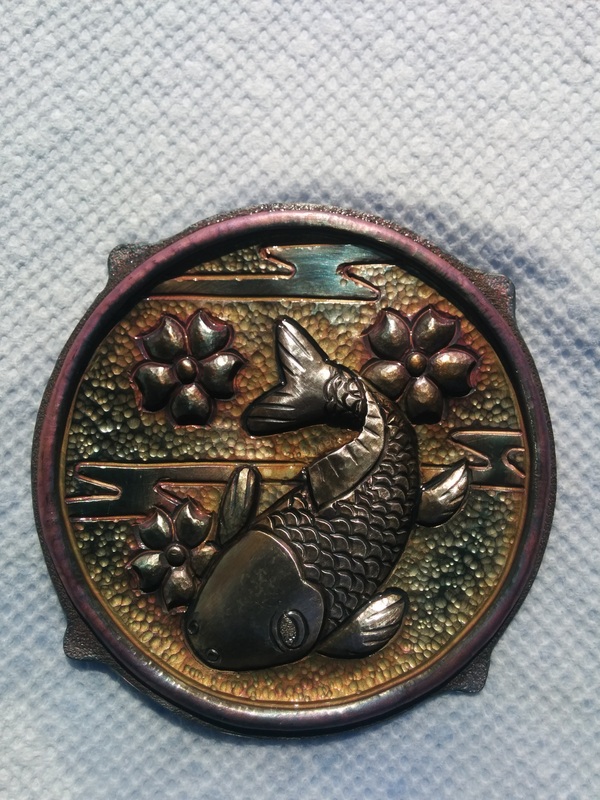
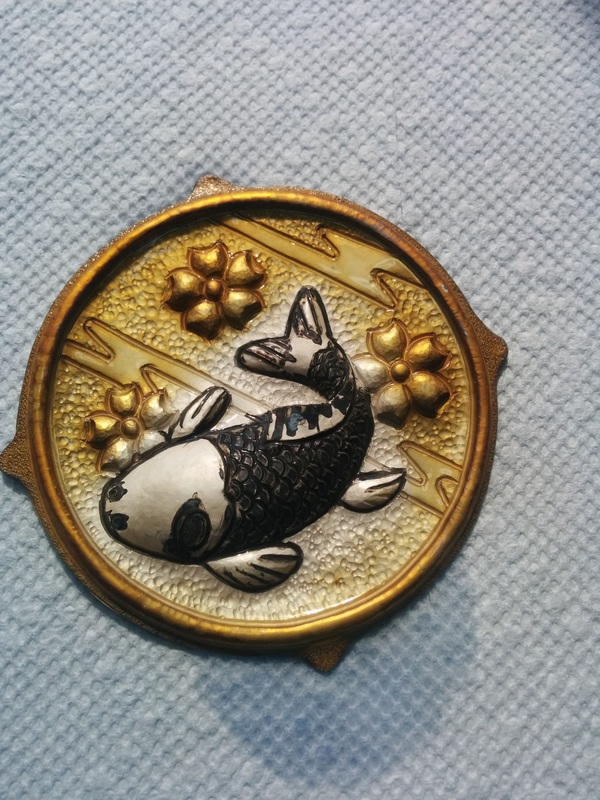
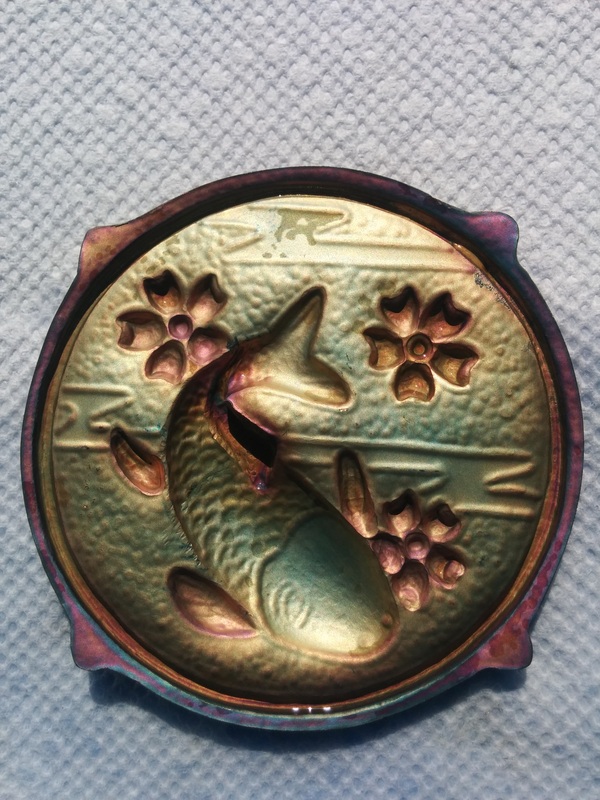
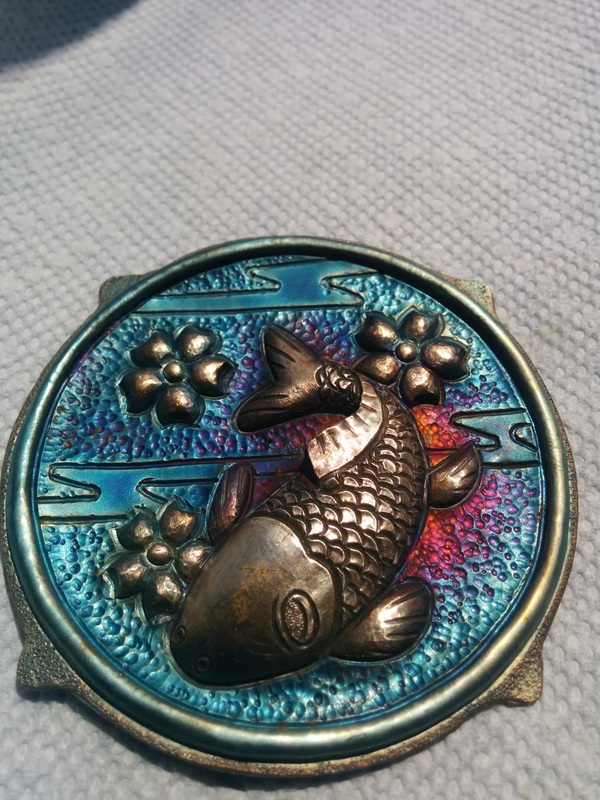
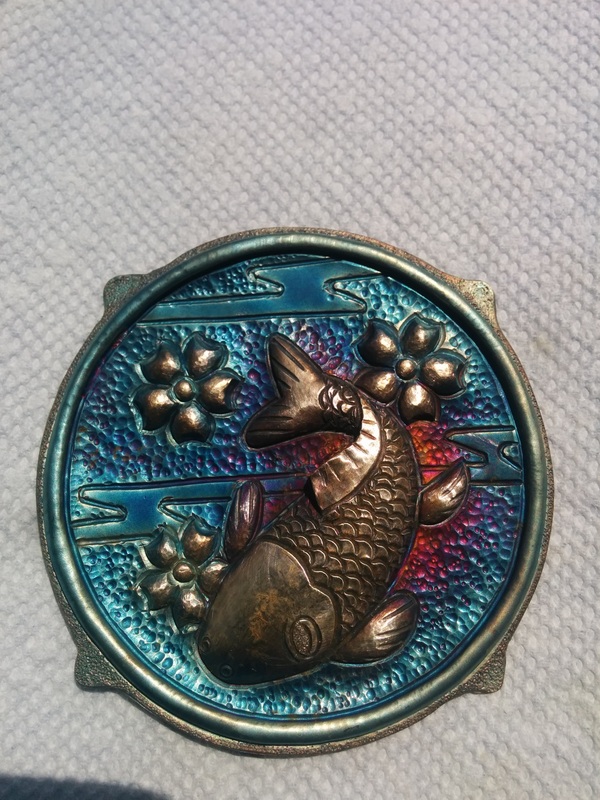
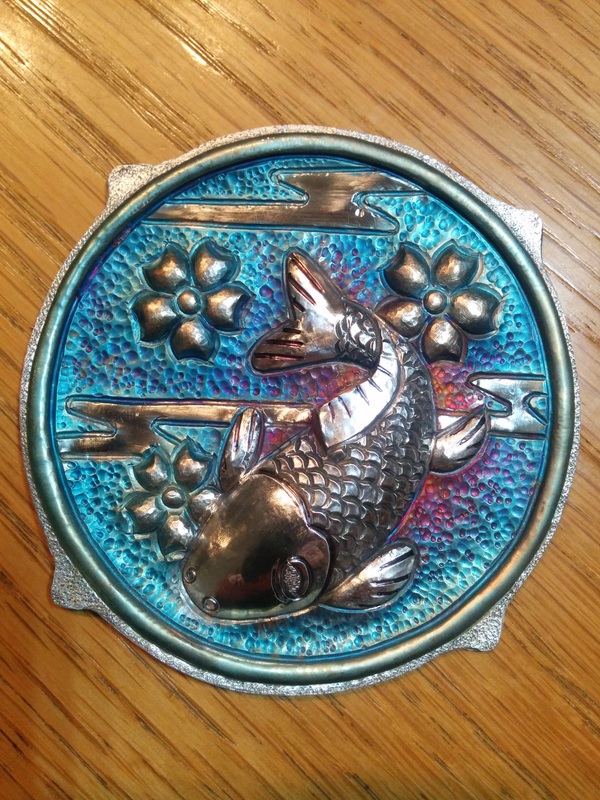
Last weekend I went to Mesa Arizona for a workshop with David Huang that was all about patinas. 
I have always lusted after his patinas (and work) after seeing it up close when I took his chasing class oh so many years ago.   As soon as I saw this posted, I signed up. I was the 9th out of 10 students, and then I had to wait almost 6 months for the workshop.

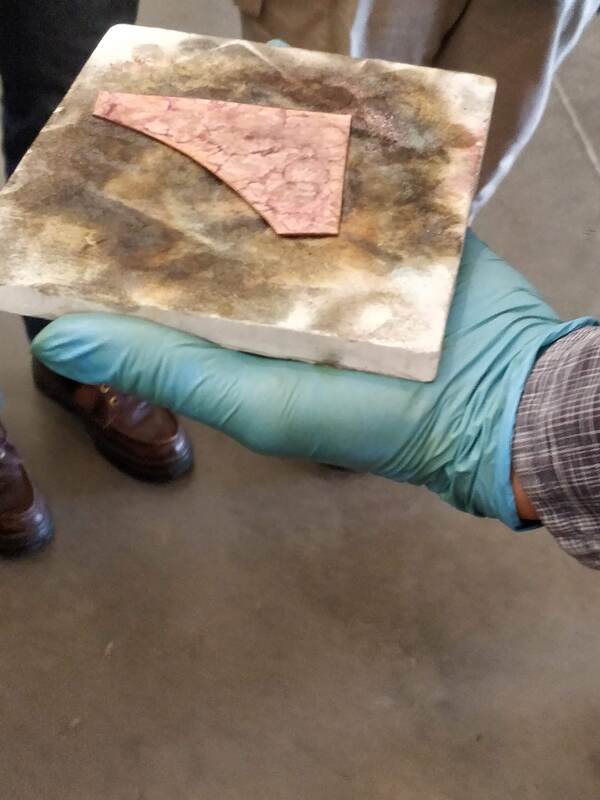
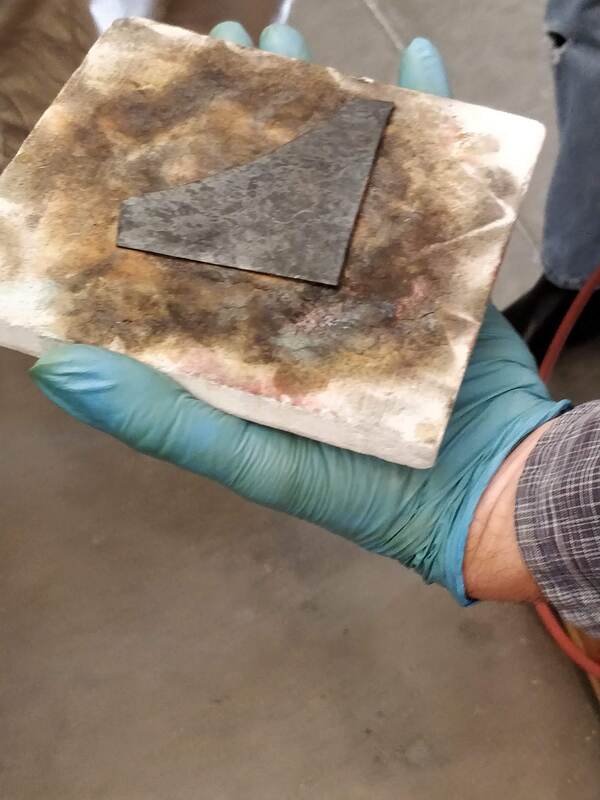
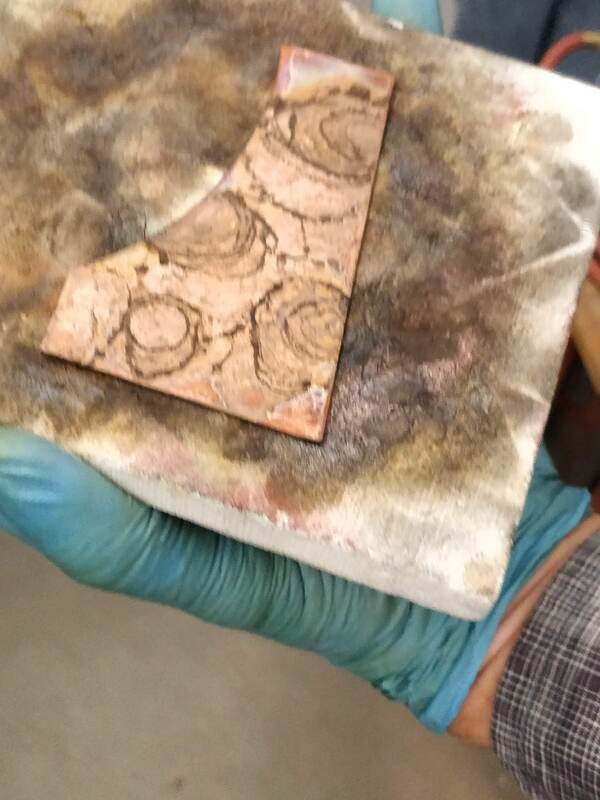
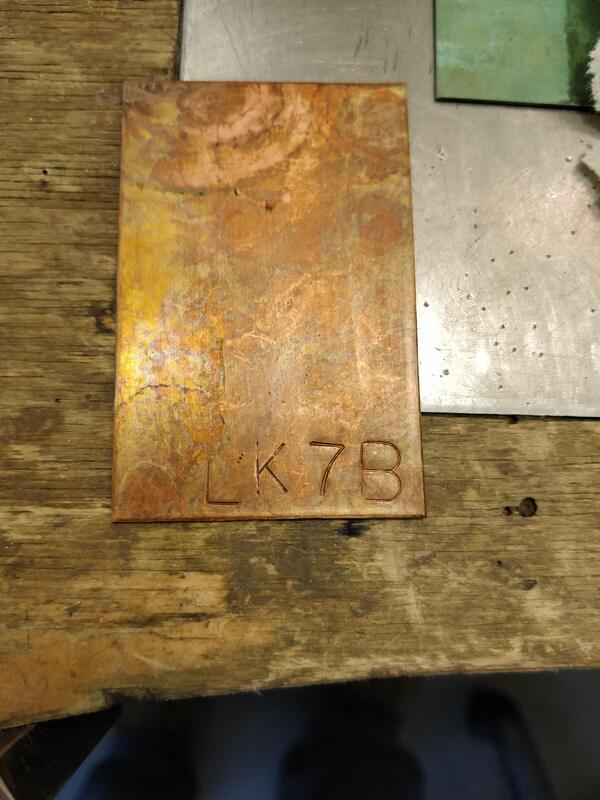
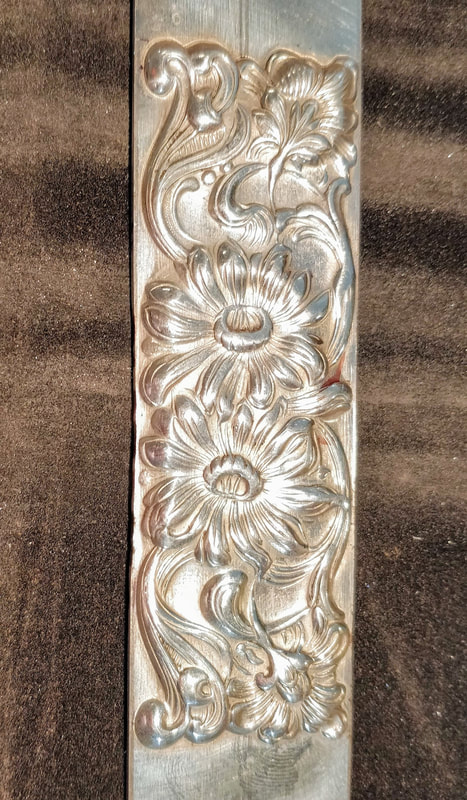
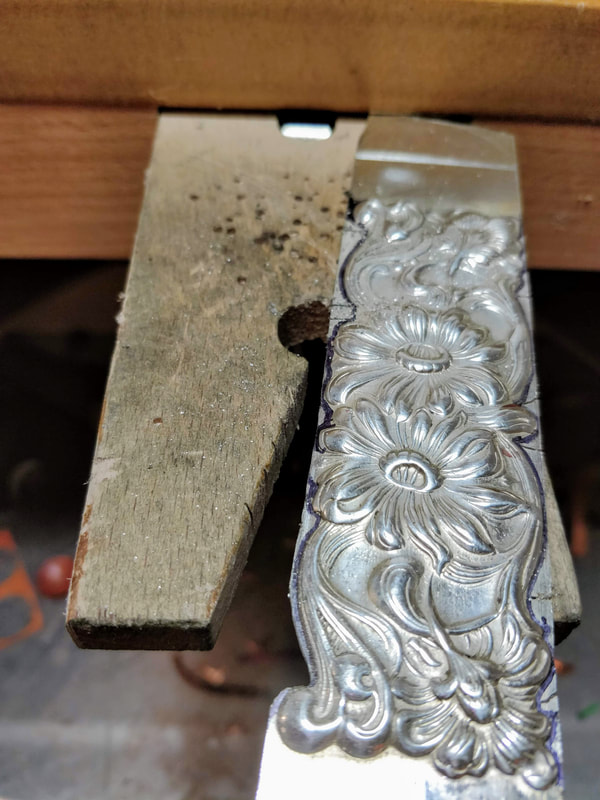
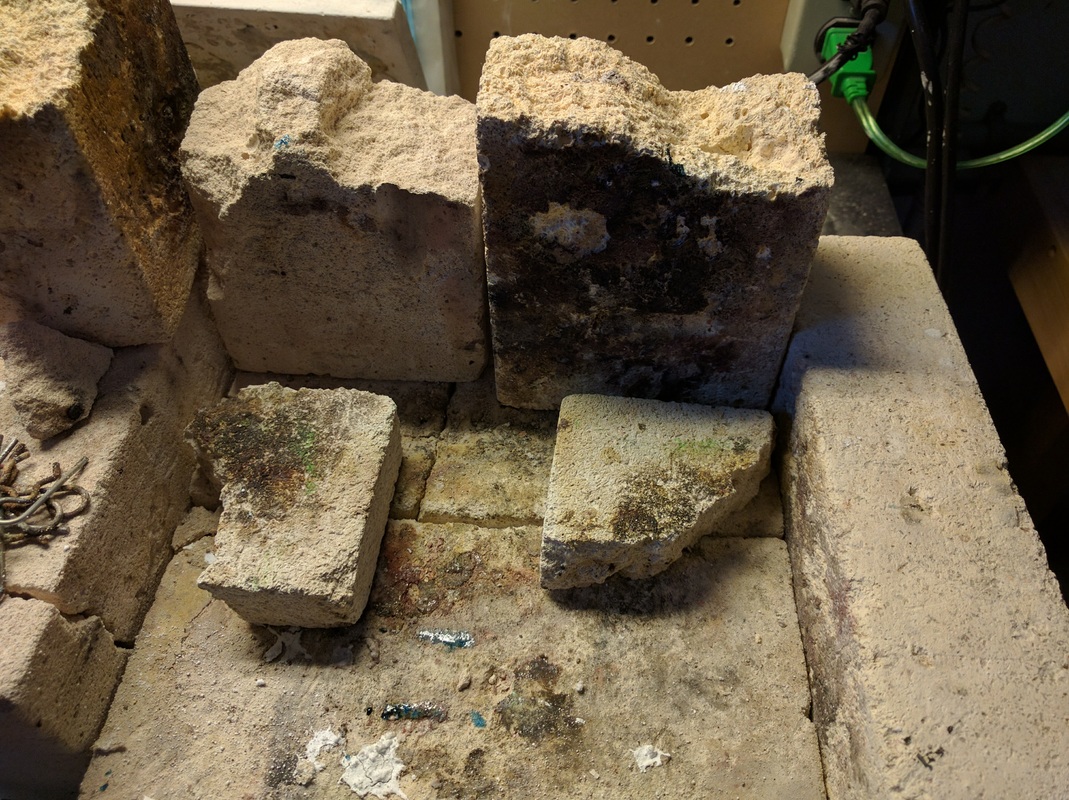
So last Friday I flew to Mesa with my copper tiles, apron, book for notes, safety glasses and expectations. The workshop started on Saturday, for 3 day and I flew home on Tuesday. 

It was a wonderful workshop. David gives great demonstrations and shares an amazing amount of information.
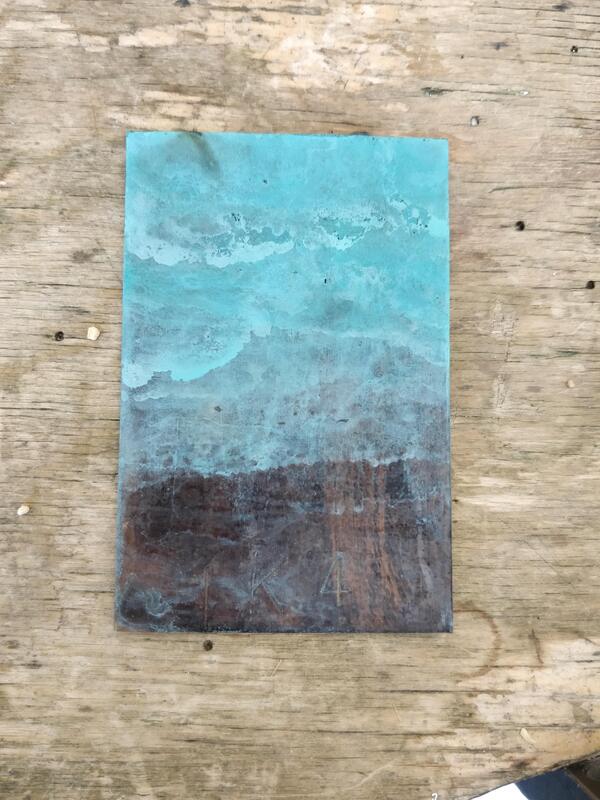
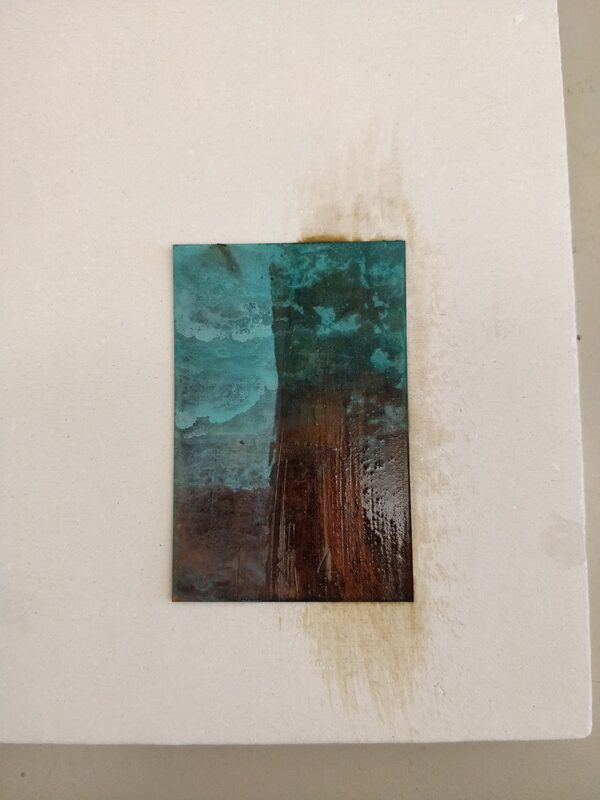
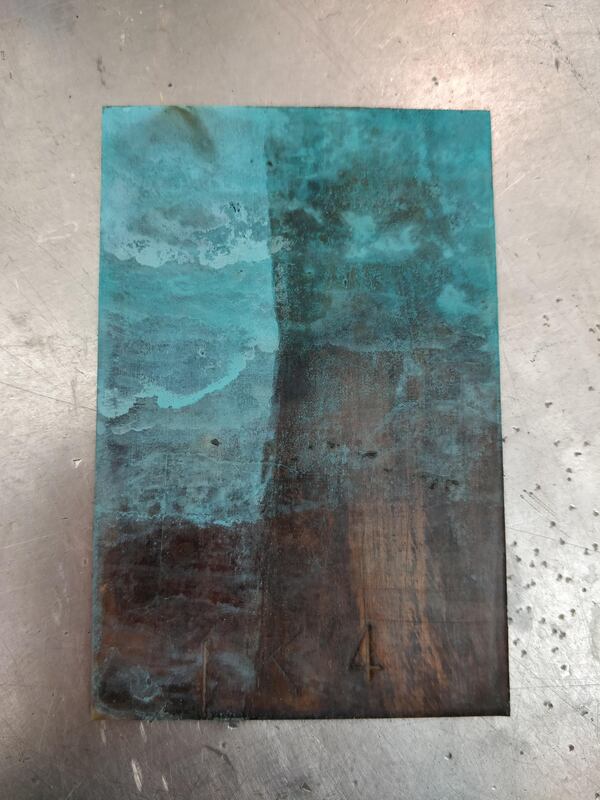
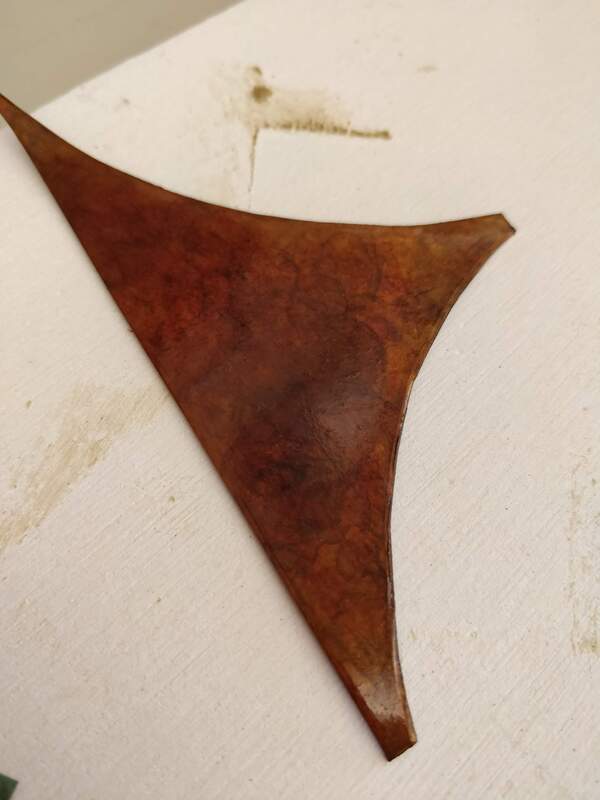
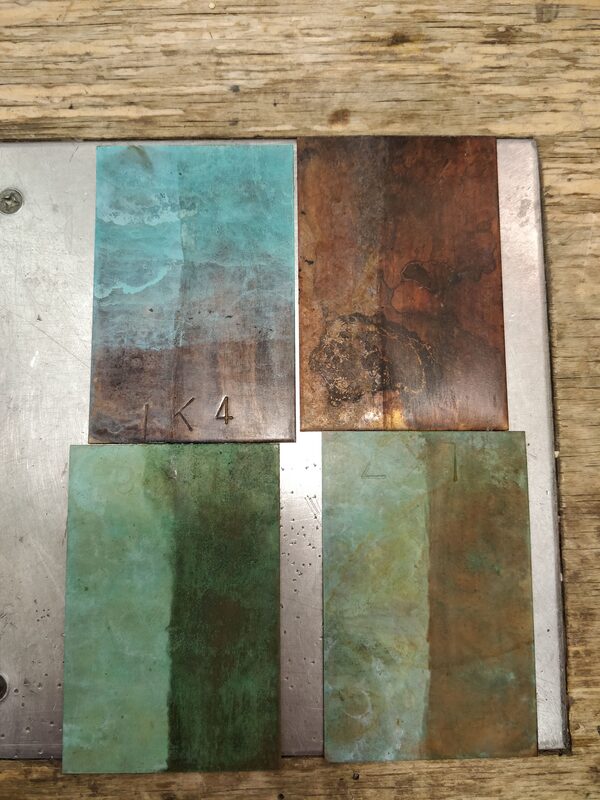
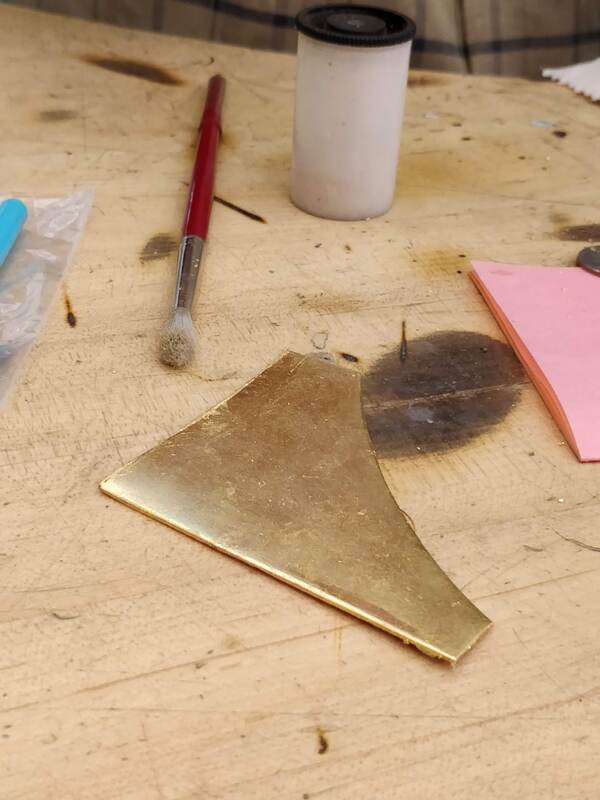
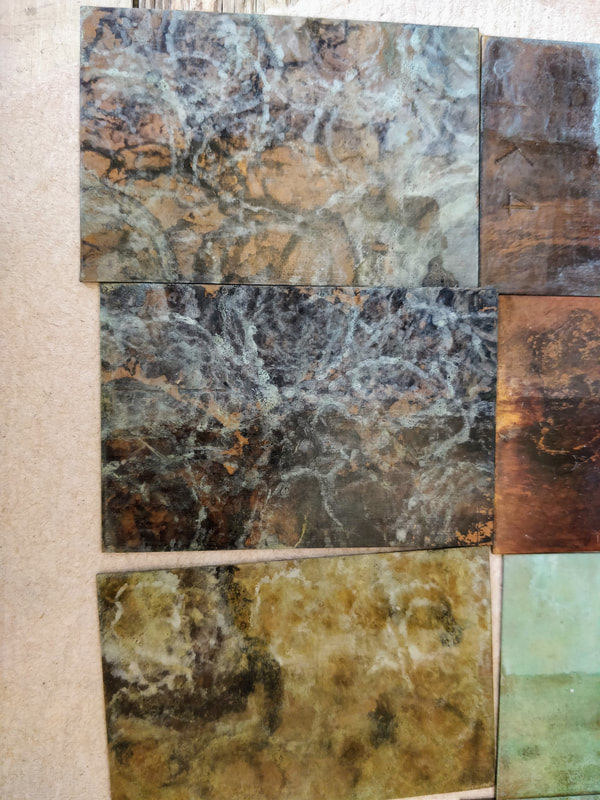
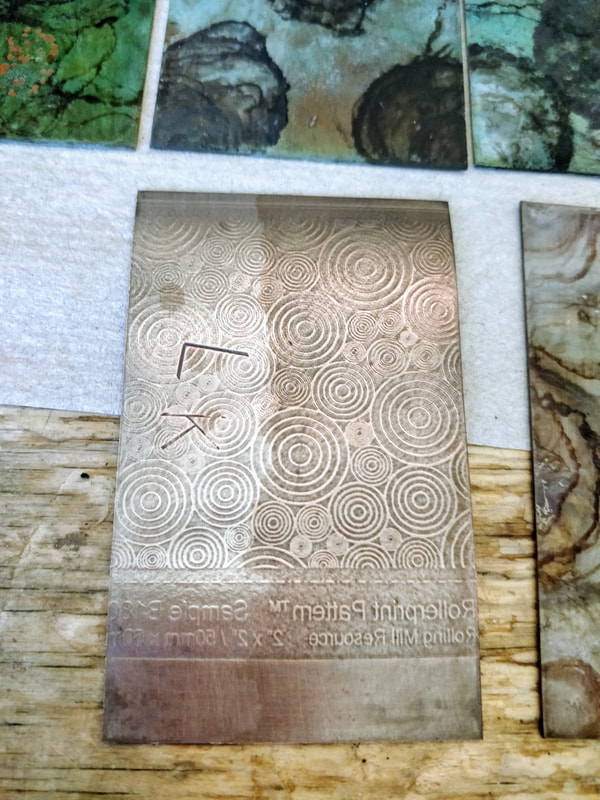
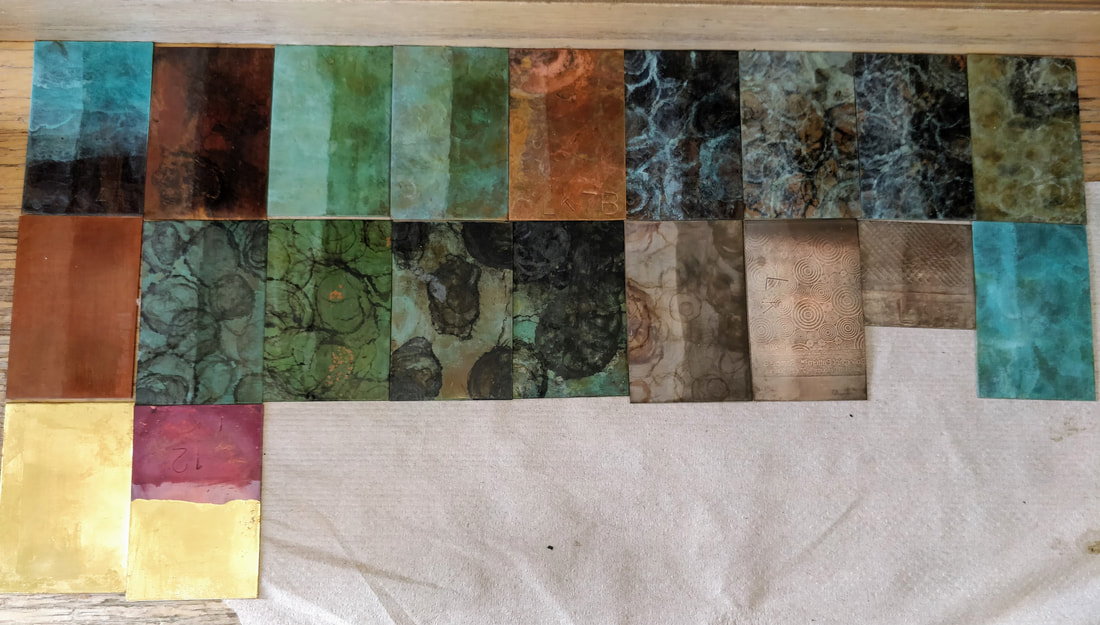
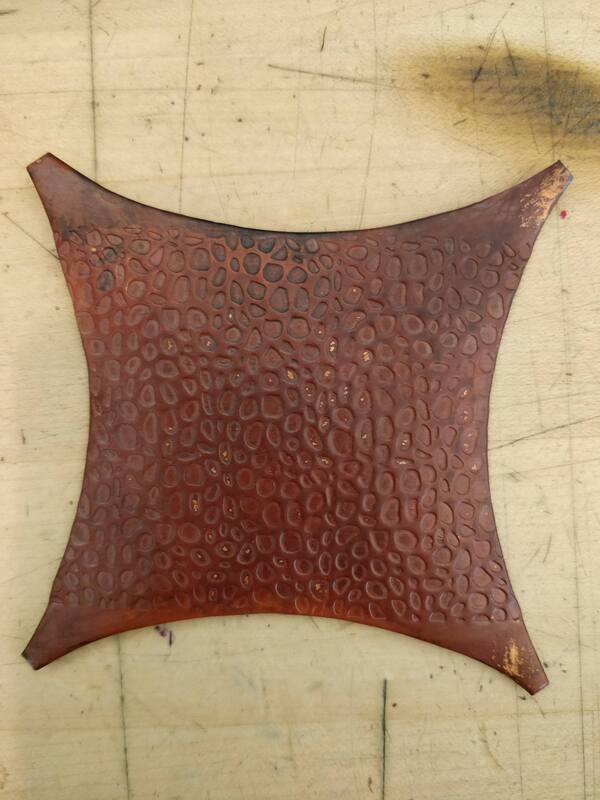
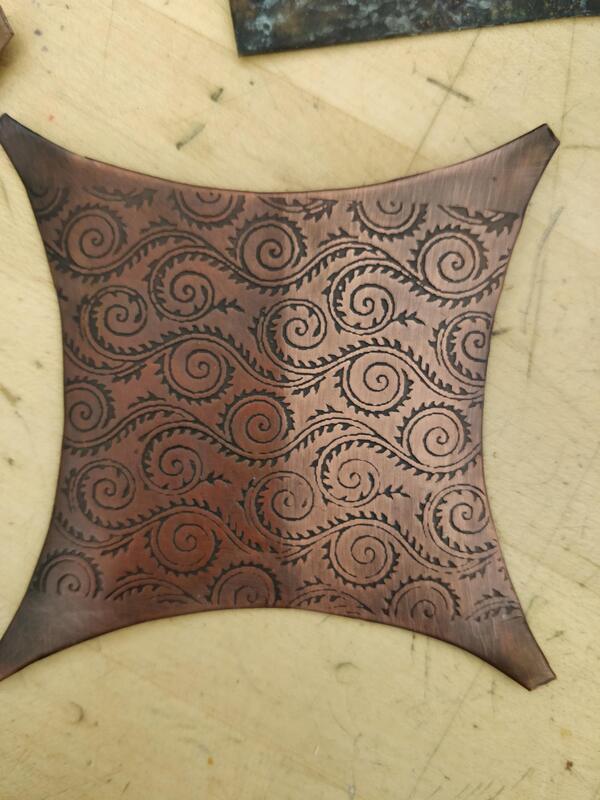
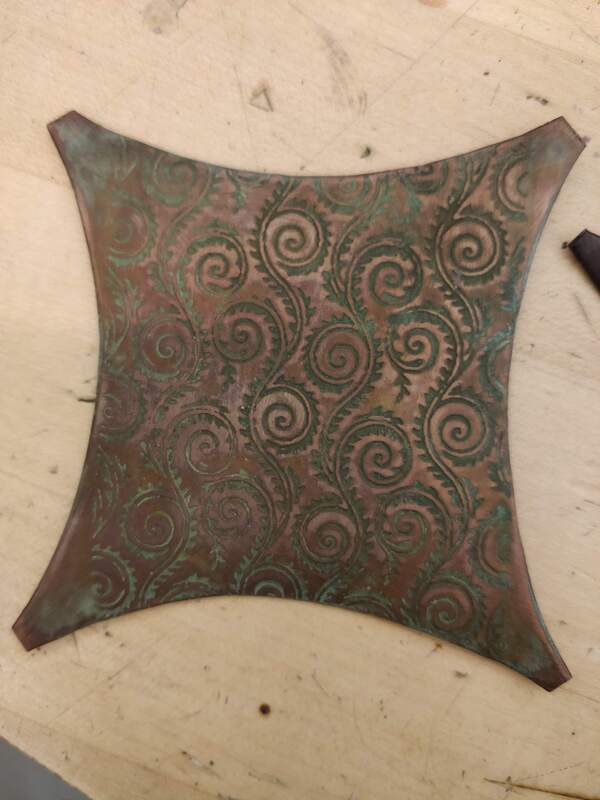
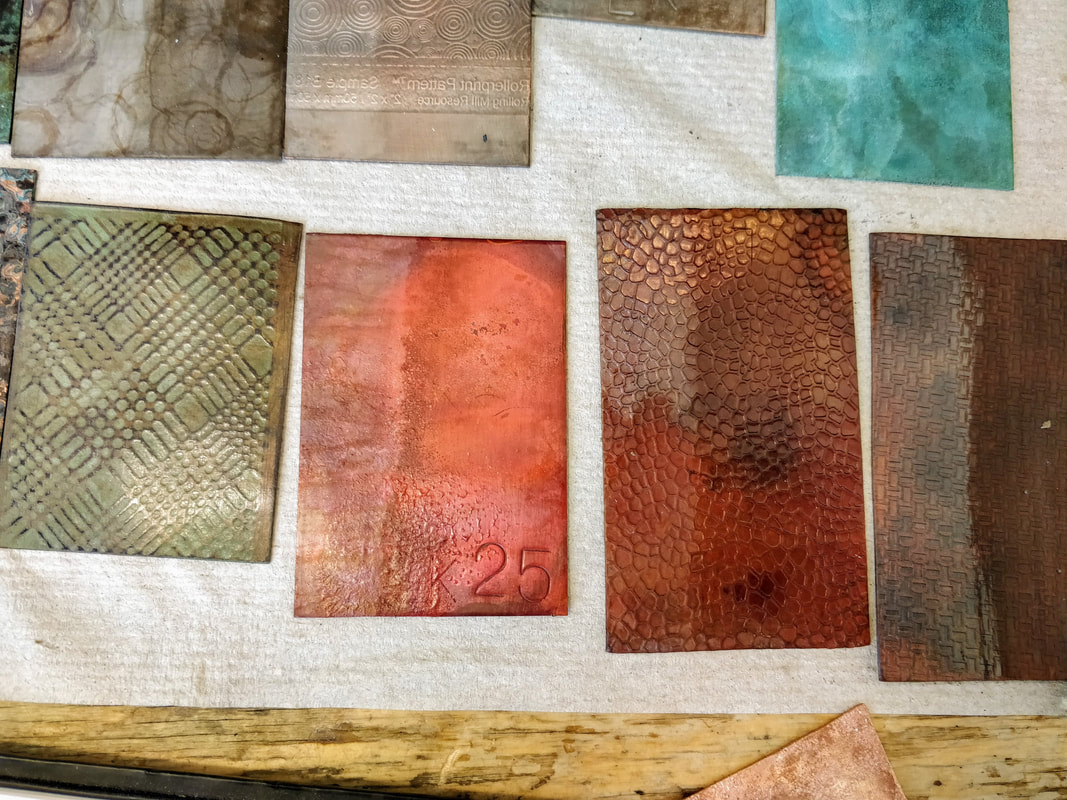
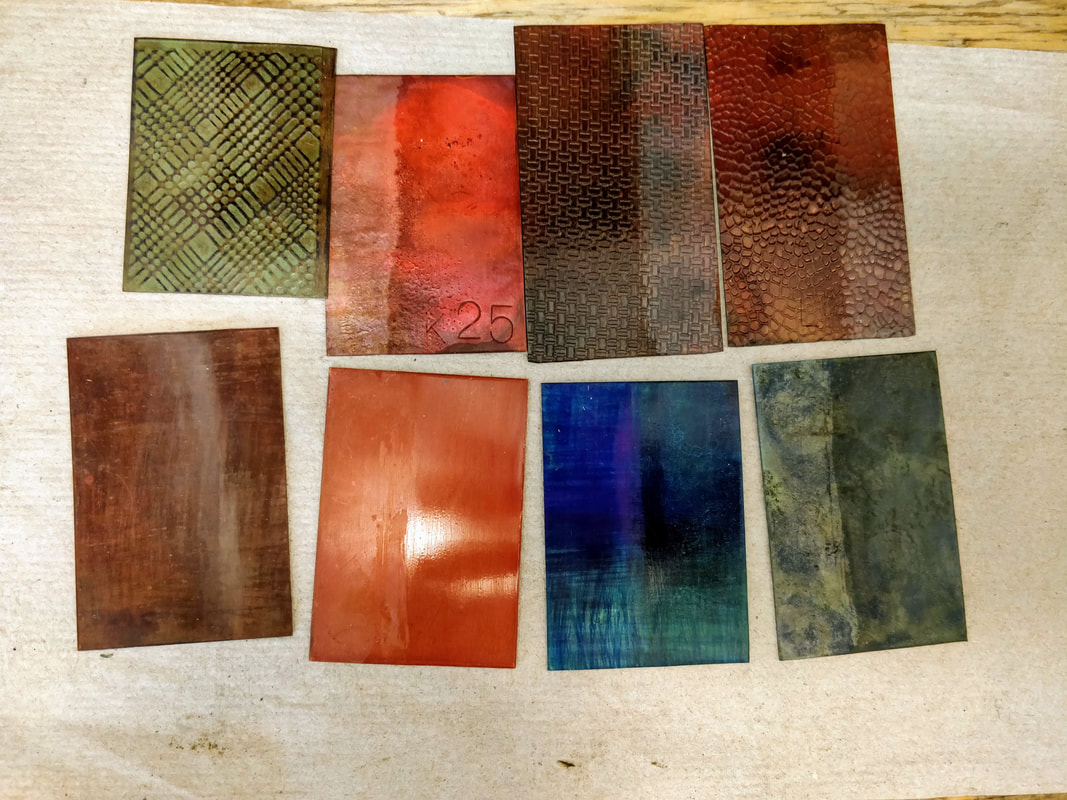
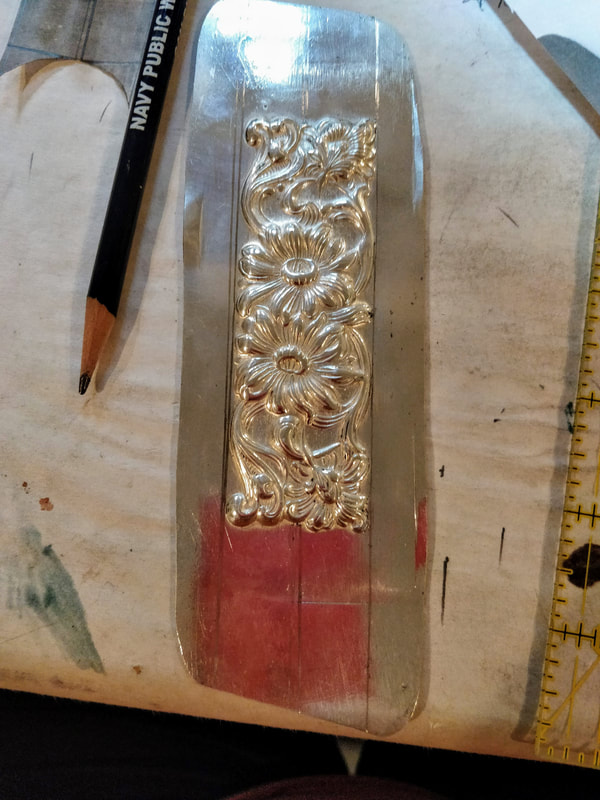
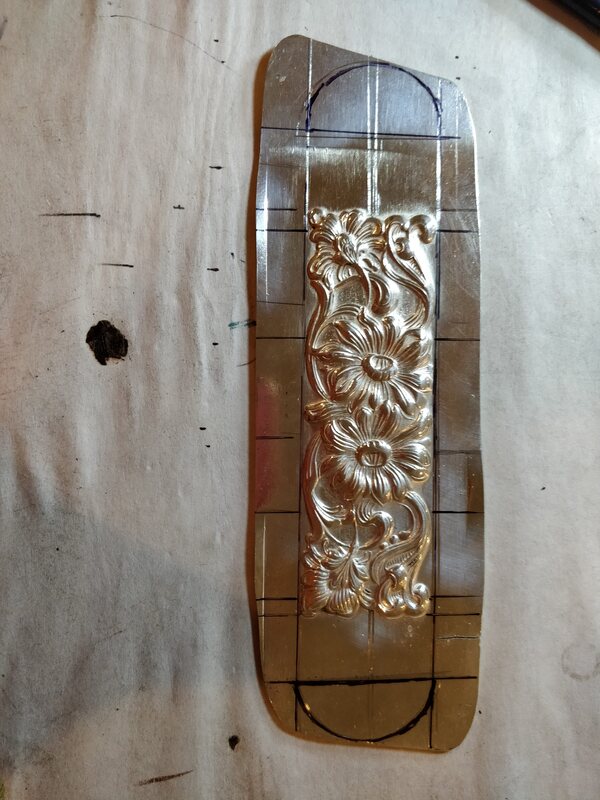
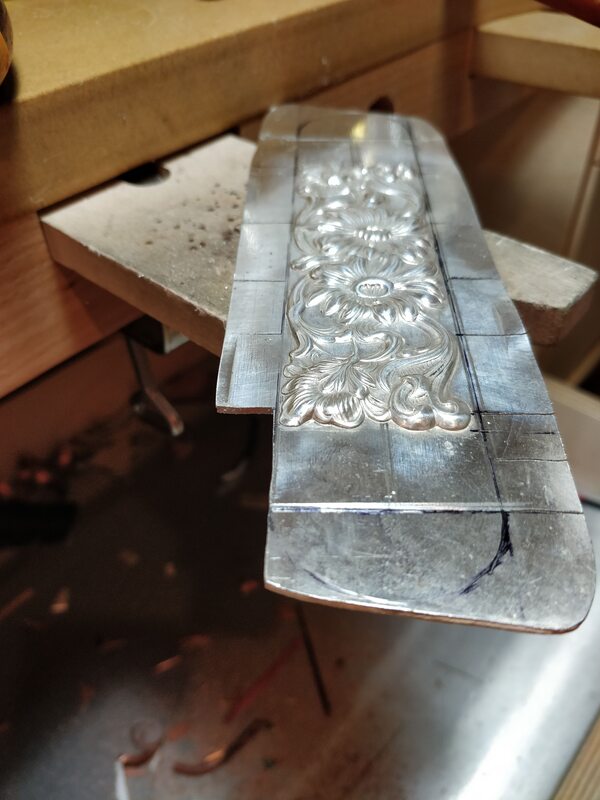
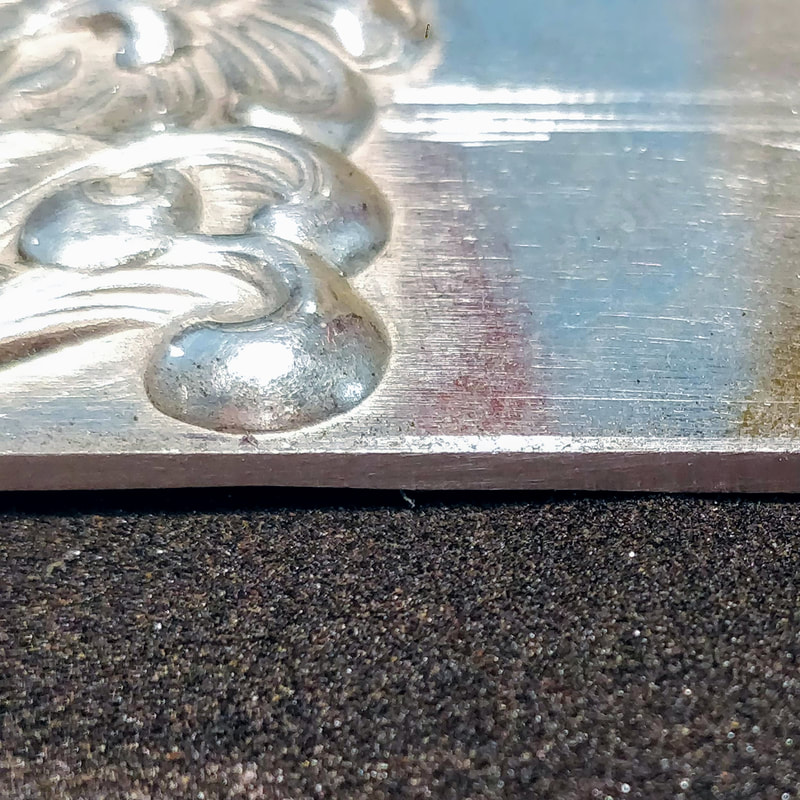
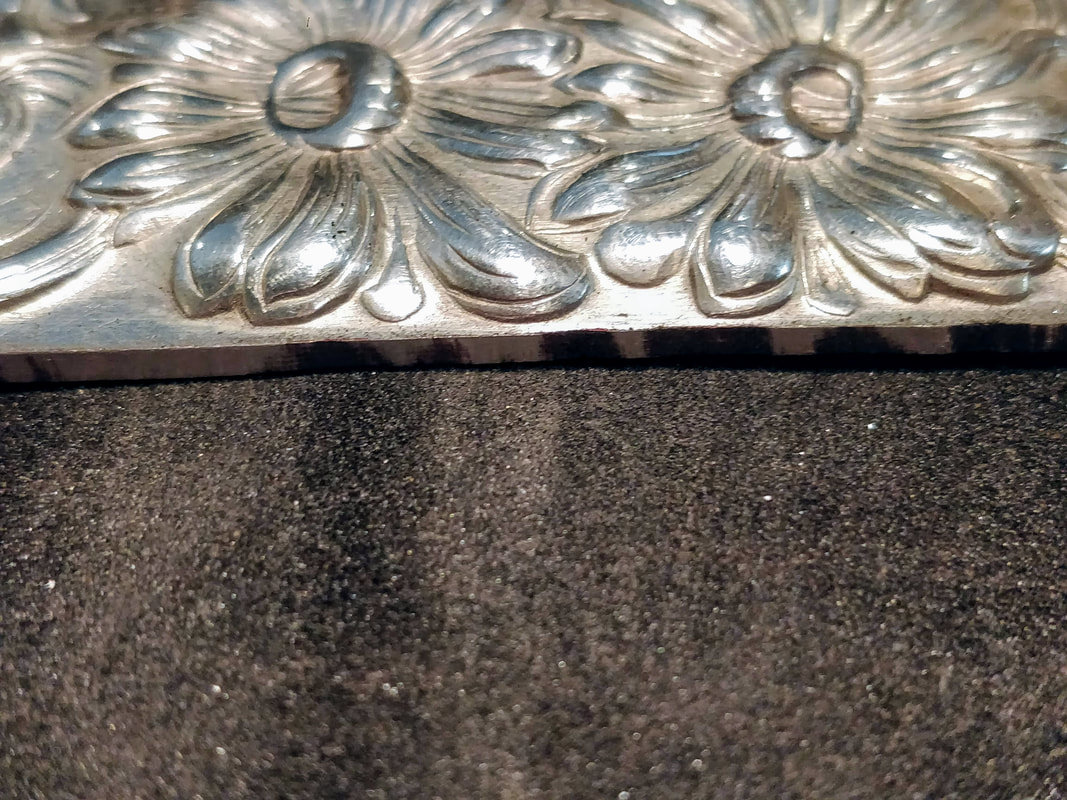
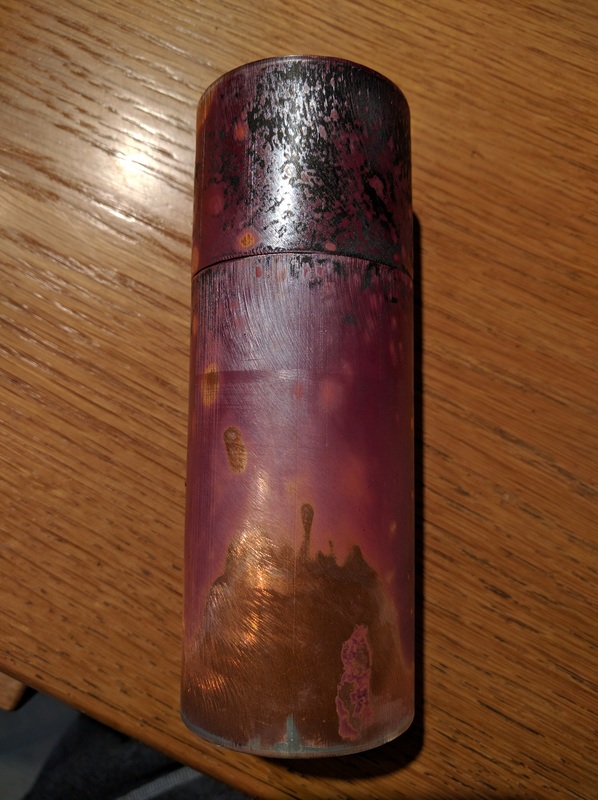
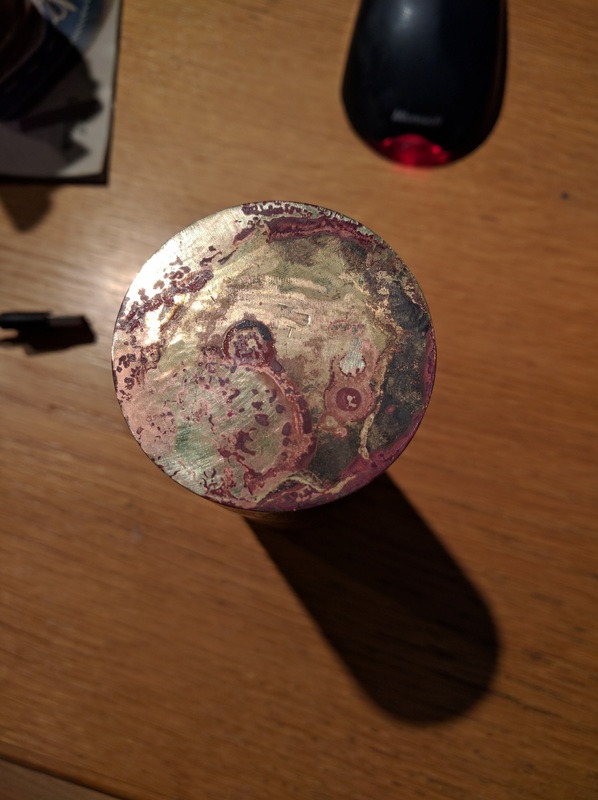
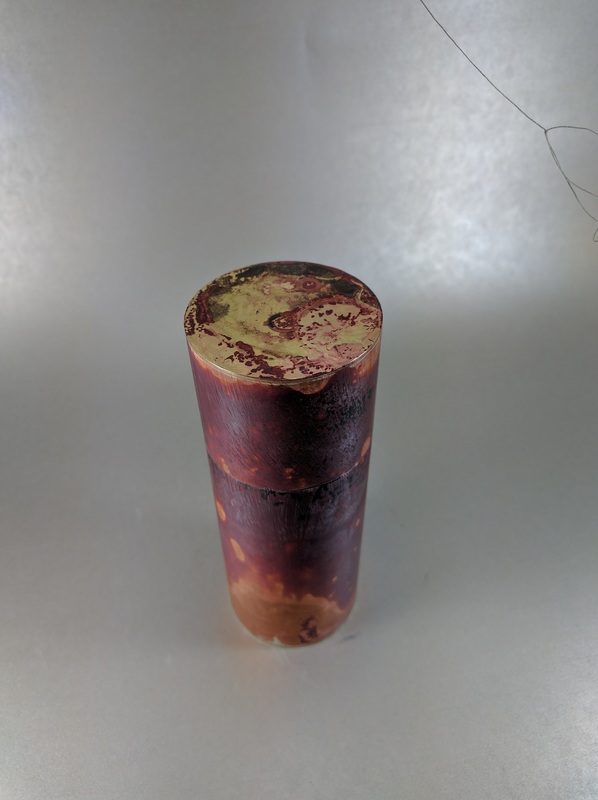
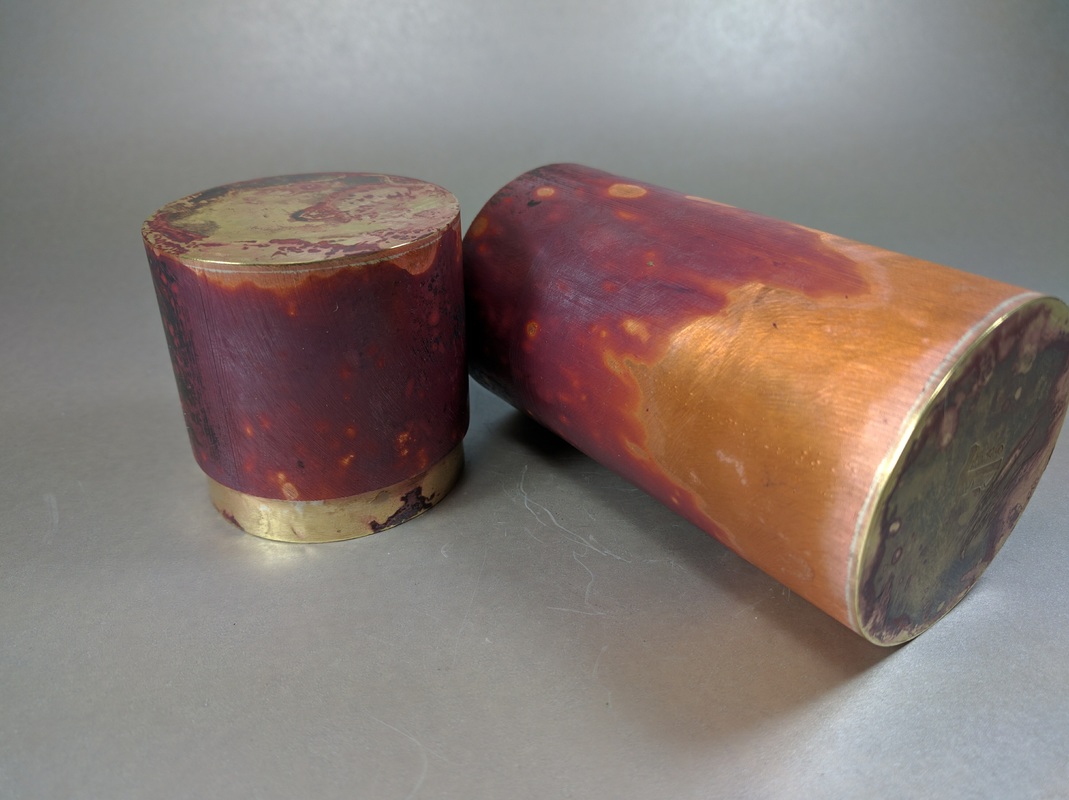
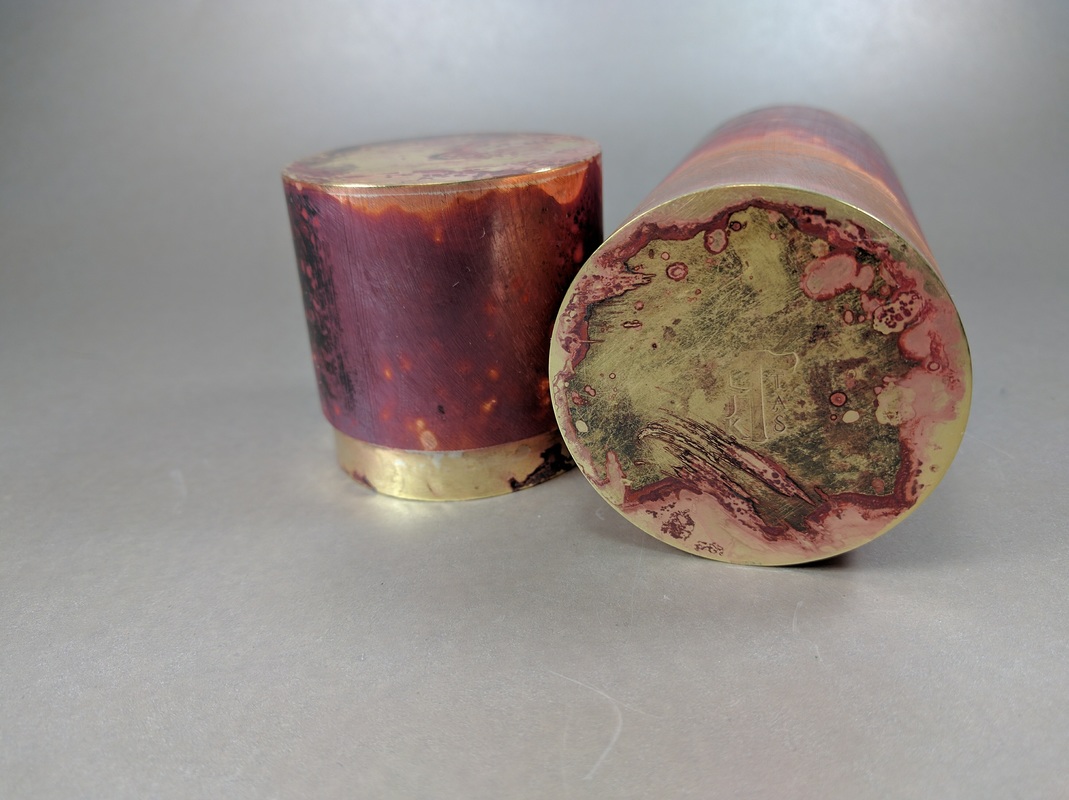
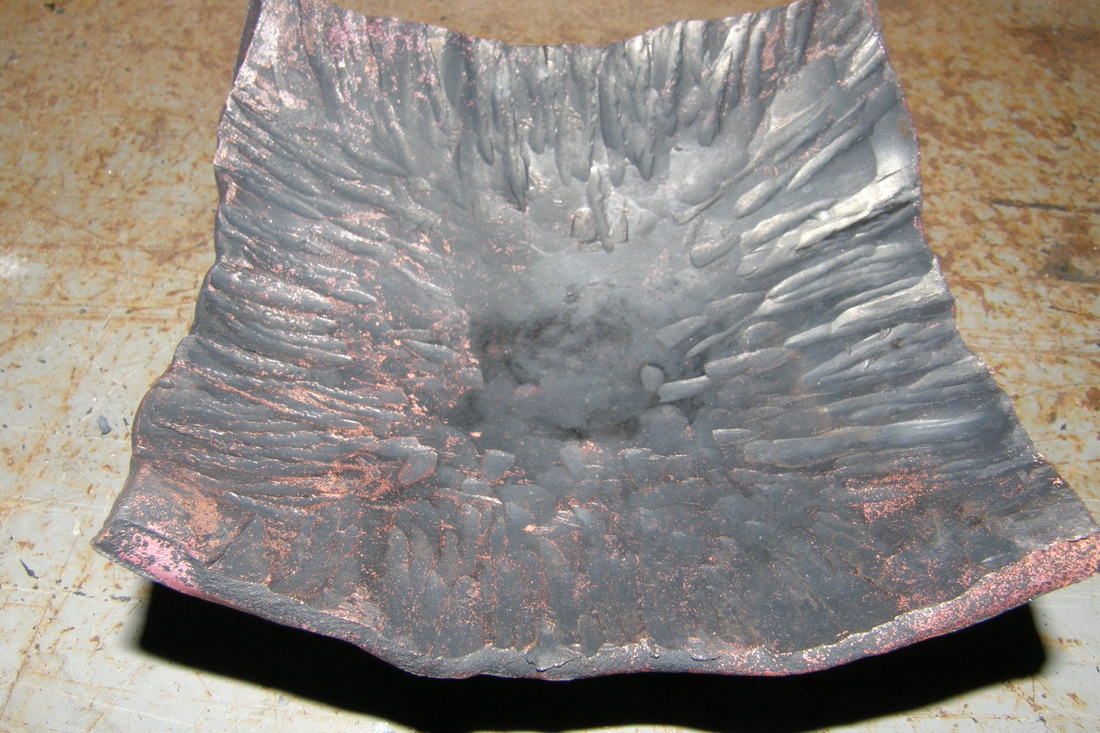
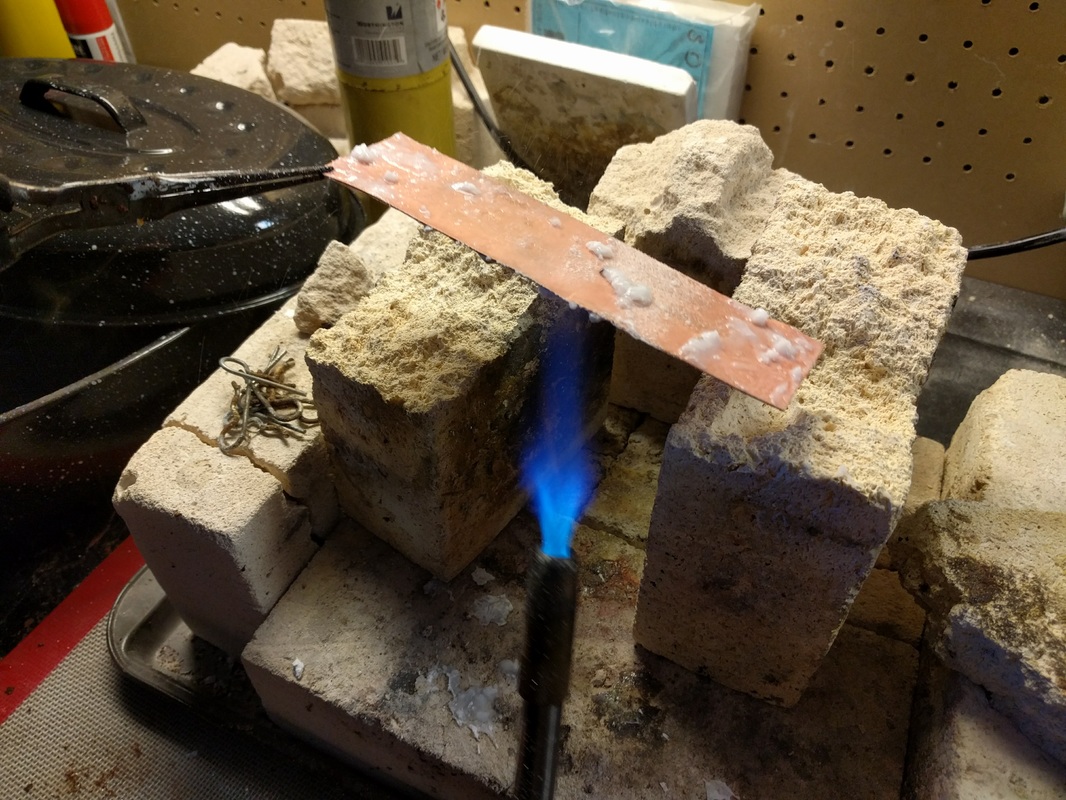
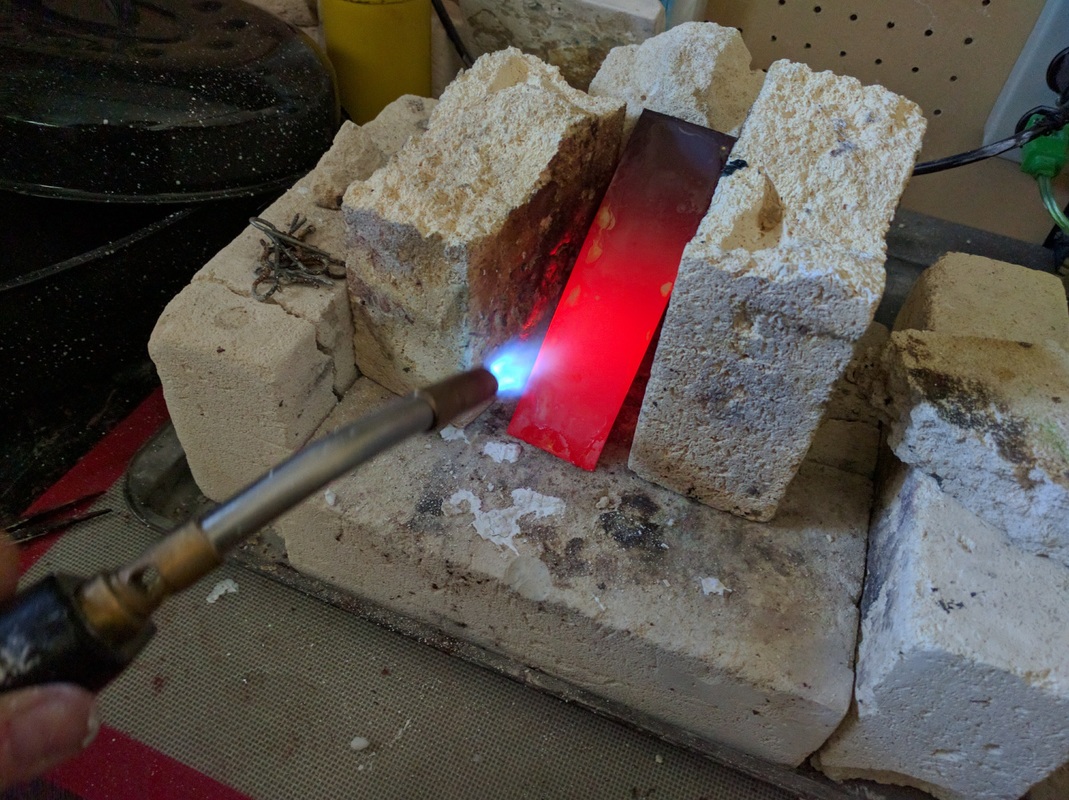
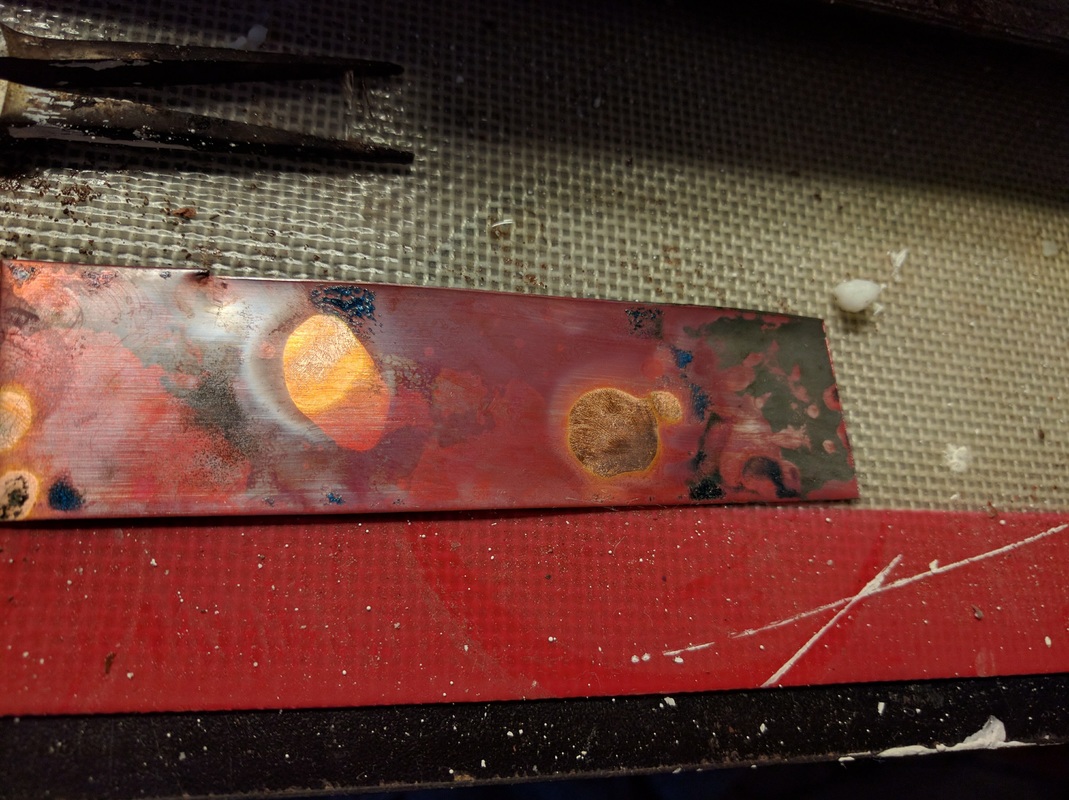
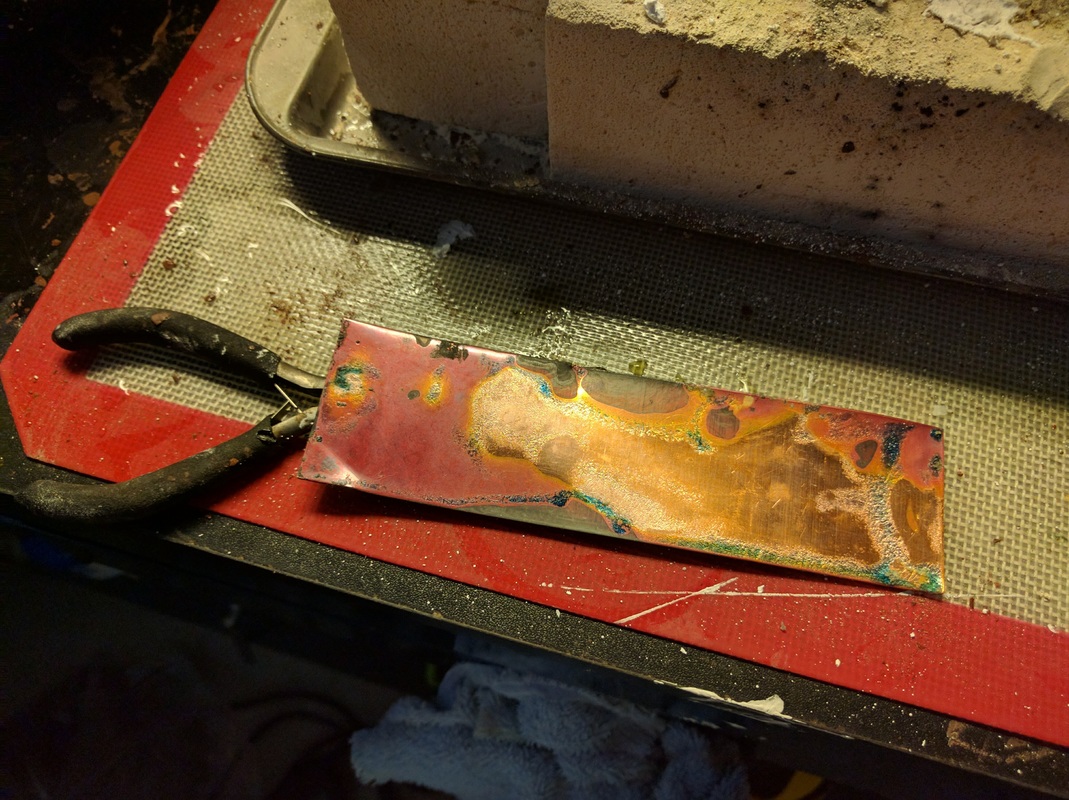
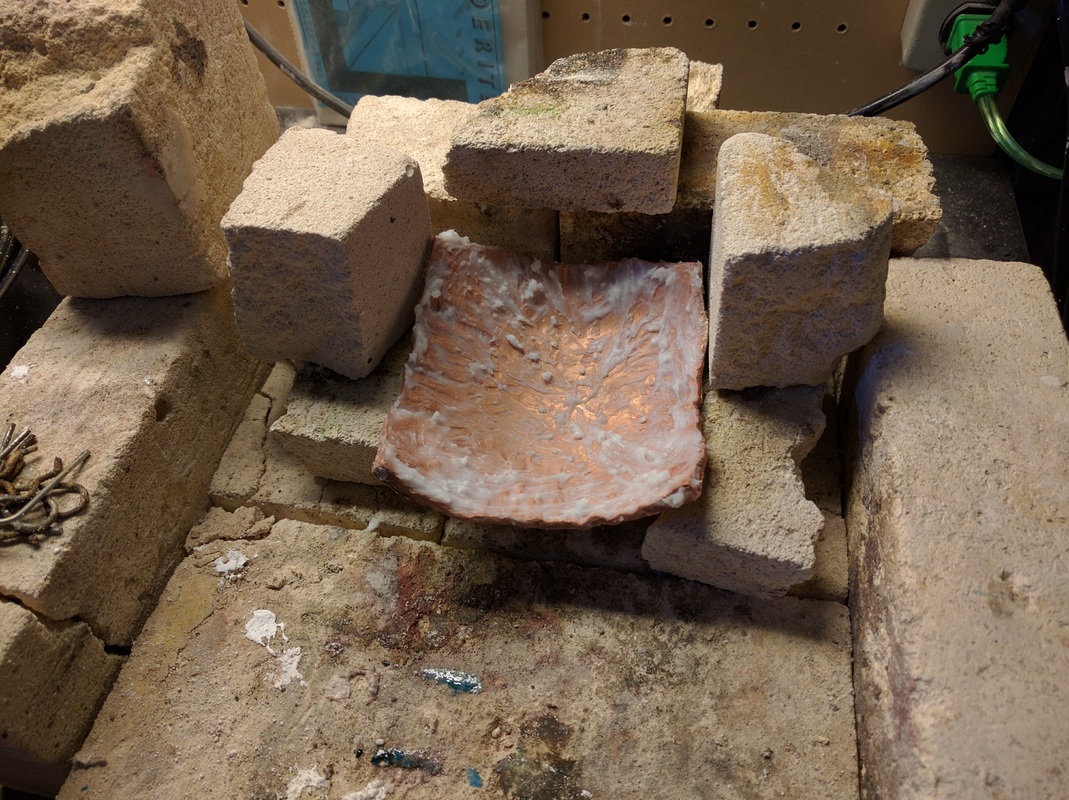
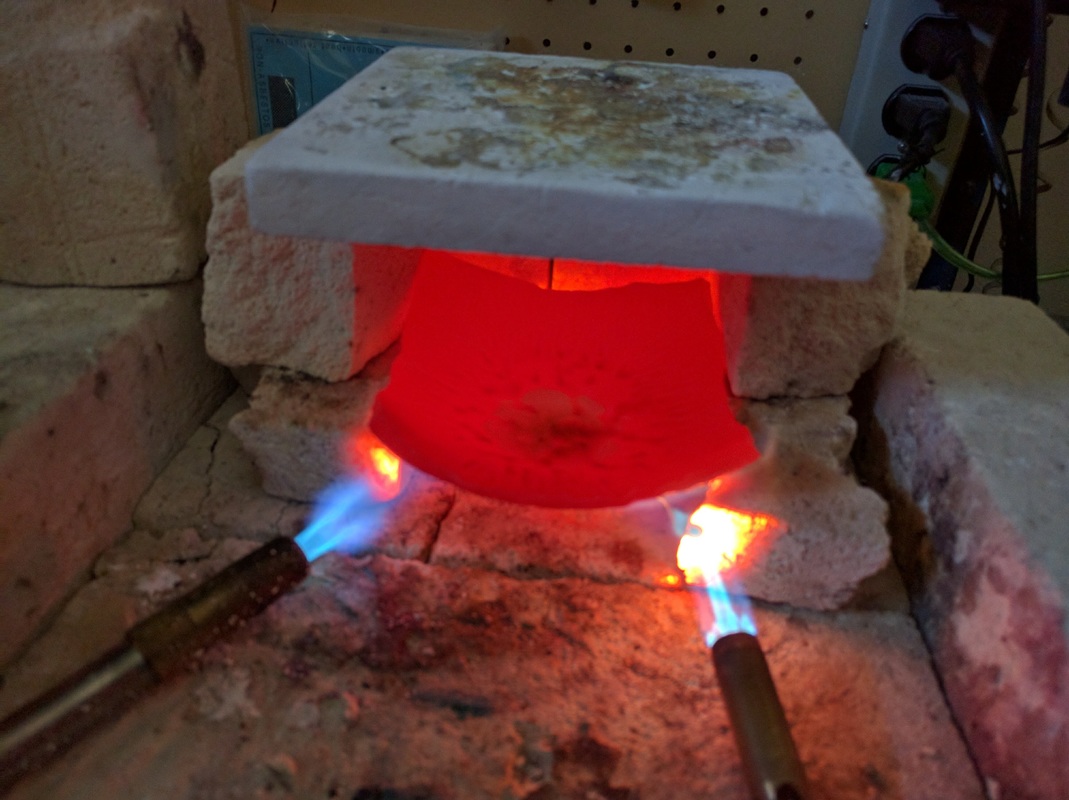
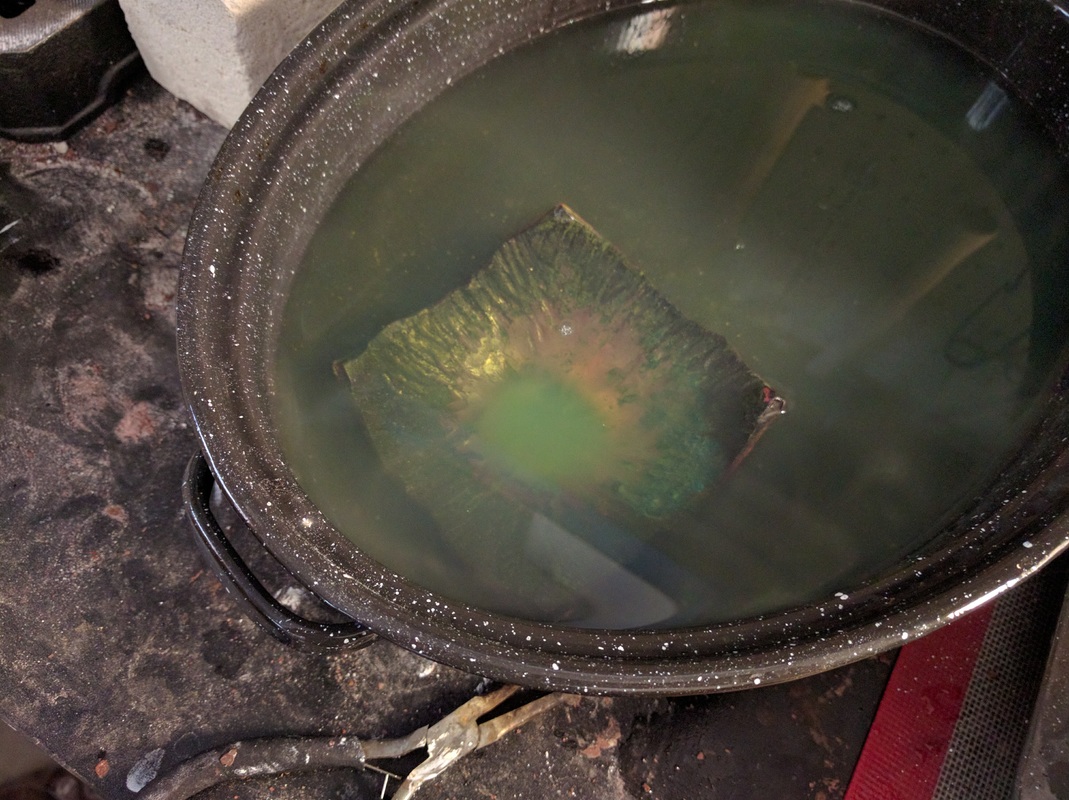
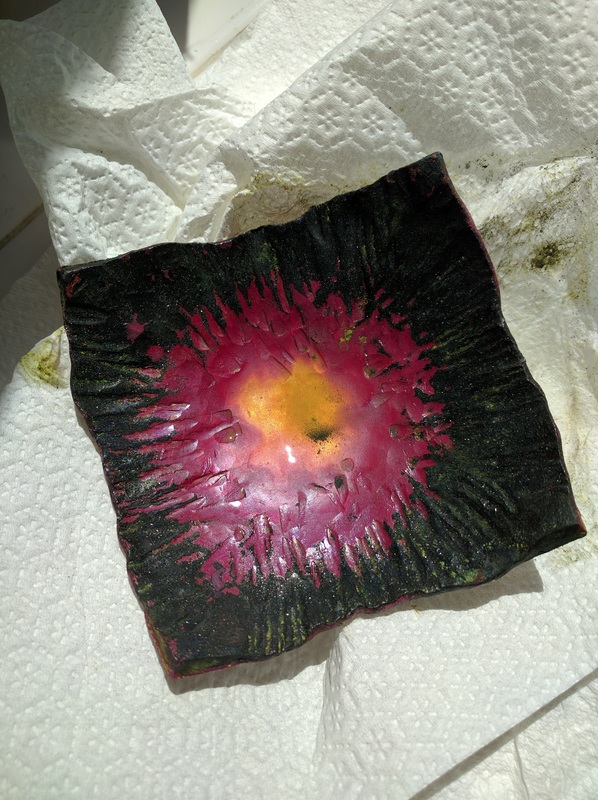
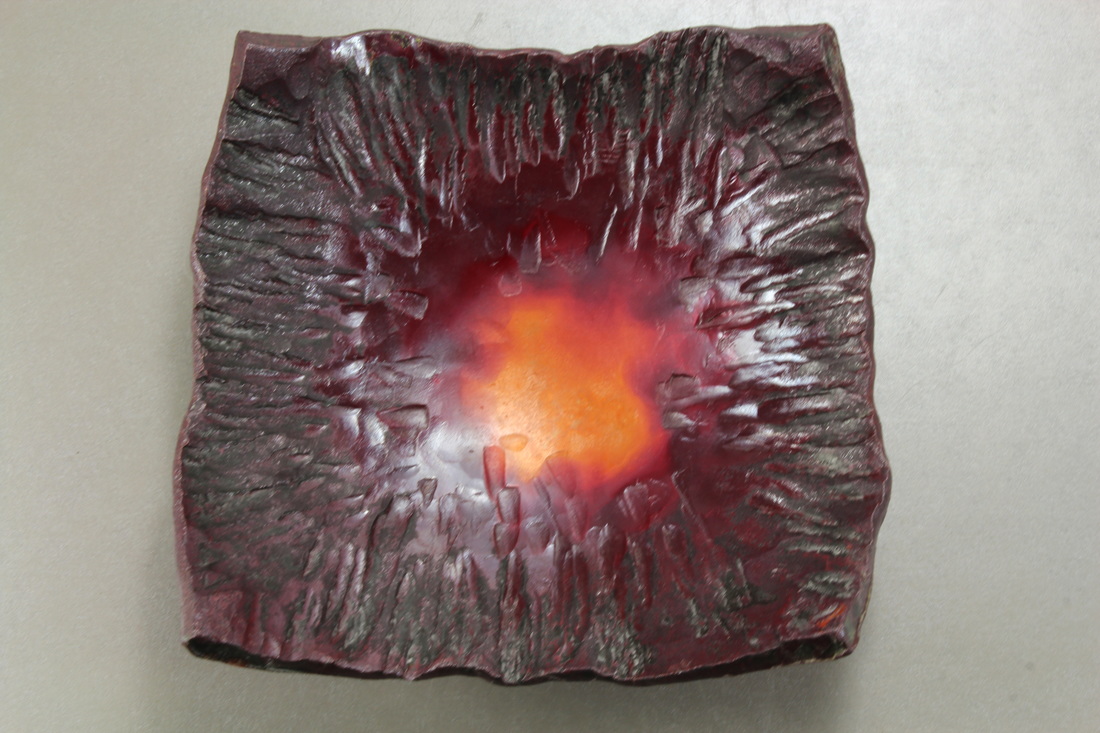
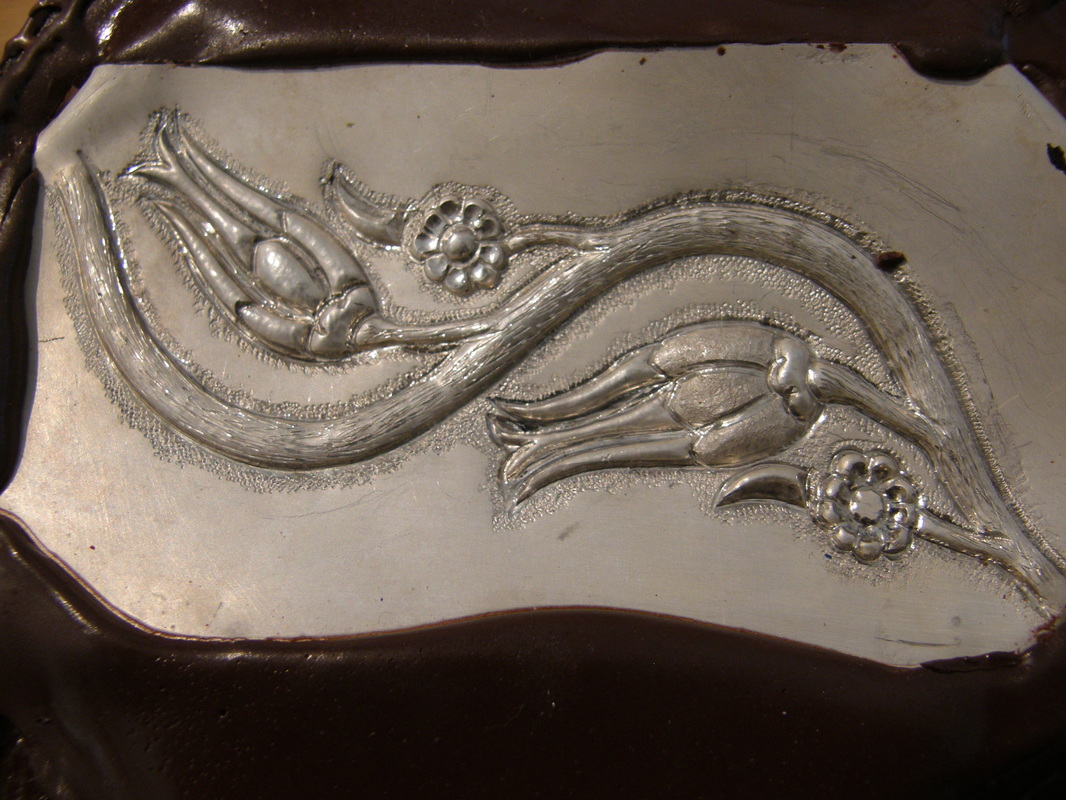
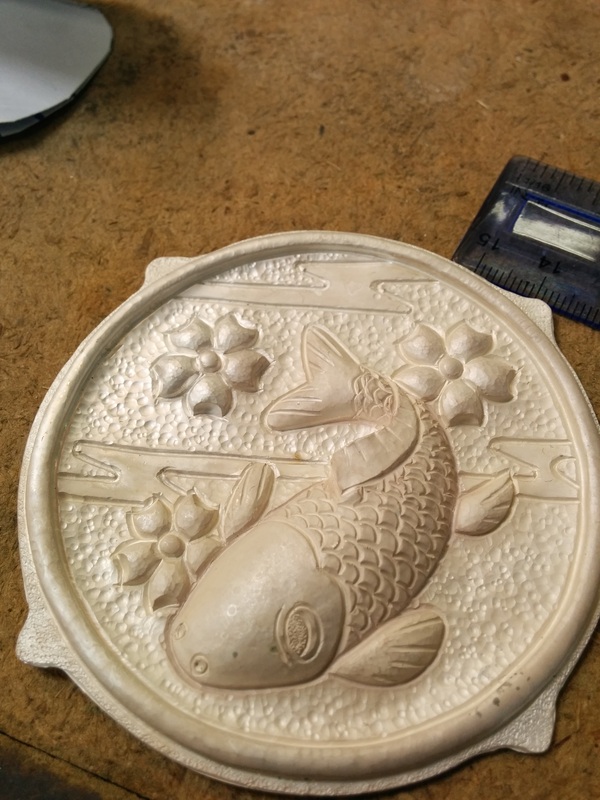
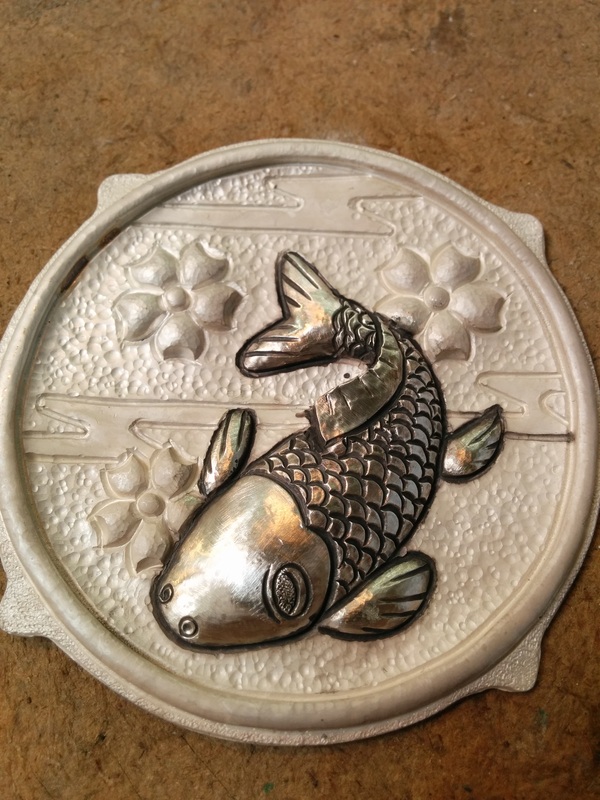
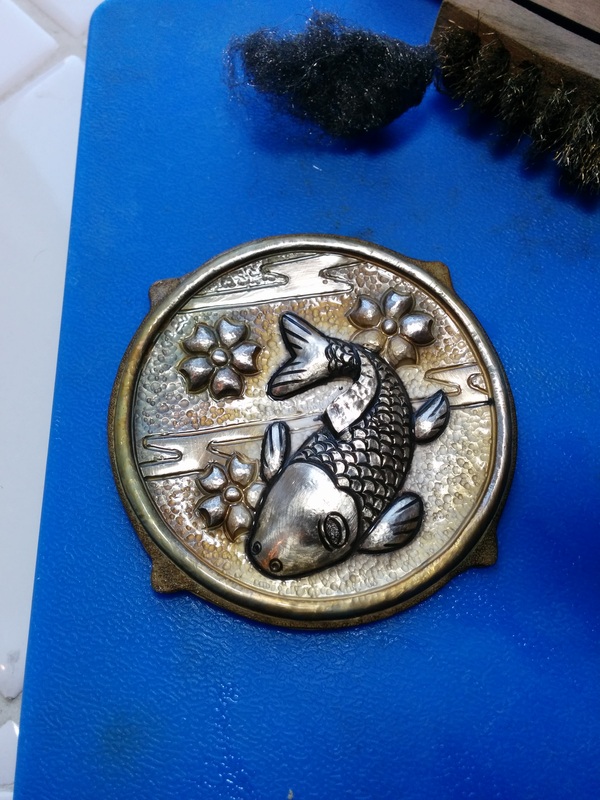
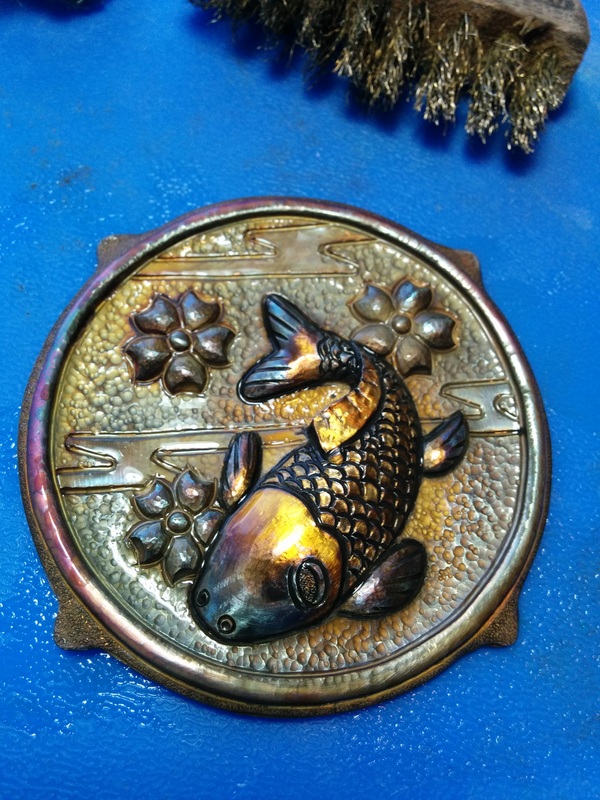
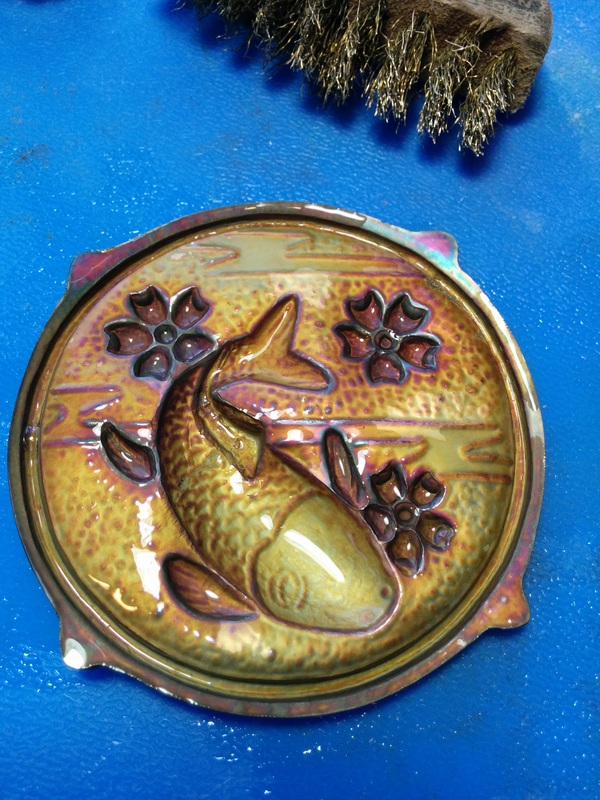
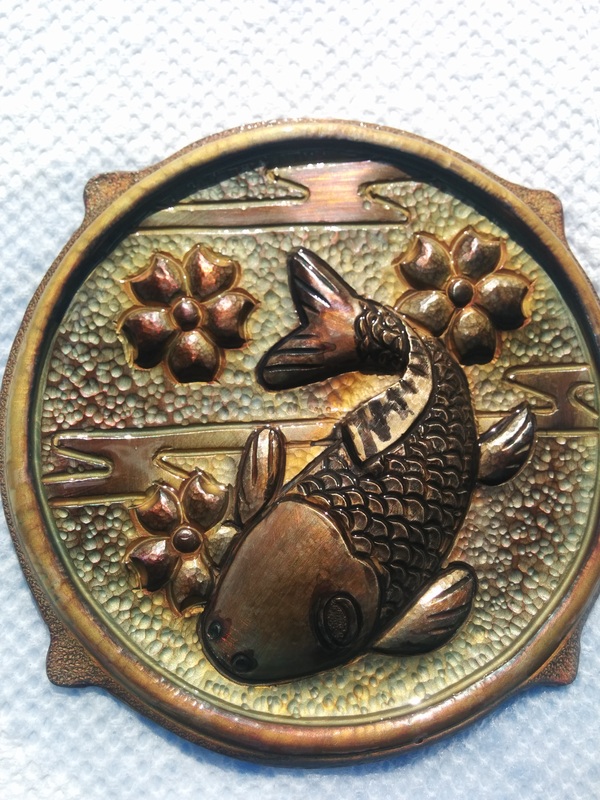
We covered cold patinas, hot patinas, boiled patinas, and gold leaf along with layering; we only worked on copper but there is also brass, bronze, steel and even silver that patinas can be applied to; nor did we cover all the possible chemicals that can be used - we covered just the ones David uses most often. 

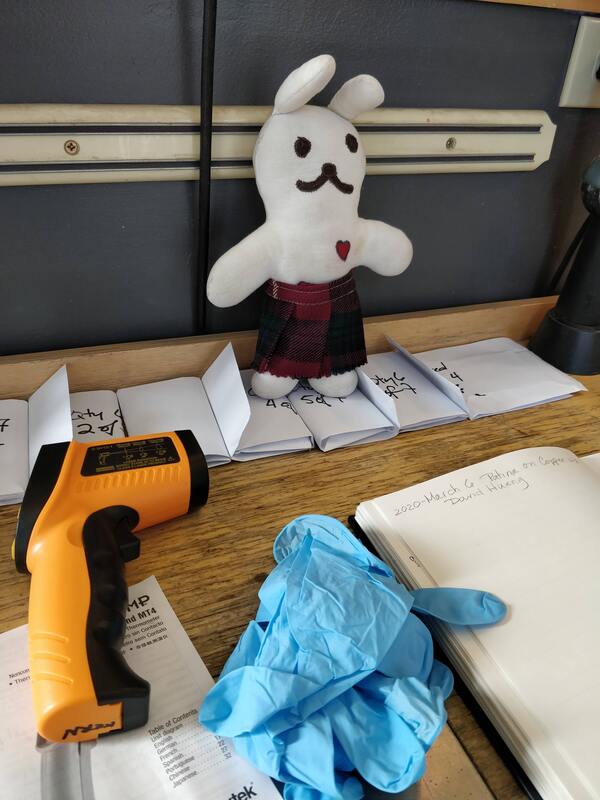
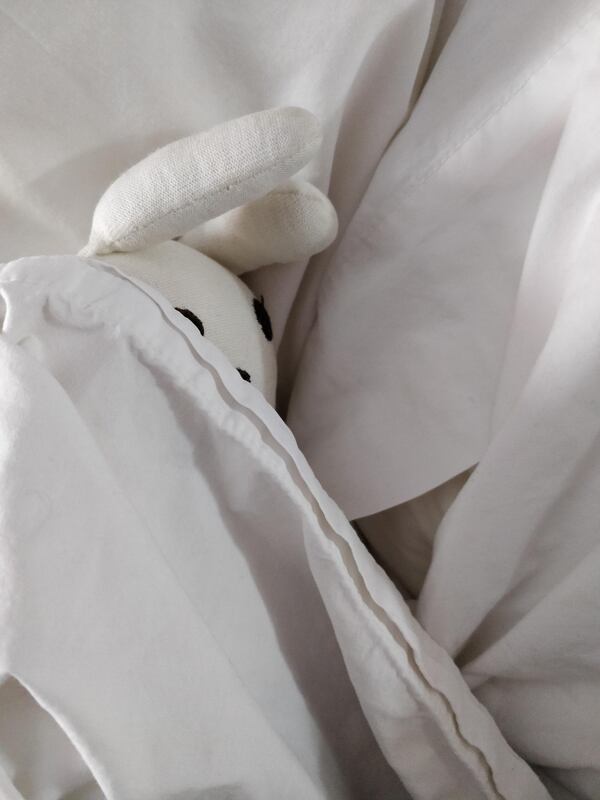
Of course Bunny Bravehart came with me but he just watched as he was afraid of getting burned. 

The day went like this. 
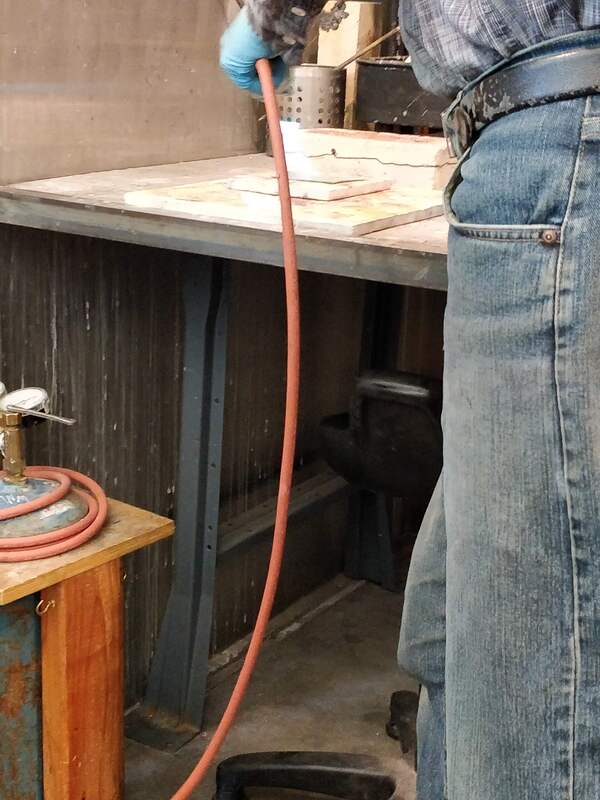
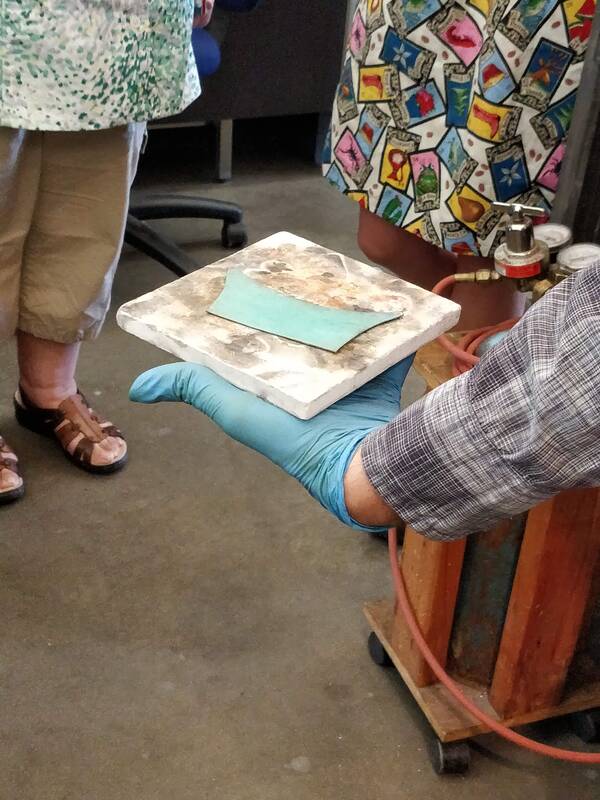
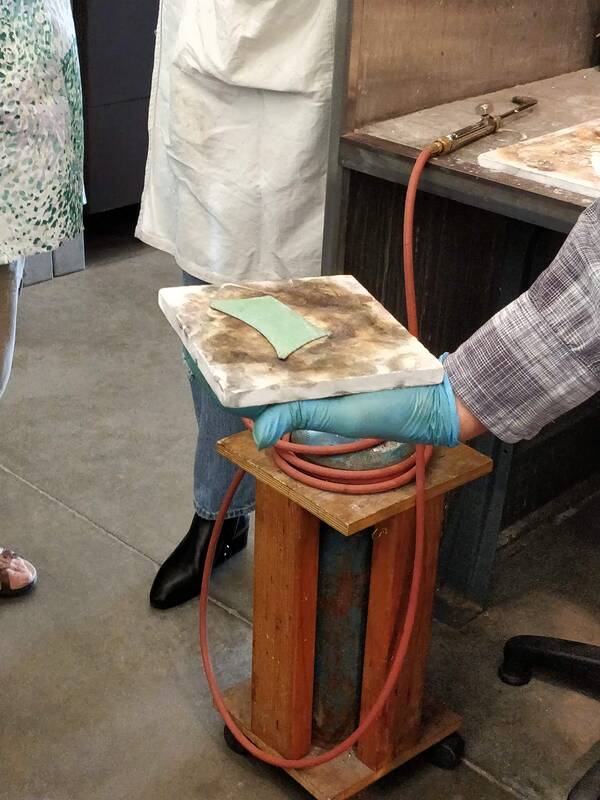
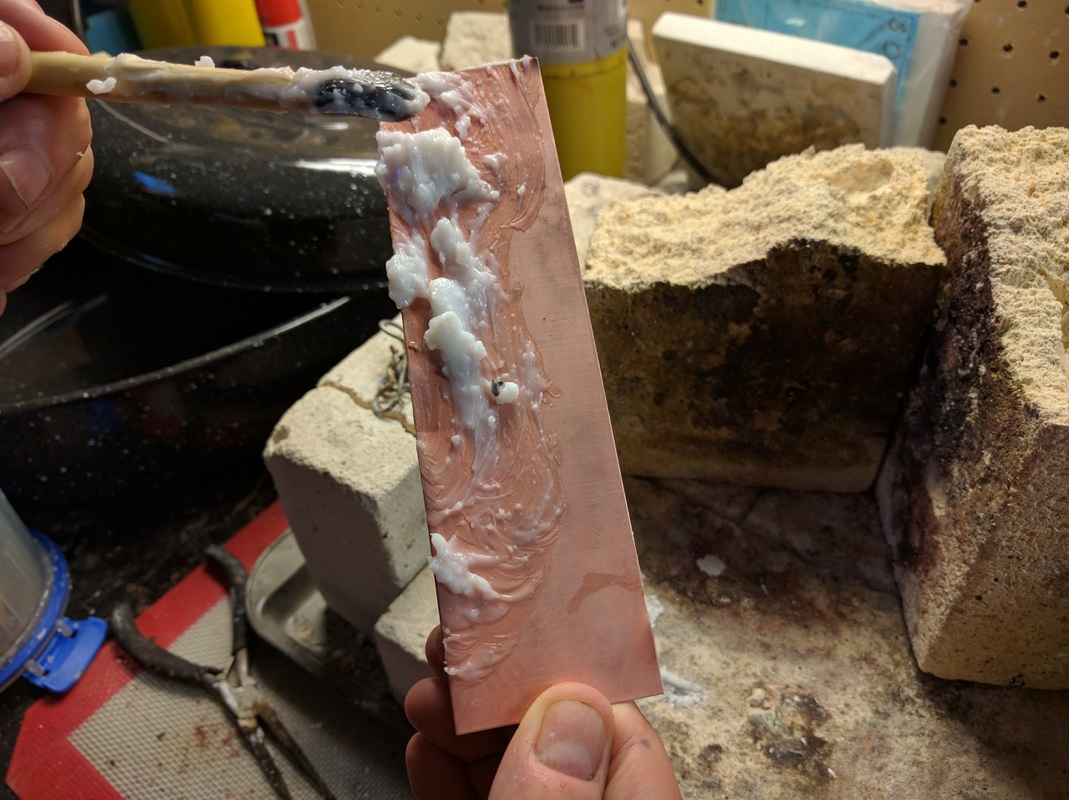
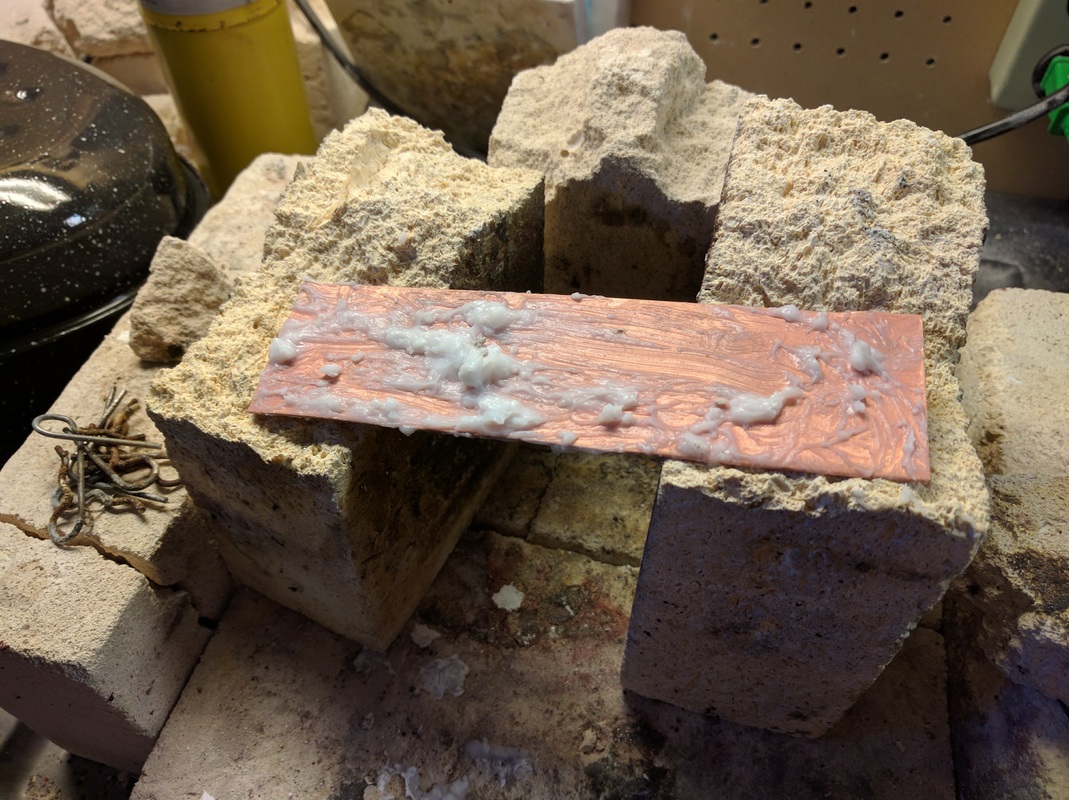
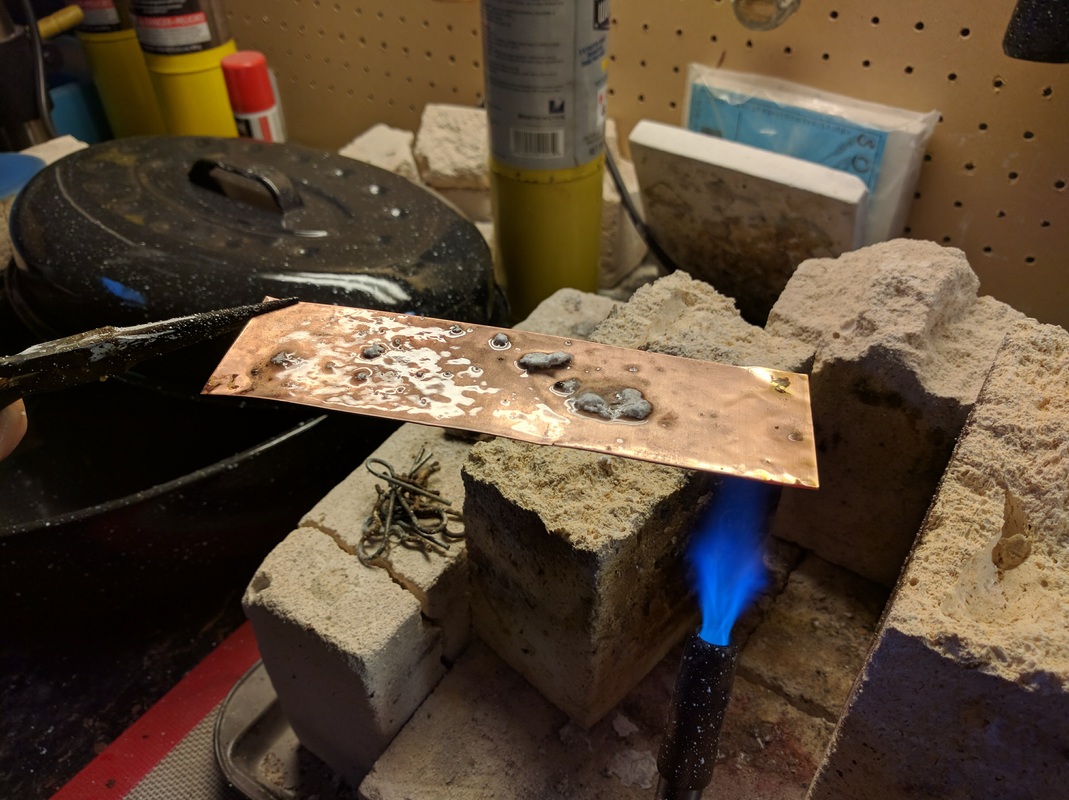
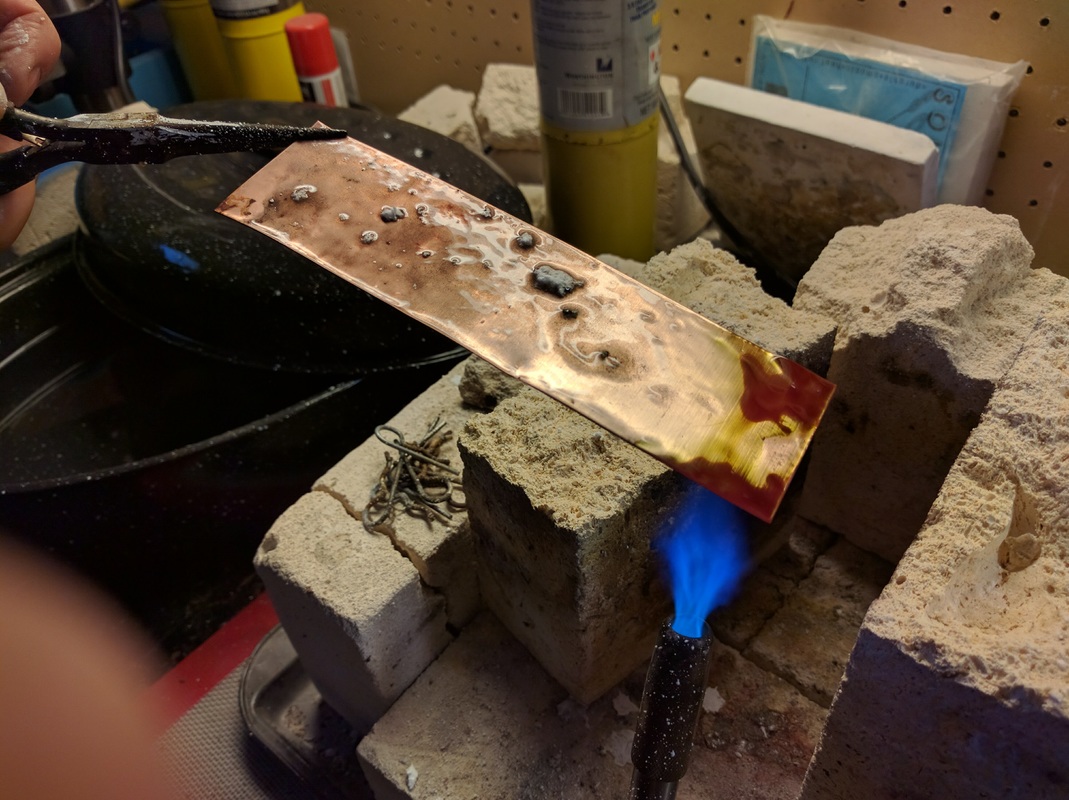
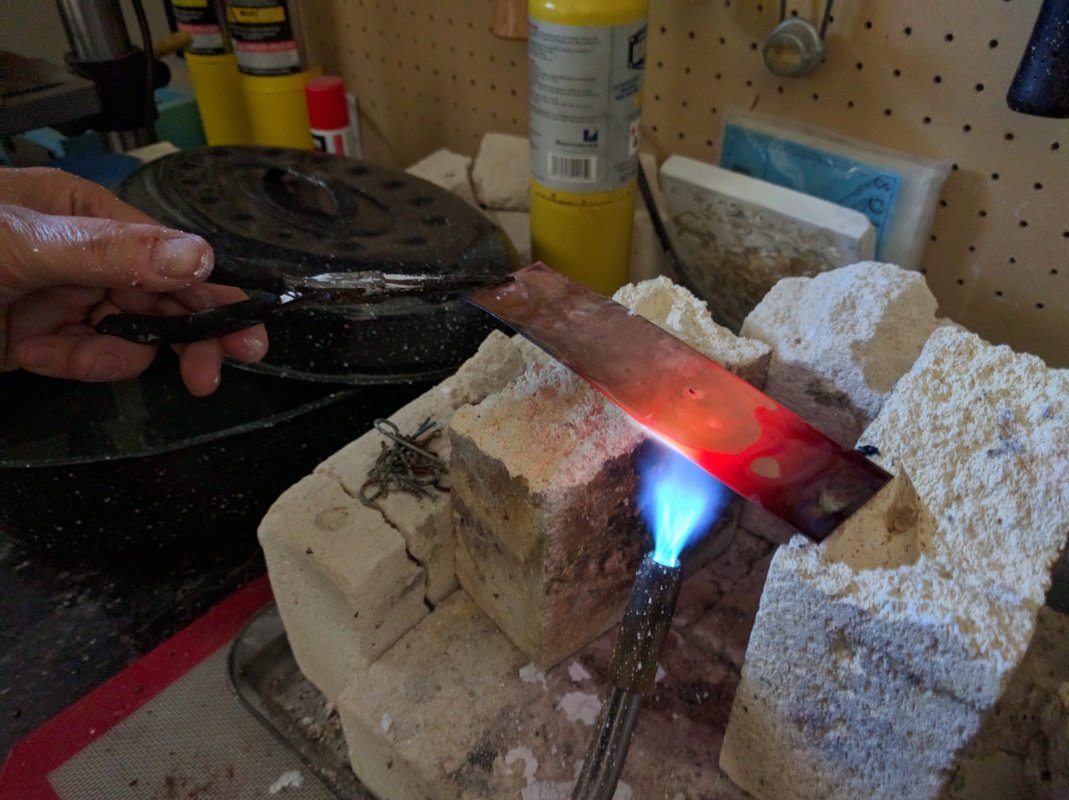
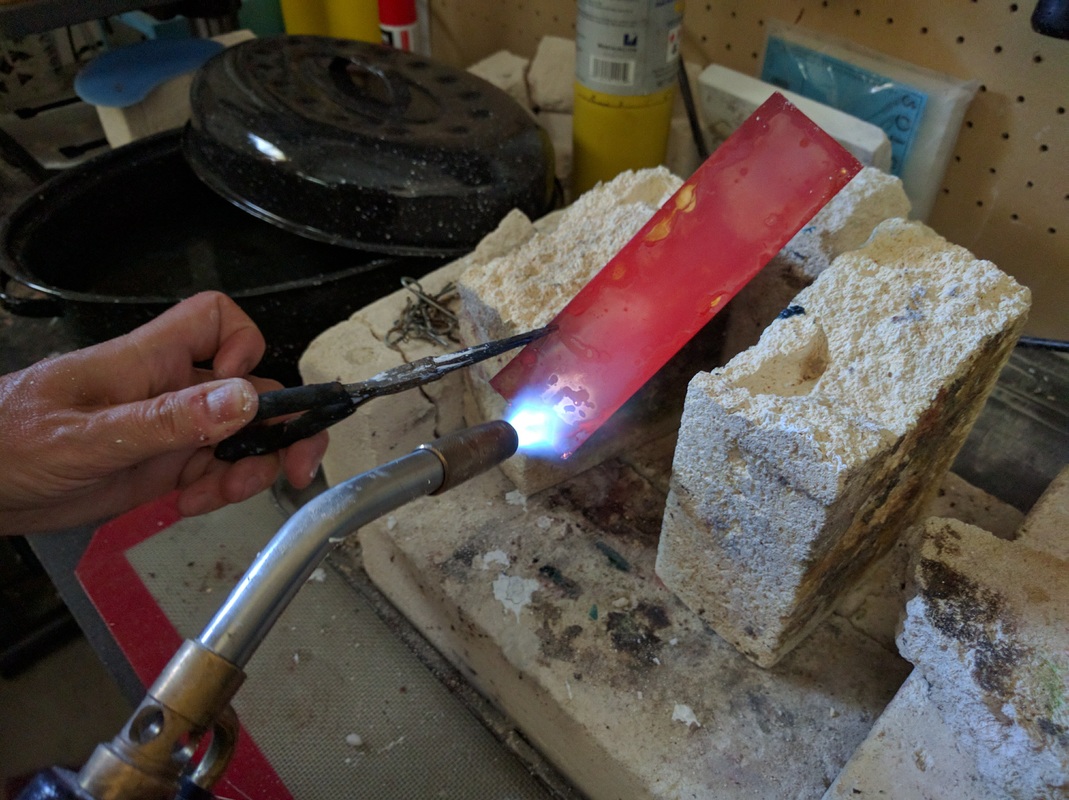
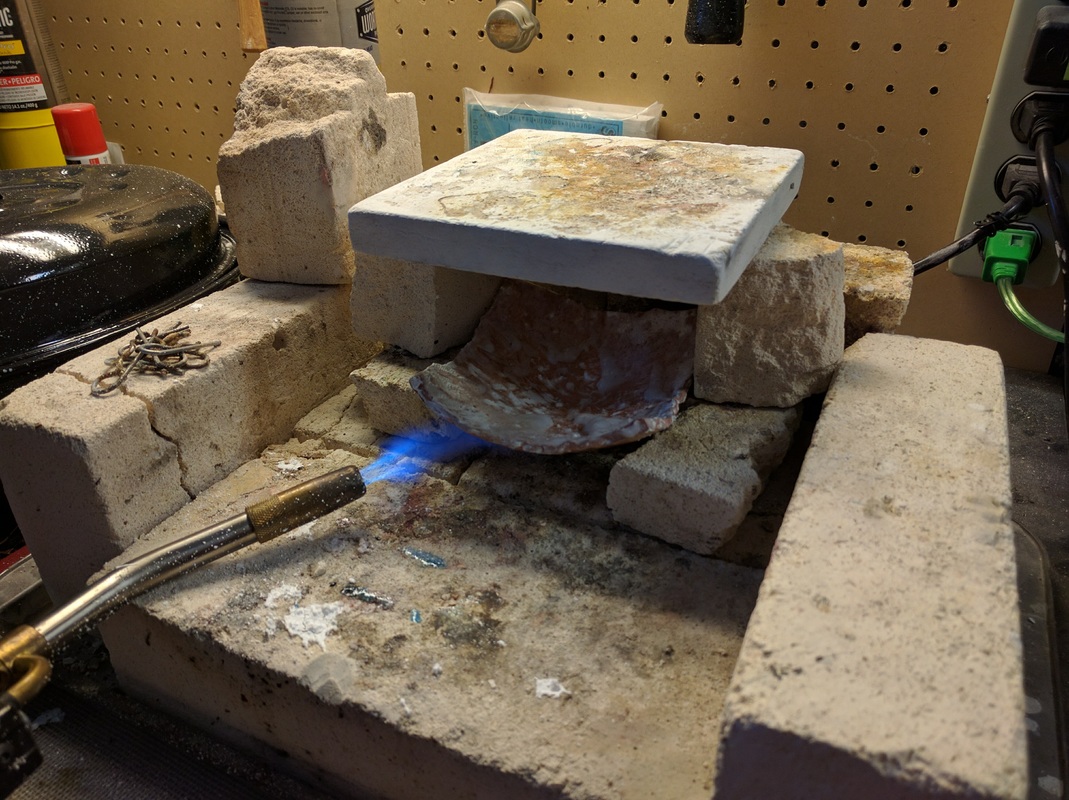
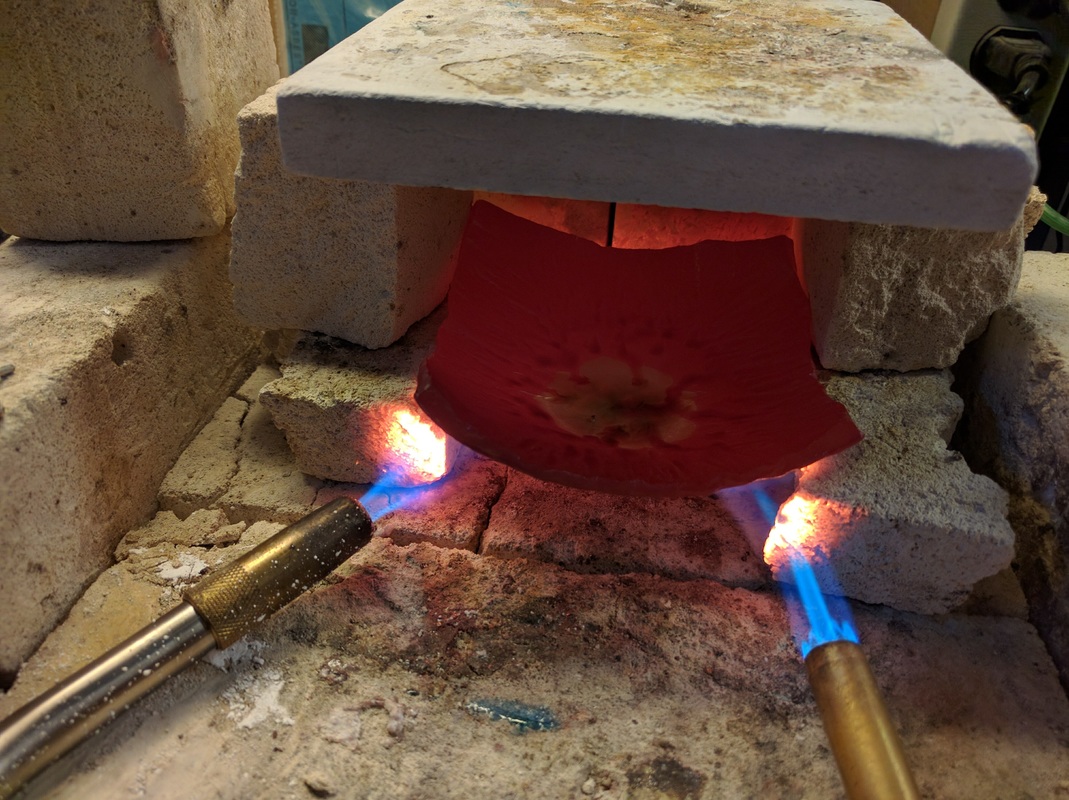
  • David gives us a recipe and then he mixes it and put the solution in jars for each station
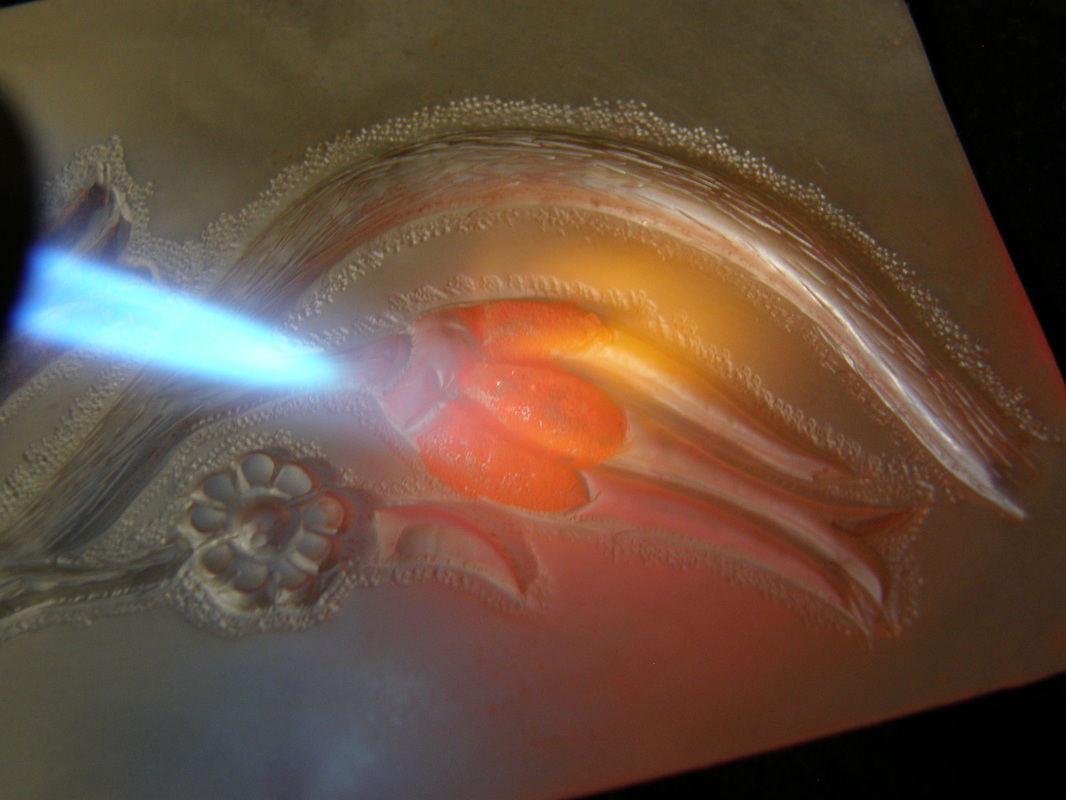
  • David then demonstrates the application (creation) of the patina
  • Students ask questions
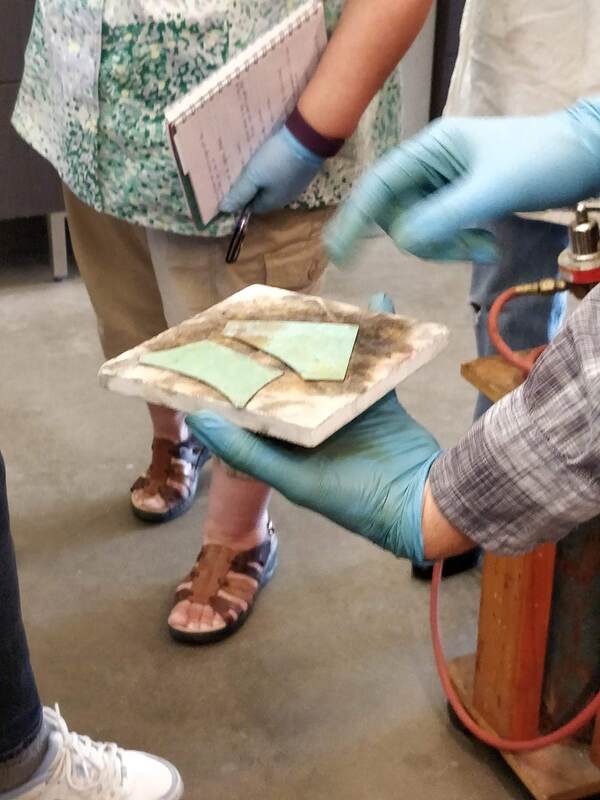
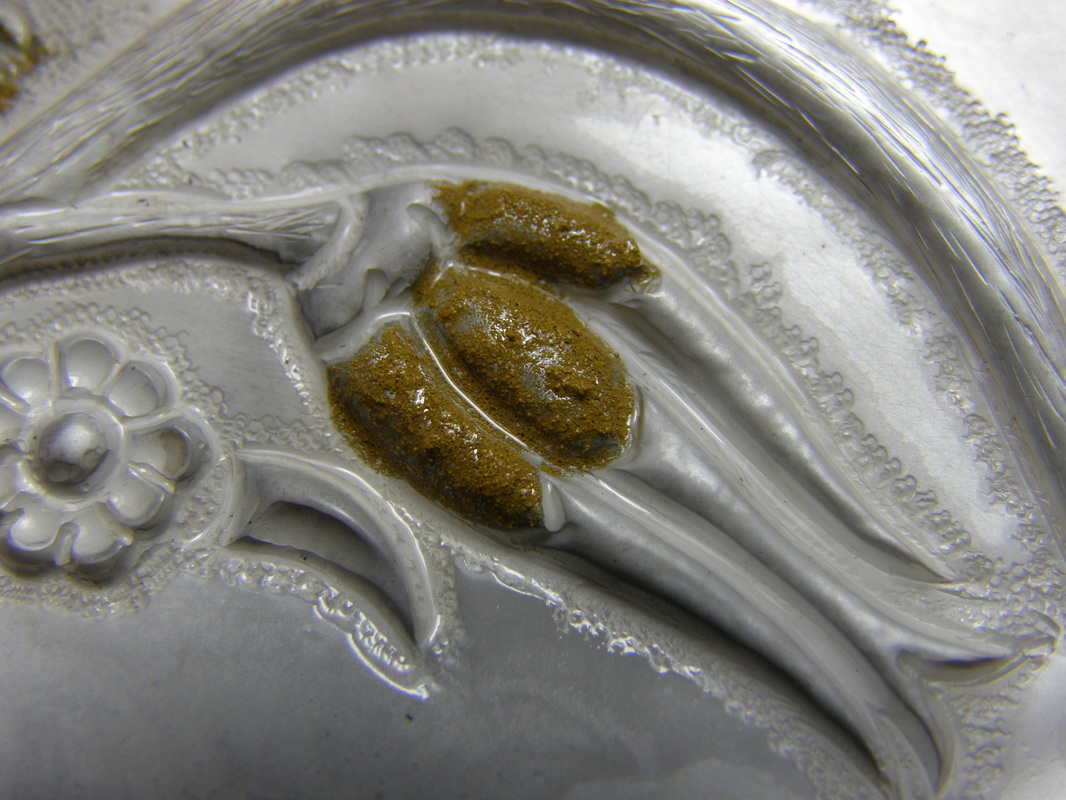
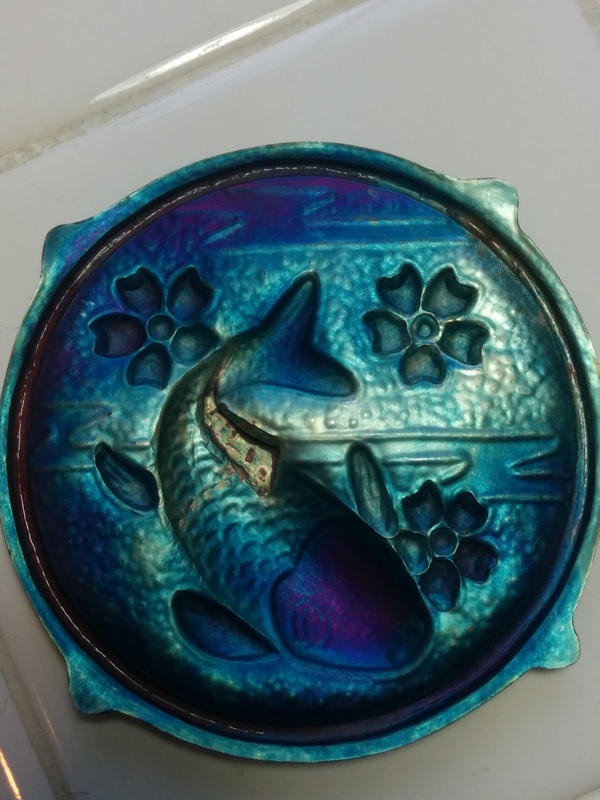
  • Student apply patina to their copper tiles
  • Students share results with each other and ask David more questions
  • Repeat

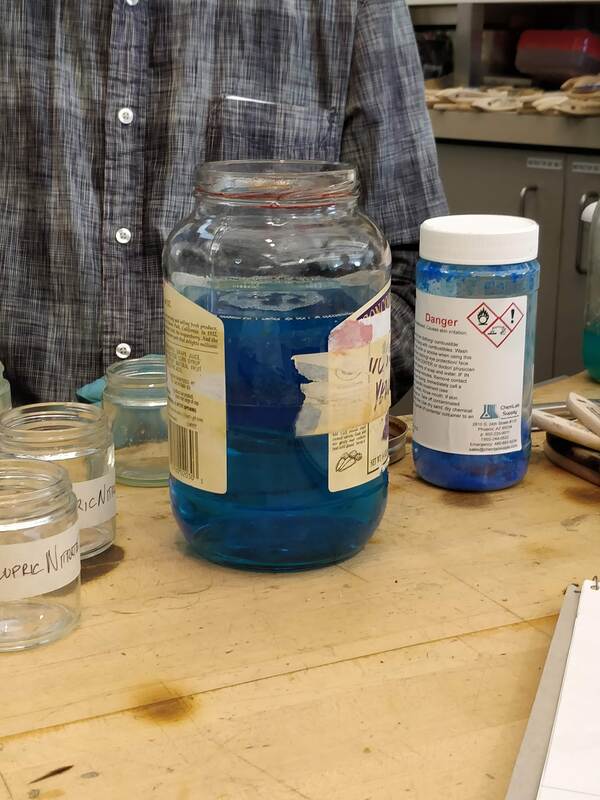
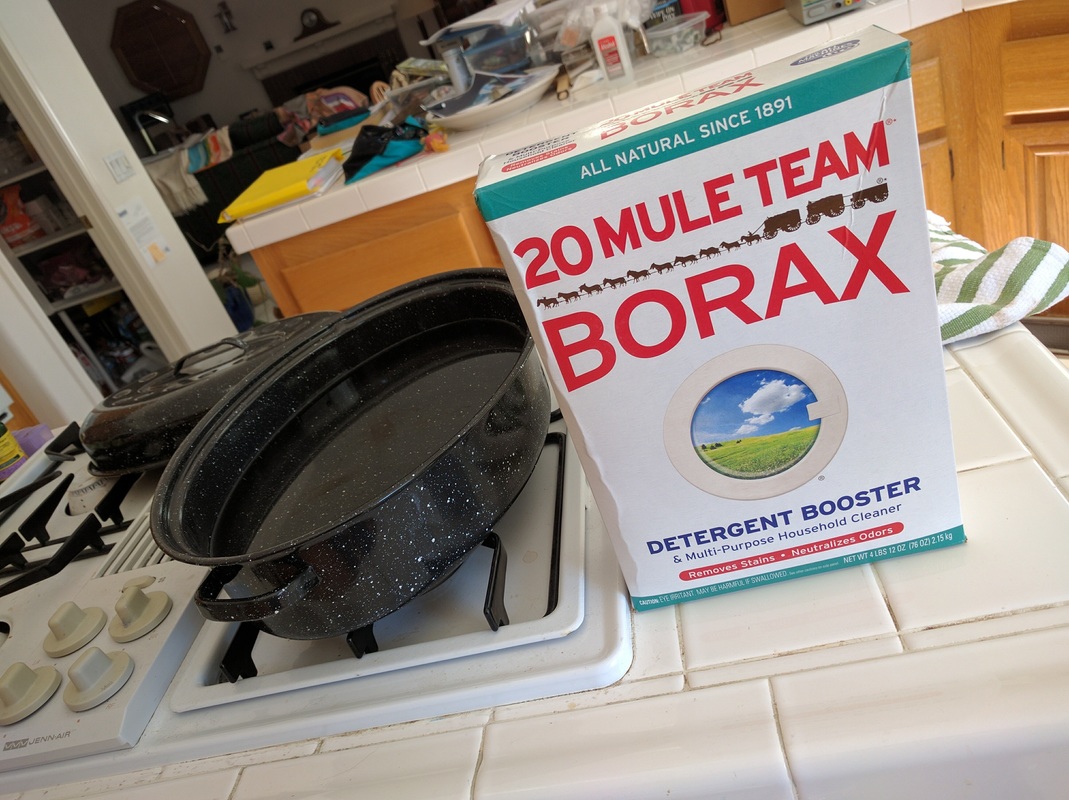
What we used: But not how we used them as that is what a class or research is for! 
  • Cupric Nitrate
  • Ferric Nitrate
  • Ammonia
  • Sodium Chloride (Salt)
  • Dihydrogen monoxide  (Water. Yes it is a chemical and a powerful solvent; hey it can kill you!!) 
  • Bismuth Nitrate
  • Ammonium Chloride
  • Cobalt Nitrate
  • Copper Sulfate
  • Silver Nitrate
  • Gun Bluing
  • Liver of Sulfur
  • Gold Leaf
Here are some of my pictures. 
0 Comments

Art Nouveau Flower Cuff

8/11/2019

1 Comment

 
Picture
Several weeks ago I bought a fine silver stamping from PotterUSA, this was made from a die (female) that was made from the vintage hob (male) that was purchased when the Frank Morrow Company closed it's doors last year; the hob is over 100 years old. This stamping is from a die that requires a massive amount of tonnes because the die is so big and deep  and to get a good result. Kevin used 5 ounces of silver resulting in the piece being 16 gauge thick! 

So what was I going to do with it? Make a cuff, of course; even though I could do something like this via chasing & repousse, it was a challenge for me to take the stamping and turn it into something - so I started to ponder what I would do. I figured I would do some piercing but how much? What would I do to the side sections of the cuff so they weren't plain?  Would I screw it up having not done something like this before.

I started my ponderings by making a copy/scan of the stamping and drawing on it - where was I going to pierce, how long did I need to make it so the cuff would fit me, how wide would it be.  I did 3 or 4 copies with ideas. 

It was now time to stop pondering and to start the project!

So yesterday, was the day to start the project and my goal was to have it finished by this afternoon - which I did, yeah me!
I tracked the hours it took - 14 from start to finish.  I went through 5 saw blades but having never done this much piercing before, I think that is pretty reasonable. I had to use many needle files to get into all the nooks and crannies from the sawing and I had to stay relaxed by keeping my shoulders down, not using the grip of death on the saw and breathing through my mouth; this prevents you from clamping down on your jaw and that results in overall body tension.

What skills did I use that were not ones I normally use because I don't make much jewelry:
  • Sawing a.ka. piercing
  • Filing
  • Sanding
  • Drilling
When I was all done, I weighed the piece and it was almost HALF the original starting weight of 5 ounces; the final weight ended up at 2.4 ounces; that's a lot of material cut away but it will be recast into sheet for another project.

When all the sawing and filing was done, I did a pre-polish to smooth all the edges and to see if I needed to get rid of any major scratches, I did not. Then I coated the silver in flux and annealed; the flux goes glassy when the silver gets to annealing temperature. Then I did a real 3 step polish, inside and out - white, green and red to get everywhere nice and bright - plus a good cleaning in between each polish.   Once all that was done, it was time to pull out the bracelet mandrel and time to bend the silver into a cuff and my anneal was good enough that I was able to do it with my hands!

Lastly I mixed up some Liver of Sulfur thinking that the antique look would add some depth to the flower details but as I am working the piece, I see the patina going gold and I knew that I had to keep this as the patina; I slowly kept swirling the cuff in the LOS solution and knowing that LOS can go dark at a moment's notice, I worked slow and ended up with a great gold color TIME TO STOP! A rinse and dry with a clean cotton cloth and it was done.
​ 
 I also took loads of pictures, as usual so enjoy them.
1 Comment

Calibrating The Kiln

9/10/2017

0 Comments

 
This past weekend, I setup the kiln, I will be using for my Red Oxide experiments,  with my pyrometer to compare the kiln read out to the pyrometer readings.  I can't actually calibrate the kiln but I from this test I can determine the temperature differentials.

To start, I put the thermistor (the sensor) in the oven via the vent hole on the top. I  set the oven up to use one of the pre-programmed heating schedules for PMC and turned the oven on.  I found for this first test, that at the lower temps the difference was off by 10 to 15 degrees Fahrenheit and as the kiln got up to temperature and into the hold range, the temperature differential between the two read outs was either spot on or within 5 degrees.

For my second test, now that the kiln was already hot, again kiln was a bit lower in temperature but well within a 5 degree window of the pyrometer read out.

It should be noted my sensor was in the middle of the kill in relation to the four walls and in the upper quarter of the height of the kiln but the internal sensor is located in the middle of the back wall. That may be why my sensor was a bit warmer. 

Today I am annealing and then picking my copper disk that I will be using for my experiments. Then they will be read to be stamped them with the codes for the various experiments which will start next week.  
Picture
0 Comments

Red-Oxide Experiments - Part 1

6/18/2017

 
Several weeks ago, before I moved, I sent a proposal to the Santa Fe Symposium concerning the Red Oxide patina, and they asked me to fill out an abstract form which would all them to further evaluate the topic. I have heard back from them and now the symposium committee is reviewing all the topics submitted and I should hear from them soon, I hope.  

And to that end I figured it is time to start my Red-Oxide experiments.   

Two weeks ago, in a Facebook re-sale group, I found a used kiln. I had been searching for one as using a kiln with a temperature controller will help me refine the process and do more test. The one I found is a Rio SL2 wich can heat to 2000 degrees F (much higher than I need) with a vent hole, temperature controller with 5 PMC presets and 4 that I can set myself;  it runs on 110 volts and 14 amps so I can use a regular household circuit.   It arrived yesterday and this morning I unpacked it.  

Then I went to Rio and ordered a boat load of 1.5" 18g copper disks and a spatula, and trivets.  Once these items arrive I can start the experiments.

In the mean time, I am going to take my pyrometer and check the calibration of the temperature controller; I will put the thermister into the oven via the vent hole, close the door and using some of the PMC presets, verify that the temperatures I am seeing on the pyrometer display match up to what is on the kiln read out.   I will do the temperature calibrations next weekend. Stay tuned for those results.

​Here is the kiln.
Picture
Picture

Superbowl Challenge IX - The 2017 Edition

2/5/2017

1 Comment

 
It is that time of year again, when Wendy over at Hammermarks has the Superbowl Challenge and this is the ninth year. 
​I was going to do a fabric bowl this year but then I got busy at work and it even overflowed into my weekends so I gave up on that.

Instead I did a forged and sunk copper dish - what else!

I used a drop hammer to forge the edges and then gently sunk the middle. I used 6" square copper that is 0.125" thick or gauge 8.
I then had to pickle it and gave it a good polish. It sat for a week and then began to tarnish, so I cleaned it again (yesterday) and then went into the garage to create the Red Oxide Patina.   This took almost an hour with the setup, heating and quench.  I let it sit and then had to polish it again to bring up the color and then put a good coat of wax on it. This morning I buffed the wax and took pictures.    

I really like it but I think I heated it a bit too much. The red is deep and on the back side, without proper lighting, it look almost black. Then on the inside of the bowl,  the forged areas are on the border between red and black.  I still have some work to do on how to limit or prevent the black oxide from forming.  

I hope you enjoy this slide video (with music!) that shows the process. 
​
1 Comment

Copper Dishes with Raspberry (Red) Oxide Patina

9/21/2016

0 Comments

 
As a result of playing with the red oxide patina the past few weeks and having to make some presents for people, I thought that this past weekend was the perfect time to do so. I acquired some more copper sheet but it as only 1/8" thick, not the heavy 1/4" stuff. I forged and formed 3 dishes on Saturday and on Sunday I again, flamed on!   Here is a "music" (slide show) video of it all.
NOTE: click the arrows in the lower right corner and it will fill the screen.
0 Comments

They Said... or More Red Oxide Patina

9/14/2016

0 Comments

 
Most of what I have read, has said that you should NOT do the red oxide patina on pieces that have been soldered ...
Because all that heat will cause the joints to un-solder. 

Do I listen?
                  I think NOT


I was making a tool canister this weekend and I wanted to have the red oxide patina on it. Again, I blame Jan.  I really only had the solder joints for the top and bottom and the slip sleeve on the top. I figured that IF I used hard solder and was really really careful, I could work on getting said patina.  Remember,  I ONLY had 1 or 2 solder joints on each piece. I would gather that if you had LOTS of tiny little solder joints that could wiggle and move, this won't work - your milage may vary.

I made the canisters and after soldering on all three pieces, I trimmed off the excess brass, for the top and the bottom and put a steel brush texture on the outside of the canister.  Today during lunch, I setup the fire bricks and a pot of HOT borax water. I fluxed the outside really well and turned on the torch. I had to position the torch such that it did not flame out and kept my eyes on the solder. When I could see it flow, I backed the heat off a bit but I was able to get it really RED hot by keeping the heat on for a long time, using bricks to help hold in the heat and occasionally turning the piece. 

Here are the results. I am rather quite piece and what I was surprised to see what that the oxide started to form on the brass end pieces. Brass has some copper in it but I was not expecting the red oxide to appear with any great color. 

The first two pictures are before I waxed it.
0 Comments

Red Oxide Patina

9/11/2016

0 Comments

 
Back in 2012, I went up to Adams Forge for a late night fold forming session with hot forging and more. I made a few folded cups and then took on hot forging a 1/4" thick piece of copper.  I never did finish it, I wanted the edges more ruffly, but I was happy with what I did. ​
Picture
And it has been on my workbench ever since. I cleaned it at one point thinking I would put a fumed, Tiffany green patina on it but I never got around to doing that either, so it eventually just tarnished.

After last weekend's tool making workshop, with Jan, where we experimented with the HOT red oxide patina, I decided to do this technique on the forged copper (seen above).  Yesterday, I did a good cleaning and brought it to a bright copper finish (sorry but I did not get a picture of it). Then this morning I explained to the shop elf how it all worked and what I planned - not having a forge, acetylene or a big blast-O-3000 torch, I figured I would use TWO propane plumbers torches and set up a hot box so I could get the copper really, really, red hot. The shop elf also took many of the pictures while I held the torches and flamed on!

We first practiced on two smaller, thinner pieces of copper. Those pictures are next. 
 After the practice piece, I took an enameled metal pan and warmed my water and added a handful of borax and moved it to my soldering station in the garage. I then setup my fire bricks to support and surround the forged piece, I fluxed it really well and lit those torches up.  I estimate it took a good 10 minutes just to get everything hot, then we could see the flux based upon the timestamps on the pictures. Then I just kept pumping in the heat... and then we took the top of the hot box off, I handed the shop elf one of the torches and I picked up the tongs so I could pick up the copper and I dropped it into the water.  It bubbled and steamed and I walked away, allowing the piece to "cool" and to let the oxide develop.  

We went to have a cuppa coffee and wait. 

I pulled it out of the water a while later and could see some amazing effects. The edges were black and the center was a great gold with the red oxide in between. The black, you could see was a crust and there was more oxide underneath; with a soft scrubby and warm water, I was able to remove the crust.  There was red oxide on the out/back side too but it did not hold up as well, to the scrubby but that's ok, as the it is the inside that was important.   

Enjoy the process pictures. The final picture is of it waxed.. and under good lights with the good camera looking down at it and along the edge. ​
Picture
Picture
0 Comments

Squash Blossom and Flowers - Teaching Sample

2/21/2016

0 Comments

 
In March I will be teaching a chasing & repousse cuff class to the ladies at the Palomar Gem & Mineral club. It is four day and I have 7 students (Mary, Heather, Karen, Laurie, Stephanie, Sylvia and Eleanor) and a shop elf (Diane). 

The goal of this class is described here. 

I was going to make a full set of teaching samples. The frame, the frame soldered on, the designed transferred to the metal, chased and with repousse, and then a final cuff before bending.  But then I got sick and oh, boy was I sick; and I am still recovering. 

Thus I cheated, for now, I did a small section of the design and it is now all finished. You got your chasing; you got your repousse; the texturing; a tube set CZ; a wee bit o'patina; and even some Keum-Boo!

​During the workshop I will be making the teaching samples so I have them for the next time.

Here is the sample all done - a good full shot and after that, lots of process pictures
Picture
0 Comments

Patina Plight

9/8/2014

 
Picture
I spent this weekend finishing the silver Koi Kuff and that entailed patina, bending, cutting out the leather for the cuff, adding the snaps and then riveting the medallion to the leather.

But this blog post is about patina.

Producing a Liver of Sulfur (LOS) patina is alchemy. Especially with Fine or Sterling (I don’t use Argentum so I don’t know about that)

If the metal is not clean, you will have areas with no color

Too much LOS and the metal will go grey and black almost instantly.

If the water is too hot the colors will change really fast and again you can get a grey or black patina.

If everything is JUST right – water temp, clean metal, amount of LOS – it is a Goldilocks moment. The colors you can get will be perfect.  The only thing you may not like is where you get the colors.

Here is the picture of the first patina I had on the Koi. It really is perfect and I should have stopped there.
Picture
But I saw blues. I wanted blue and I so I went back to the LOS and dipped some more.r. And the blues that appeared were amazing.  

Picture
But after I cleaned the koi and water I realized that the deep blues were also in the fish, around the scales and I saw that the koi was getting lost. It was no longer the focus of the piece, the BLUE was. 

I then used Jax Blackening solution to darken the areas around the scales (sorry no picture) but the liquid dropped on the water in two places and the back ground patina was ruined.   At this point I had to remove it ALL and start over. 

This time I decided to add the black, around the fish,  first as then the LOS on top of the back would not make a difference. 

I mixed up my LOS and started dipping and I realized that the LOS was too strong as the gold was developing too fast and it moved past blue to the blue gray. 
It was time to start over AGAIN. 

I made a very weak LOS solution with cooler water and started to dip.  The colors started to develop and slowly the gold appeared and then blues around the rim. I rinsed and let it dry and then I knew I should stop. 

I then sealed it; which will darken the colors but if you go slow, and not flood the piece, the colors will stay.  Then it was bending and riveting.

Here are the picture of the final time .
The medallion has been bent and riveted to the leather cuff. 
<<Previous

    RSS Feed

    How to Aquire Your Own Shop Elf

    Archives

    June 2025
    May 2025
    April 2025
    March 2025
    February 2025
    January 2025
    December 2024
    November 2024
    October 2024
    September 2024
    August 2024
    July 2024
    June 2024
    January 2024
    November 2023
    October 2023
    September 2023
    October 2020
    August 2020
    March 2020
    December 2019
    November 2019
    October 2019
    September 2019
    August 2019
    July 2019
    June 2019
    May 2019
    March 2019
    February 2019
    January 2019
    December 2018
    November 2018
    October 2018
    September 2018
    August 2018
    July 2018
    May 2018
    April 2018
    February 2018
    January 2018
    November 2017
    October 2017
    September 2017
    July 2017
    June 2017
    May 2017
    April 2017
    March 2017
    February 2017
    January 2017
    December 2016
    November 2016
    October 2016
    September 2016
    August 2016
    July 2016
    June 2016
    May 2016
    April 2016
    March 2016
    February 2016
    January 2016
    December 2015
    November 2015
    October 2015
    September 2015
    August 2015
    July 2015
    June 2015
    May 2015
    April 2015
    March 2015
    February 2015
    January 2015
    December 2014
    November 2014
    October 2014
    September 2014
    August 2014
    July 2014
    June 2014
    May 2014
    April 2014
    March 2014
    February 2014
    January 2014
    December 2013
    November 2013
    October 2013
    September 2013
    August 2013
    July 2013
    June 2013
    May 2013
    April 2013
    March 2013
    February 2013
    January 2013
    December 2012
    November 2012
    October 2012
    September 2012
    August 2012
    July 2012
    June 2012
    May 2012
    April 2012
    March 2012
    February 2012
    January 2012
    November 2011
    August 2011
    July 2011
    June 2011
    May 2011
    April 2011
    March 2011
    February 2011
    January 2011
    December 2010
    November 2010

    Jan - Nov 2010 History
    File Size: 2272 kb
    File Type: pdf
    Download File

    Jan - Dec 2009 History
    File Size: 2332 kb
    File Type: pdf
    Download File

    Categories

    All
    42
    Art
    A Year Of Repousse
    BFA
    Blacksmithing
    Blogoversary
    Box Project
    Business
    Chasing & Repousse
    Commission
    Education
    Embroidery
    Enamel
    Entries
    Entry
    Exhibition
    Facebook
    Filing
    Fold Forming
    Gold
    Holloware
    Hot Forging
    Hydraulic Press
    Jewelry
    Keum-boo
    Knitting
    Learning
    Leather
    Market
    Metal
    Patina
    Photography
    Polishing
    Publications
    Quilt
    Raising
    Sanding
    Santa Fe Symposium
    Shop Elf
    Sinking
    Social Media
    Soldering
    Store
    Studio Visits
    Superbowl Challenge
    Teaching
    Teapot Project
    Technique
    Temari
    Tin
    Tools
    Vessels
    Visiting Workshops
    Weaving
    Website
    Workshop
    Yubinuki

Powered by Create your own unique website with customizable templates.