Follow Me On:
The Adventurous Silversmith
  • Home
  • Blog
  • Portfolio
    • Metal Work >
      • Chasing & Repousse
      • Holloware
      • Jewelry
      • Other Wonderful Items
    • Fiber Arts >
      • Temari
      • Yubinuki
  • Resources
    • Library
    • Tools & Equipment
    • Links
  • About
    • Artist Statement
    • Curriculum Vitae
    • How it is Made
    • Contact

Yubinuki - Materials

8/25/2018

0 Comments

 
NOTE: The post was originally posted on my personal site

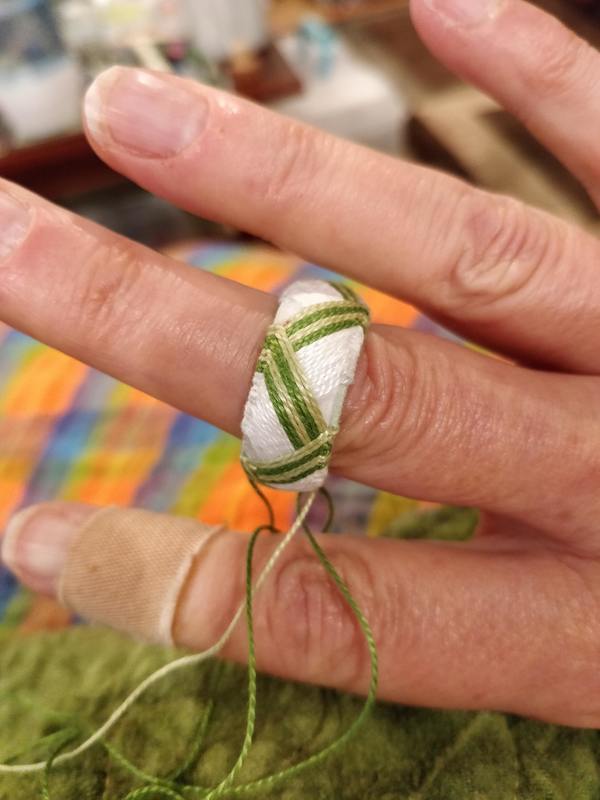
Now let's talk materials for the yubinuki of which there is only ONE - THREAD. This is the primary material to make the design. There are several things to consider when selecting the thread for your yubinuki: color, material, and size. I don't think I need to discuss color at this point as that is important for your pattern, which shall be discussed in a later post. But the thread material and size are what be discussed in this post.

First some general information: Material and Size
Thread Material: In Japan, the traditional materials are either cotton or silk which was taken from the remnants of weaving. These are the two fibers still primarily used in modern times. Your skill level, design and personal preference will influence what material that is selected. There are also nice threads in linen, polyester, and blends and are also metal threads which is where a very fine wire is wrapped on a cotton or silk core; with some searching you can find silver, gold, and copper.

Thread Size:  Thread size is not actually measured in inches or millimeters; there are 3 major measuring system and each thread manufacturer picks how  measure their thread; trust me it is confusing and I learned quite a bit. What is important to know is that the thread size will influence how detailed the design of the pattern can be; the finer the thread the more details the pattern can have.   There are 3 ways to measure thread: Weight (meters per 1 gram), Tex/Length (grams per 1000 meters) or Denier ( weight in grams per 9000 meters).  Perle cotton is in the weight system and Japanese silk is sometimes given in denier and some I can't figure out at so let not worry about it at this point

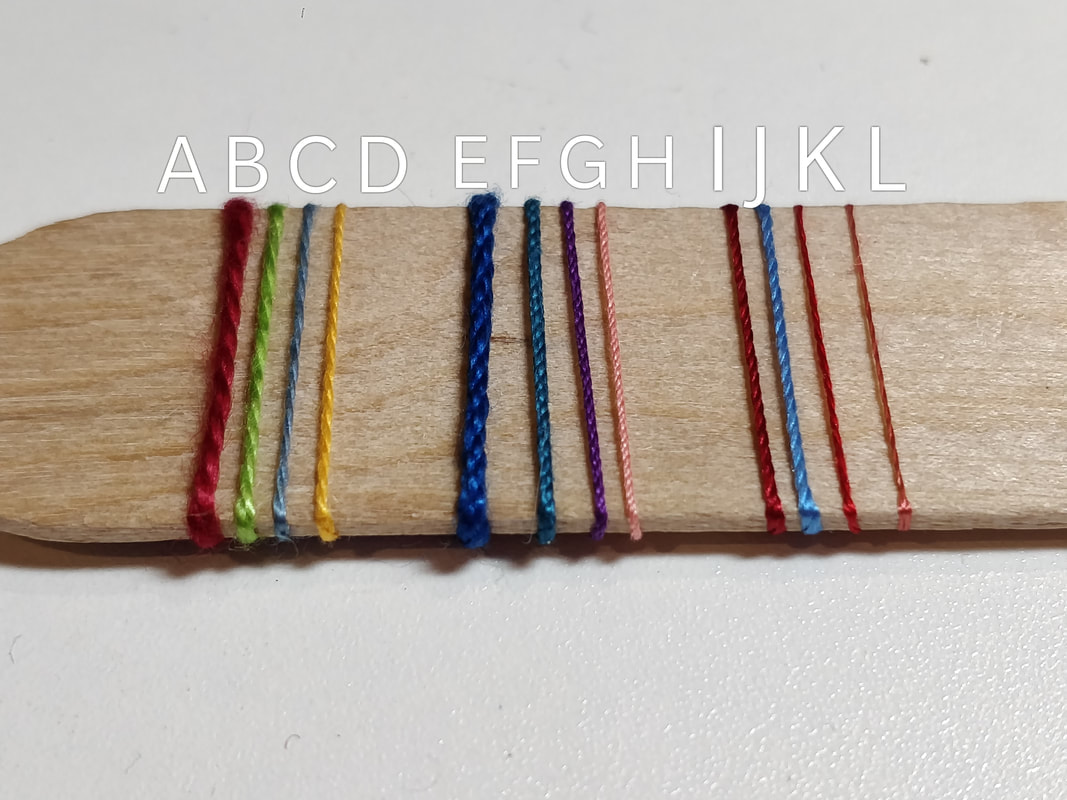
​Let's now  let's look at some actual threads which can be used to make yubinuki.  The letters the start of each paragraph refers to the letters in the picture below. 

A) Cotton Perle Size 5: A 10 gram ball contains 45 meters.

B) Cotton Perle Size 8: A 10 gram ball contains 80 meters.

C)  Cotton Perle Size 12:  A 10 gram ball contains 120 meters.

D) Cotton Perle Size 16: On a 10 gram ball which contains 143 meters.

E) Tatting Cotton Weight 10: On a 25 gram spool which contains 112 meters.

F) Tatting Cotton Weight 20: On a 25 grams spool and contains 192 meters. 

G) Tatting Cotton Weight 40: On a 25 grams spool contains 274 meters.
 
H) Sewing Silk Perle: A spool contains about 17.5 yards or 16 meters and is about a cotton perle #12 in size. 

I) Silk Perle #16: Labeled as 1000 Denier, which is on a card and contains 20 meters. This is in between a perle size 12 and size 16 and is marked as 0.25 mm in diameter. 

J) Silk Perle #9: This is on a card and contains 80 meters.  This is finer than a perle size size 16, it could be a perle size 30 but I can't find much information on this size but it is finer than the 1000 denier.

K) Silk Thread: This is on a spool that weighs 23 grams and has 503 meters. There is also a 5 thread assortment, with each bobbin having 40 yards for a total of 200 yards.
​
It should be mentioned that there are other sized that have not been shown or other threads like cotton or silk floss's as well as various hand/machine sewing threads.  Remember as the "size" goes up, the thread diameter gets smaller; if a pattern uses a Perle Size 5 and you want to use Perle Size 8, you will have to take more stitches per division and that may require the overall pattern to be adjusted.

When making your first yubinuki, I suggest starting with a perle of size 5 or size 8 as you will have less stitches and a thicker thread is easier to work with. As experience grows, then move to using size 12 and 16 and eventually you will be using silk "sewing" thread.

I will discuss where to purchase these threads in the next post.
Picture
0 Comments

Yubinuki Supplies Clarififcation

8/19/2018

0 Comments

 
NOTE: The post was originally posted on my personal site

​
This post is to clarify and expand on a few things that are required for making a core, before a core is made; this is so the appropriate items are acquired.

First up is the card stock used for the core.

When choosing the card stock (aka paper) that will be inside the core, it should be a nice thickness that when rolled at least twice, into a circle, it will provide enough support to the core and yet be a tiny bit flexible. 

DO not use regular everyday printer or copier paper for this, it is too thin, even if there is more than one layer of it. This paper is known as "20 Bond" and this refers to the weight of 500 uncut 11" x 22" sheets. The thicker the paper, the larger the weight (bond number). A good quality paper is in the range of 16-36, but these are not thick enough. 

So what is a good paper for Yubinuki? 

A paper that has a weight over 70 is a good place to start. FYI photo paper that is used in a printer is in the range of 24-71 pound, so if you want to buy thicker high end photo paper to then cut up go ahead, it is just an expensive way to get the paper for the core when there are less expensive way.

And what way would that be you may ask? Oh, how about the paper used for a quality magazine, catalog or brochure 
cover; not the paper inside the magazine or catalog but the cover of it! This paper is classified as 80-100 pound and the coating (a type of clay) that is added to the paper for the printing to stick, helps make it a bit more durable (in case the Yubinuki gets wet).  So I save the covers from magazines that I done reading but don't want to keep. I also save the covers from all sorts of catalogs I get; I particularly like the J. Peterman Company catalog covers. Another good paper source is those thick 'card' advertisements that are stuffed in the junk mail.  Just make sure you can get at least 4 inches in length. ​​
Picture
And what way would that be you may ask? Oh, how about the paper used for a quality magazine, catalog or brochure cover; not the paper inside the magazine or catalog but the cover of it! This paper is classified as 80-100 pound and the coating (a type of clay) that is added to the paper for the printing to stick, helps make it a bit more durable (in case the Yubinuki gets wet).  So I save the covers from magazines that I done reading but don't want to keep. I also save the covers from all sorts of catalogs I get; I particularly like the J. Peterman Company catalog covers. Another good paper source is those thick 'card' advertisements that are stuffed in the junk mail.  Just make sure you can get at least 4 inches in length. ​

To find out more about paper weights and thicknesses, refer to the chart from this website

Second item is the lining material.

This material is visible as the inside surface of the Yubinuki.

It is the first layer that is laid down, as part of the making the core and it covers the paper that provides the rigidity. In the picture to the right, the blue material on the core shown below is the lining material. 

The fabric for the lining material should be cut on the bias, this is so it can stretch, and follow a curve without causing pleats or creases. The fabric should at least be 28 mm wide. Why? the paper is cut to 11 mm so the fabric has to cover the inside surface and then be folded over and overlap the fabric folded from the bottom; this will make more sense in core making tutorial. The fabric should be cotton, as it does make contact with your skin and it should not be itchy and can absorb hand moisture. The fabric color can coordinate with the thread colors used to stitch the design but going with all black is also a wise choice since it won't show any dirt.   You can make your own bias tape and there are lots of information about that out on the web but if you want to cheat, go purchase bias tape from the sewing store but this is a polyester material. If you go this route get a DOUBLE FOLD tape that is 0.5" (12.75 mm wide; when the double folded tape is opened up, it will be 44 mm wide and that is more than enough for making the core. ​
Picture
The third an last item to discuss is the padding or as I call it wadding. 

This is what prevents the needle, when being pushed with the Yubinuki, from putting pressure on the finger in one spot. Traditionally this is uncombed silk fiber formed like a sheet and stretch really well so that it's easy to handle and form a suitable padding to the thimble bases. This sheet of silk fiber is what a spinner might acquire. This sheet of silk is not easy to find in the USA but from some spinning supply stores you can find
 spinning caps and hankies. There are alternatives to using silk that can be used from spinning suppliers and this would be roving - these are fibers that have been carded and aligned to make it easier to spin; look at Tencel, soy, cotton, and bamboo. Other materials such as cotton (embroidery) floss that has had the strands separated and laid down in parallel lines. Cotton balls can be used that are carefully pulled to create a long set of fibers (think of roving) that can be wound around the core. Quilt batting can also be used and can be found easily; it is available in many thicknesses and materials besides cotton such as wool and silk. If you decide to use this, go for the thinnest batting possible. 

This picture shows, from left to right - Soy for spinning, Cotton for spinning, Silk Cap for spinning all of which I purchased at various fiber festivals.
Picture
0 Comments

Yubinuki - Tools And Supplies

8/12/2018

0 Comments

 
NOTE: The post was originally posted on my personal site
Before you can make a yubinuki, one must have some tools and supplies. I will cover the materials for making a yubinuki in another post. I use the term supplies as those items that are used again and again to make a yubinuki where as materials are those items required to make a specific yubinuki, yet they can be generally detailed.


Here is a list and a description of what/why you need them. Again, this is a list based upon what I have found to be readily available here in the USA. 

NOTE: All of these will make sense as you work through the various tutorials.

Tools:
  • Small Scissors with a fine point - this is for cutting threads especially when working on a yubinuki
  • Measuring Tape, flexible, with millimeter markings - for measuring a finger, to determine the inside diameter of the yubinuki.
  • Metal Ruler or Plastic Cutting Ruler - 6" or more in length for cutting paper and the cloth lining for the yubinuki core.
  • Large Scissors or Rotary Cutter - for cutting paper and the cloth lining for the core.
  • Cutting Mat - if you use a rotary cutter.
  • Embroidery Needles in various sizes. Depending on the thread size you are sewing with the eye of the needle will have to be large enough to accommodate that thread. Get a pack of these since having a sharp needle is important.
  • Threader - So you can easily thread your needle. Some threads are very small in diameter and this will make your life easier.
  • Pins - preferably "silk" pins as they are sharper and smaller than LARGE glass head pins.
  • Pin Cushion - for holding needles and pins.
  • Magnet - this is optional but I use it for finding pins that have been dropped on me or the floor.
  • Calculator - for doing some math. This is optional, I will show in a tutorial how to make a master division sheet so you don't have to do math.

Supplies:
  • Fine Tip Marking Pen - For marking the divisions of your pattern, on the core. I use a permanent ink.
  • Card Stock or Heavy Paper - This is the foundation of the core, this will be discussed in detail in the core tutorial
  • Tyvek, Plain Paper or Interfacing - For marking the pattern divisions and it should be thin! I like tyvek as it holds up better. Again this will be covered in the core tutorial.
  • Regular Sewing Thread - This is to sew part of the core and 100% cotton is the best! Color is not as important but you may want it to match the lining of the core.
  • Padding/Wadding - this is used to pad the yubinuki. This can be cotton from a cotton ball or cotton embroidery thread or wool or silk "top" used for spinning (this is raw fiber). 
  • Double and/or Single Sided Adhesive Tape - used for securing various parts of the core during assembly.
  • Bias Cut Cloth - this is for the inside surface of the yubinuki which is what is against the skin of the finger. It also is what covers the core.  

The pictures below will help you visualize some of the tools you will need. Next time I will discuss the materials that are used to actually make a yubinuki.  ​
0 Comments

Yubinuki

8/11/2018

0 Comments

 
​Yubinuki is another Japanese textile art form I have just learned and I have been fascinated with for a while.  Last month, I fell down the rabbit hole and bought books from Japan, some supplies based upon what I had read and seen online and started to learn about how to make them since I find the designs wonderful and the technique can also be applied to the obi of a temari.

So what is Yubinuki? 
The word translates to thimble ring.

What does that mean?
In most western countries, a thimble is either metal or leather and it is worn on the end of a finger and it is used to push the sewing needle through the item being sewn. In Japan, they wear the thimble ring, worn usually on the middle finger, just above the knuckle, to push the needle. 

Plus, as with common with traditional crafts in Japan, this has grown into an art form; people wear them as rings or just make and collect them for the colors and designs. 

To be honest, I am not going to go into the details of the history of them as there are lots of posts out on the web about it so I am providing a link to one that has a good explanation. This is a link to a website that is a bit old, but it is in English and there are several posts on how to make a core and more; just reading all the blog posts is very informative.

What you will see in this and future posts are yubinuki that I make including in-process photos and my thoughts on the materials I find and use to make them.

Here are images of my first three. I made the first one using a card stock core, bias tape, interfacing, 6 strand cotton floss for the wadding and 3 strands of cotton floss for the stitching. Since making that first one another temari artist has been giving me advice on how to make them and what types of threads to use. After trading many emails, I made the purple one and then the white/green/brown one. 

The third one is based upon a design that was in one of the books from Japan. That design had 24 stitches (and rounds) of the white in the first division. Not having the silk thread that is also thinner than the size 8 perle cotton I was using, I decided to do the math! I found it only took 12 stitches in the perle to fill the division on the core I had made thus I would only need 2 stitches for each of the other bands where the pattern had indicated 4; and it worked out perfectly!

Have fun looking at the pictures below, and watch out for more on this.
0 Comments

New Name!

8/8/2018

0 Comments


I have finally settled on a new name and have begun the rebranding of this website.

If you look at the banner, you will now see that this website is now The Adventurous Smith.

Why I am a SMITH? 
If you read Wikipedia and look at the Visual Thesaurus, you will see that not only is a smith someone who works in metal but 
it can also mean a person who is a skilled worker.  Since I have moved beyond Silversmithing, I am now a smith! 
​

Picture
0 Comments

    RSS Feed

    How to Aquire Your Own Shop Elf

    Archives

    October 2020
    August 2020
    March 2020
    December 2019
    November 2019
    October 2019
    September 2019
    August 2019
    July 2019
    June 2019
    May 2019
    March 2019
    February 2019
    January 2019
    December 2018
    November 2018
    October 2018
    September 2018
    August 2018
    July 2018
    May 2018
    April 2018
    February 2018
    January 2018
    November 2017
    October 2017
    September 2017
    July 2017
    June 2017
    May 2017
    April 2017
    March 2017
    February 2017
    January 2017
    December 2016
    November 2016
    October 2016
    September 2016
    August 2016
    July 2016
    June 2016
    May 2016
    April 2016
    March 2016
    February 2016
    January 2016
    December 2015
    November 2015
    October 2015
    September 2015
    August 2015
    July 2015
    June 2015
    May 2015
    April 2015
    March 2015
    February 2015
    January 2015
    December 2014
    November 2014
    October 2014
    September 2014
    August 2014
    July 2014
    June 2014
    May 2014
    April 2014
    March 2014
    February 2014
    January 2014
    December 2013
    November 2013
    October 2013
    September 2013
    August 2013
    July 2013
    June 2013
    May 2013
    April 2013
    March 2013
    February 2013
    January 2013
    December 2012
    November 2012
    October 2012
    September 2012
    August 2012
    July 2012
    June 2012
    May 2012
    April 2012
    March 2012
    February 2012
    January 2012
    November 2011
    August 2011
    July 2011
    June 2011
    May 2011
    April 2011
    March 2011
    February 2011
    January 2011
    December 2010
    November 2010

    Jan - Nov 2010 History
    File Size: 2272 kb
    File Type: pdf
    Download File

    Jan - Dec 2009 History
    File Size: 2332 kb
    File Type: pdf
    Download File

    Categories

    All
    42
    A Year Of Repousse
    Blacksmithing
    Blogoversary
    Box Project
    Business
    Chasing & Repousse
    Commission
    Education
    Embroidery
    Enamel
    Entries
    Entry
    Exhibition
    Facebook
    Filing
    Fold Forming
    Gold
    Holloware
    Hot Forging
    Hydraulic Press
    Jewelry
    Keum-boo
    Learning
    Leather
    Market
    Metal
    Patina
    Photography
    Polishing
    Publications
    Raising
    Sanding
    Santa Fe Symposium
    Shop Elf
    Sinking
    Social Media
    Soldering
    Store
    Studio Visits
    Superbowl Challenge
    Teaching
    Teapot Project
    Technique
    Temari
    Tin
    Tools
    Vessels
    Visiting Workshops
    Weaving
    Website
    Workshop
    Yubinuki

Powered by Create your own unique website with customizable templates.