Follow Me On:
The Adventurous Silversmith
  • Home
  • Blog
  • Portfolio
    • Metal Work >
      • Chasing & Repousse
      • Holloware
      • Jewelry
      • Other Wonderful Items
    • Fiber Arts >
      • Temari
      • Yubinuki
  • Resources
    • Library
    • Tools & Equipment
    • Links
  • About
    • Artist Statement
    • Curriculum Vitae
    • How it is Made
    • Contact

Sea Urchin IV

10/21/2015

3 Comments

 
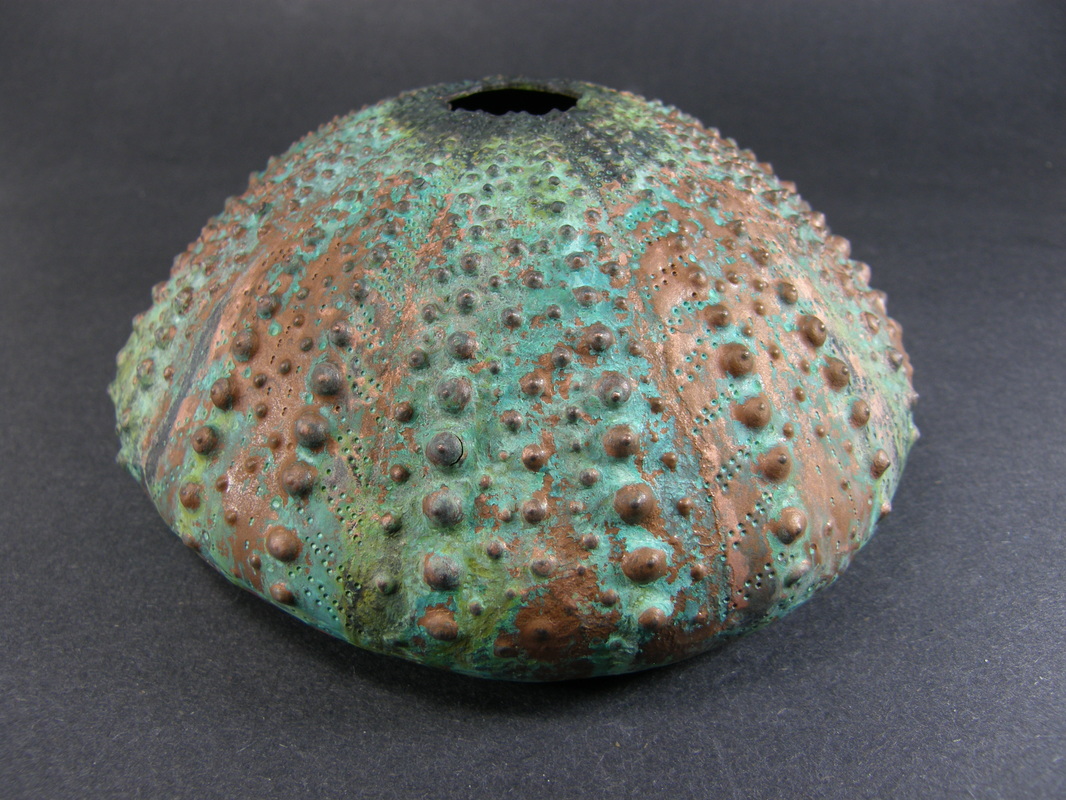
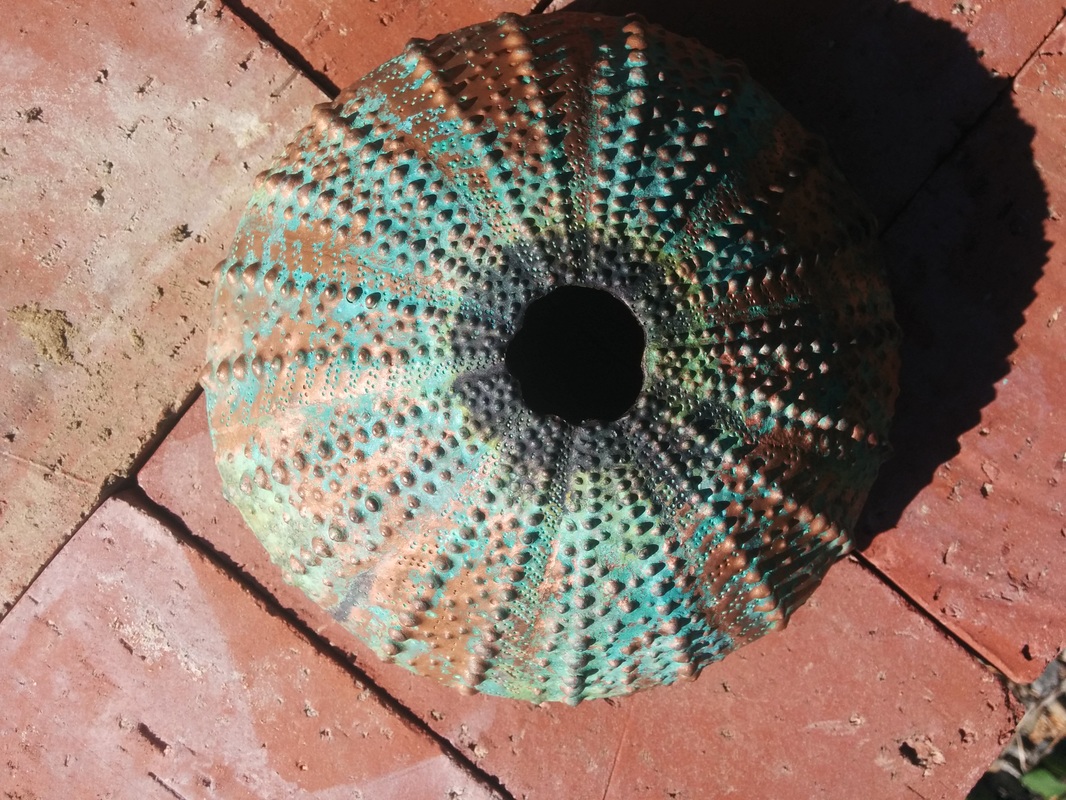
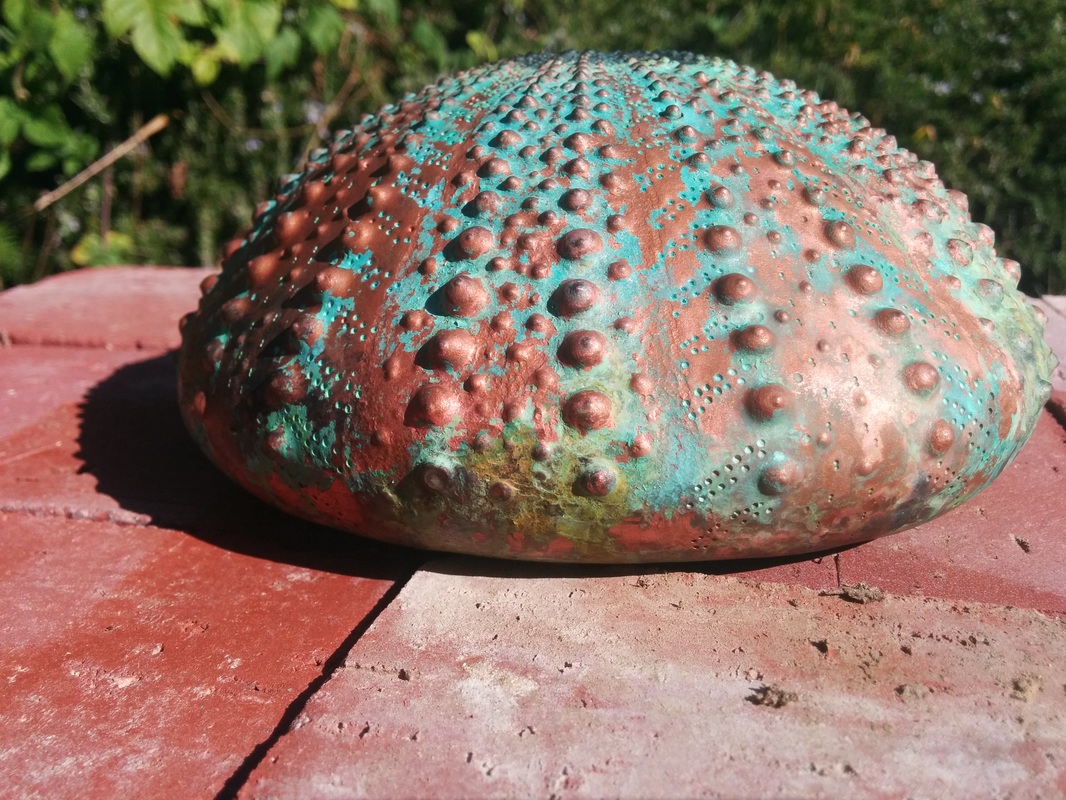
I finished the FOURTH Sea Urchin this morning. This is the last one in the BIG commission I was given back in May when I sold my first one and basically this is the majority of my work since then. Yes I squeezed in a cuff or two and a few workshops - given and taken but this has consumed my free time around all of them.  I promised I would get them ALL delivered before Thanksgiving as they are to be holiday presents; so thankfully I have met that promise and then some. 

Follow this link to see the other posts concerning the Sea Urchin series.

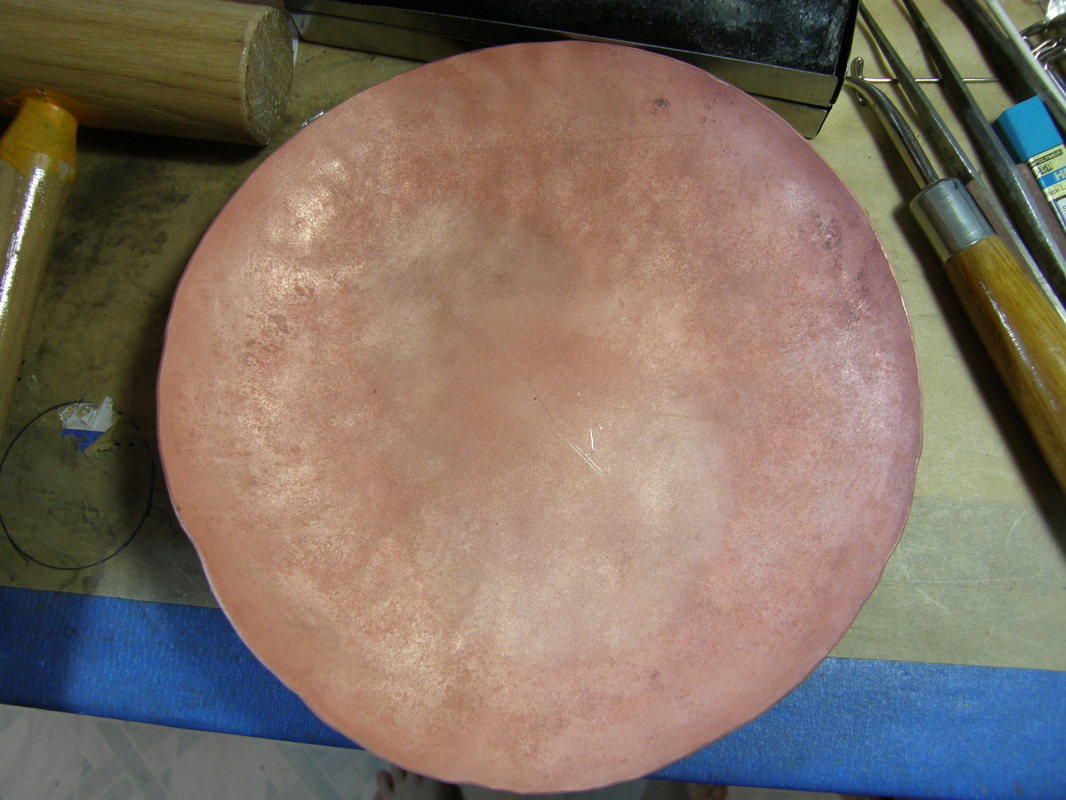
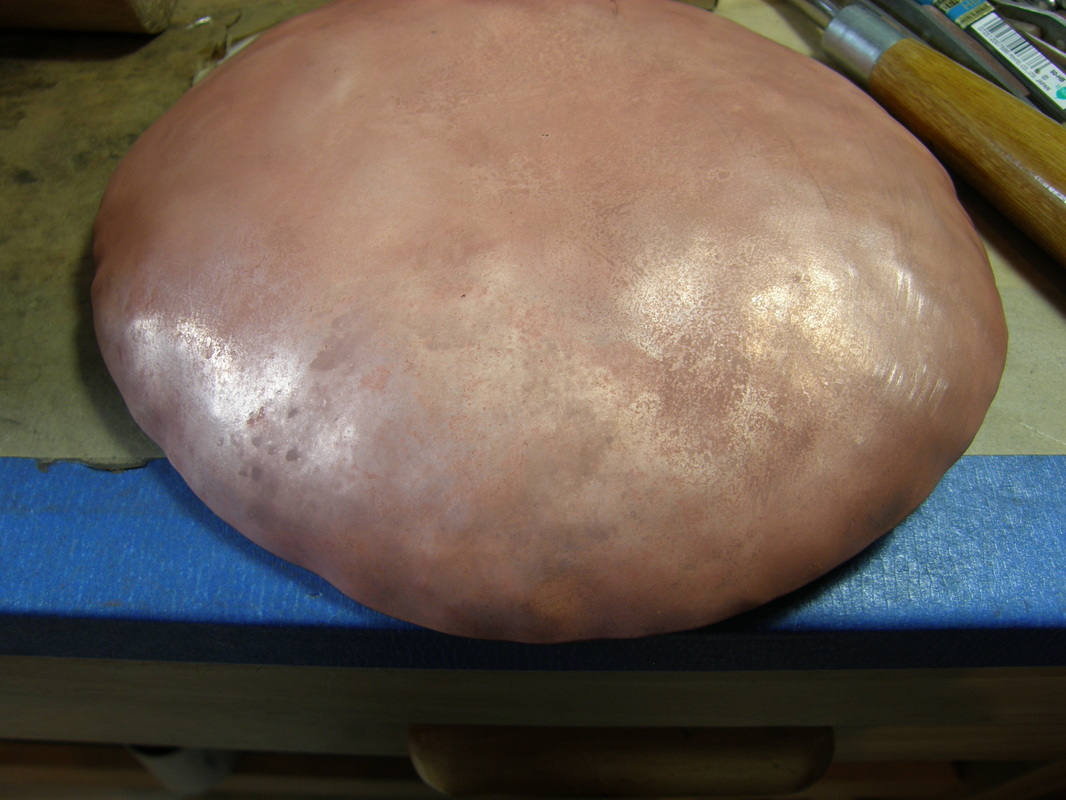
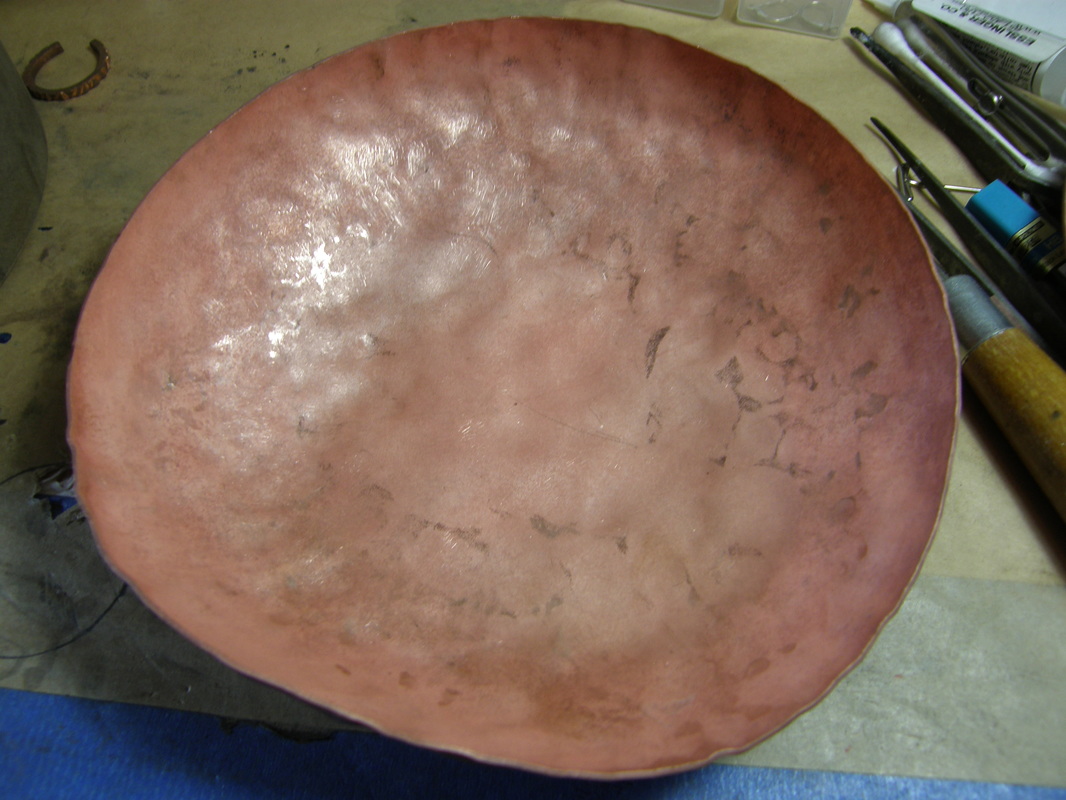
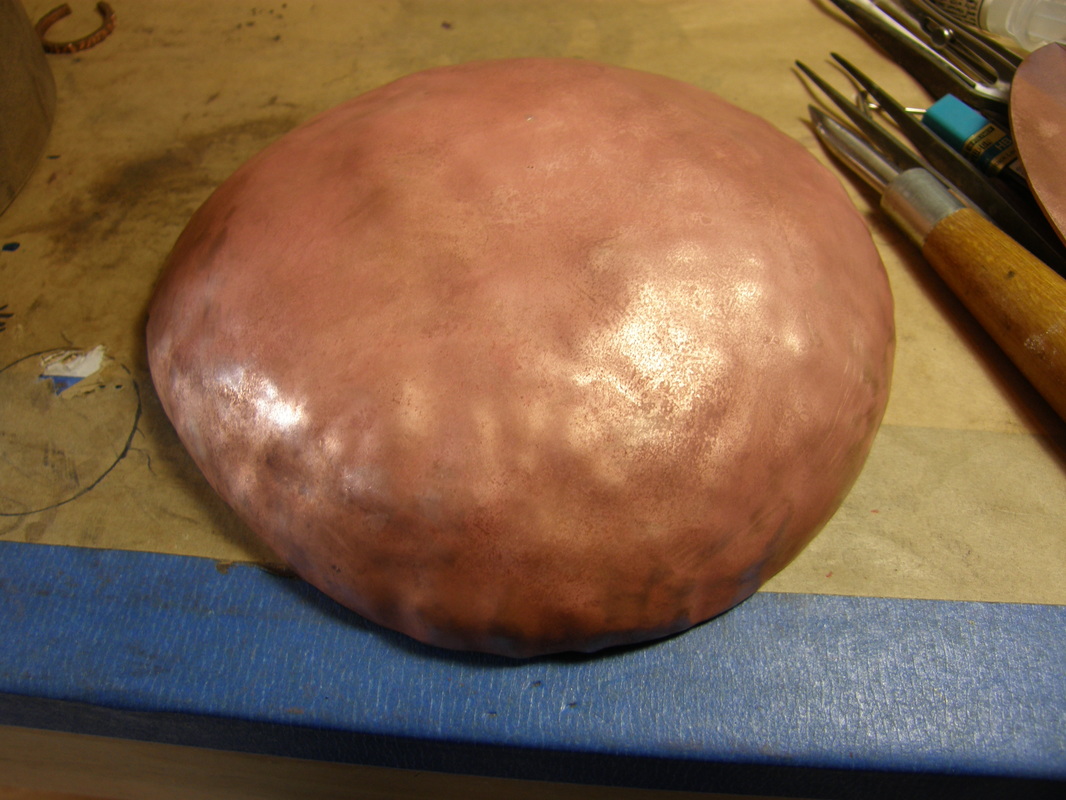
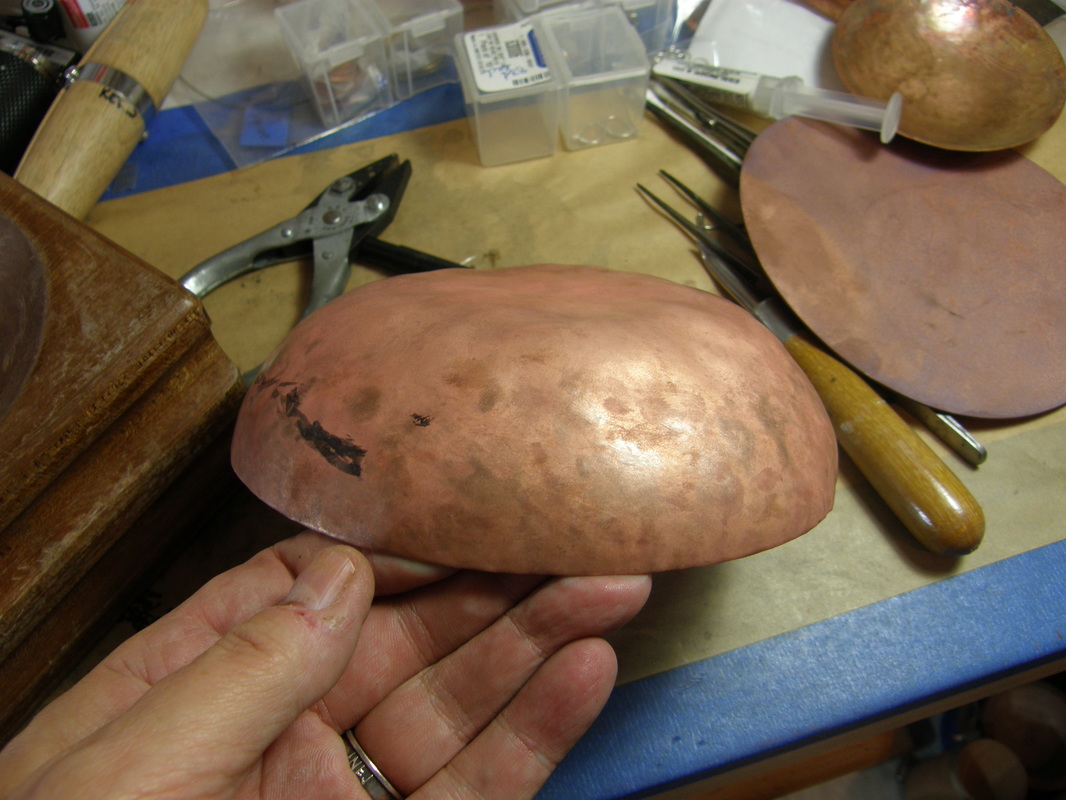
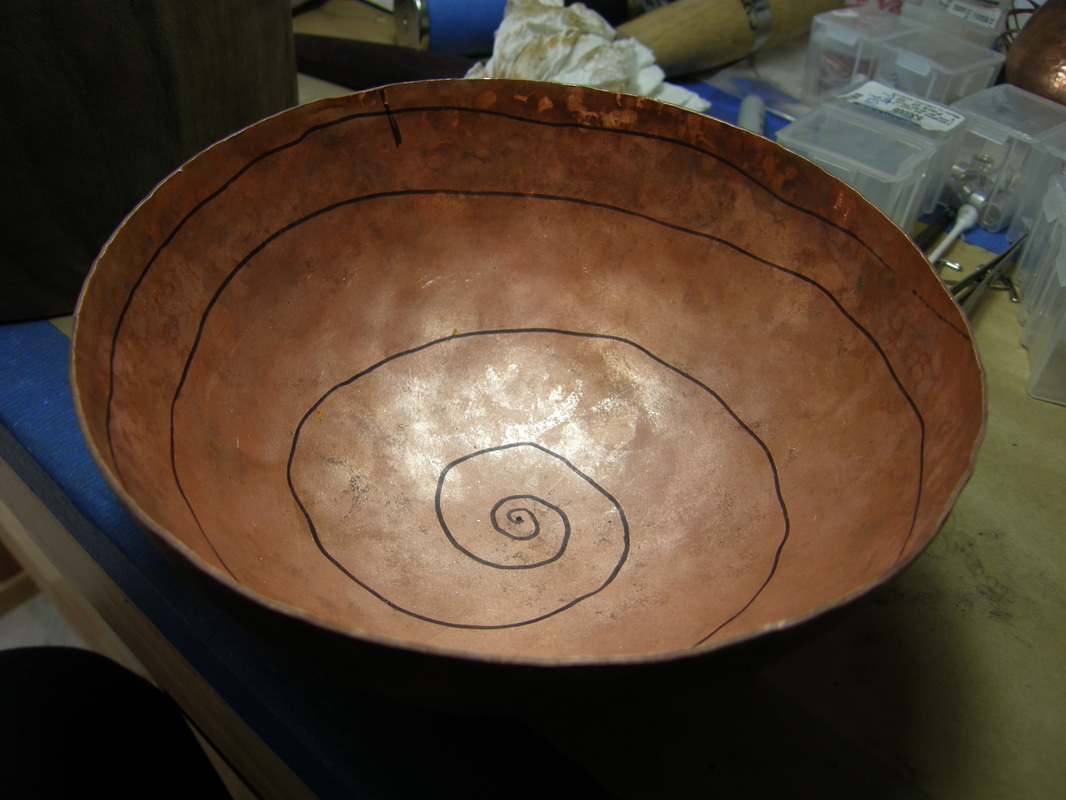
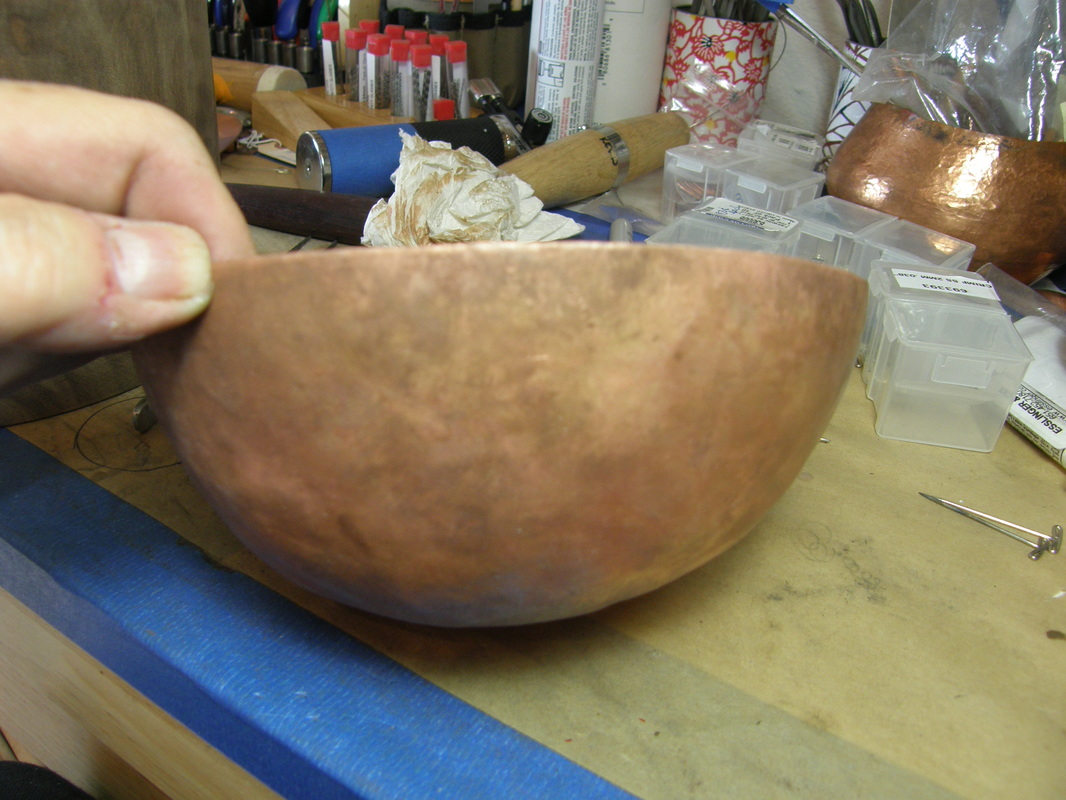
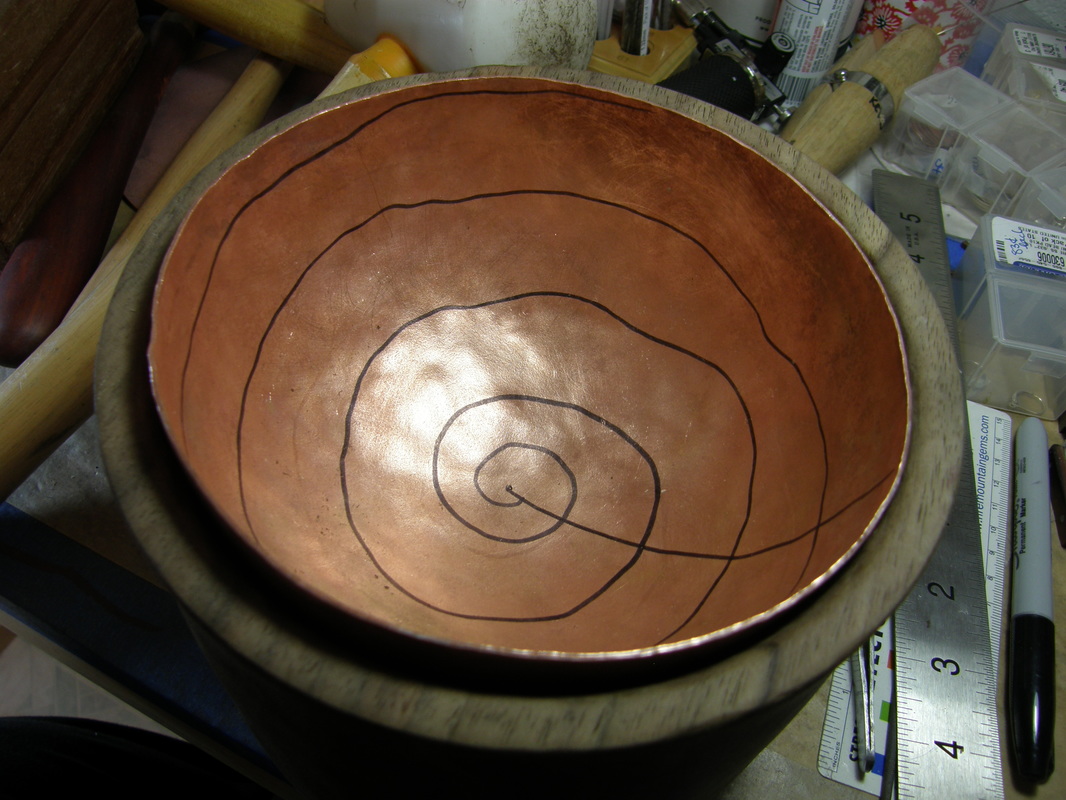
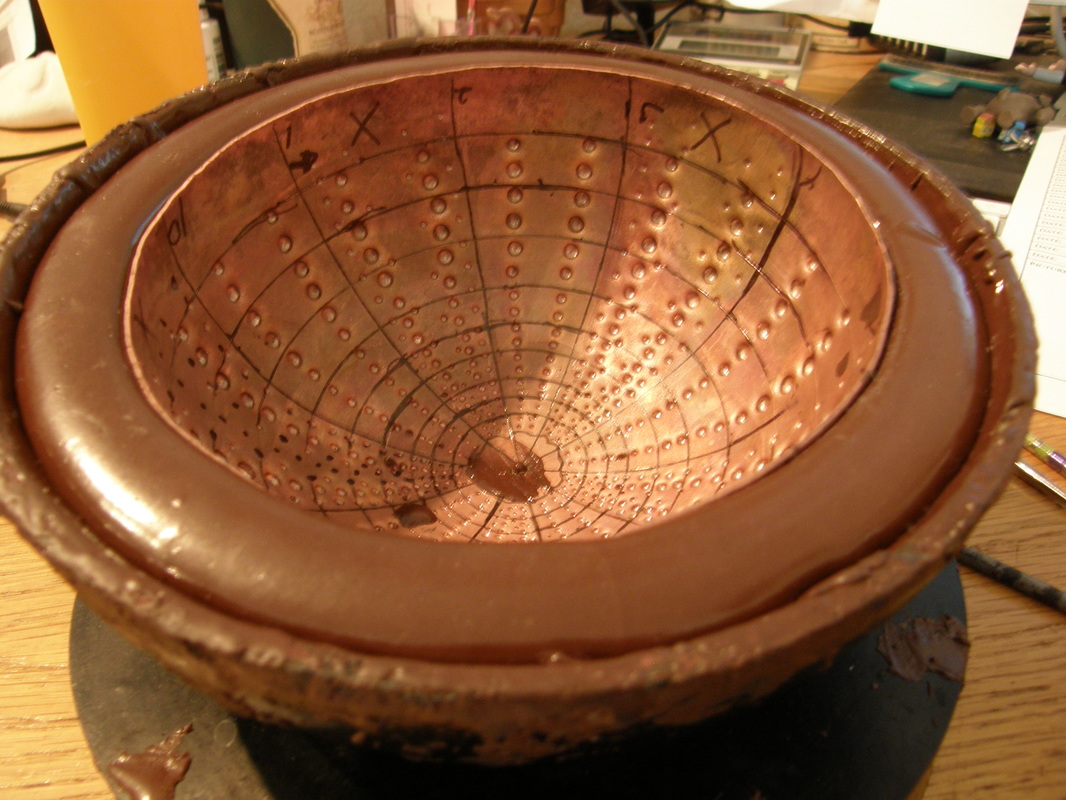
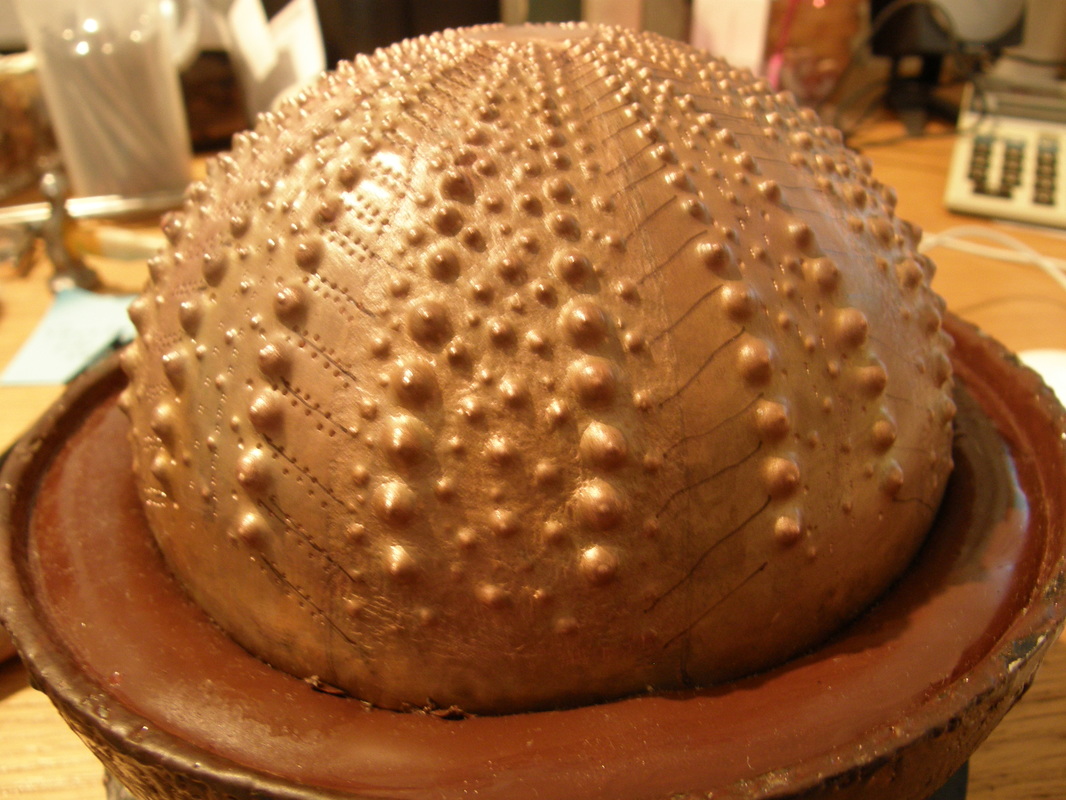
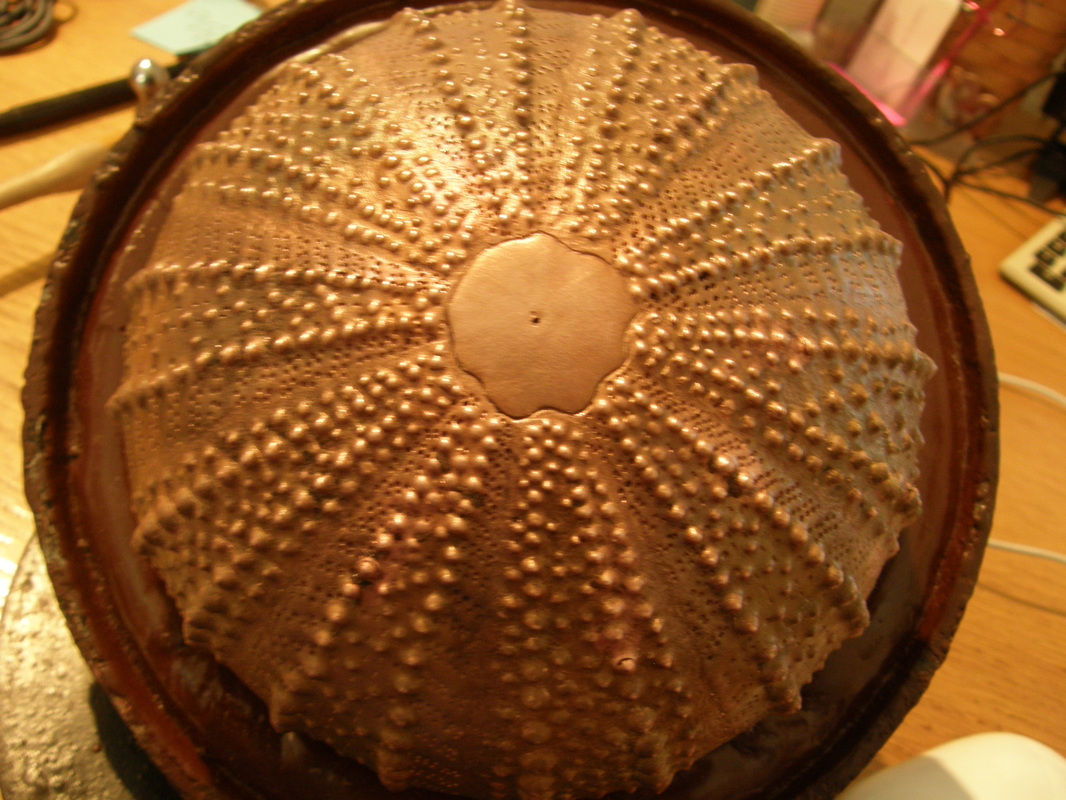
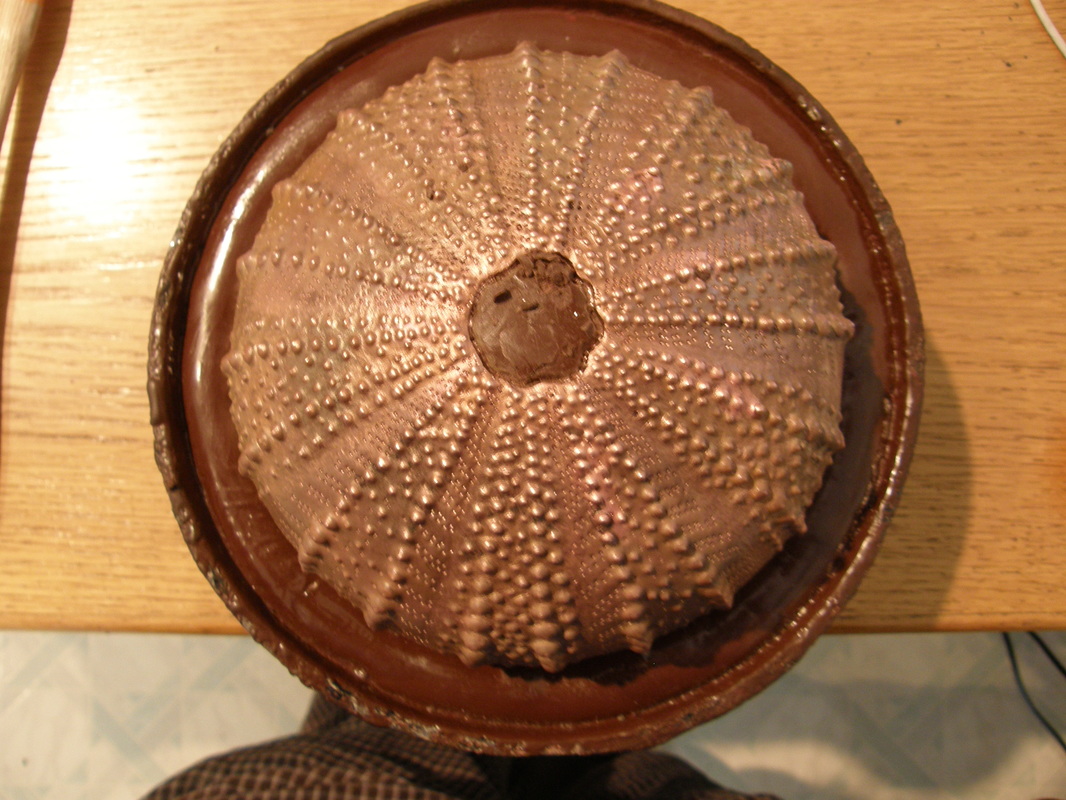
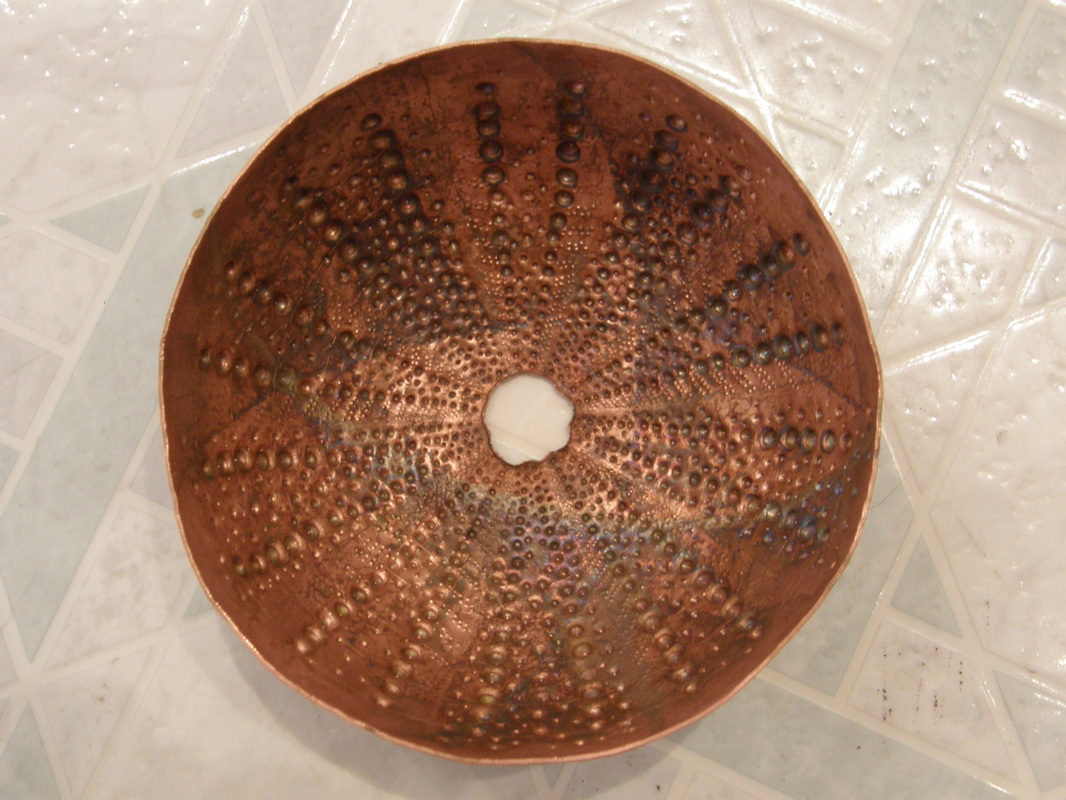
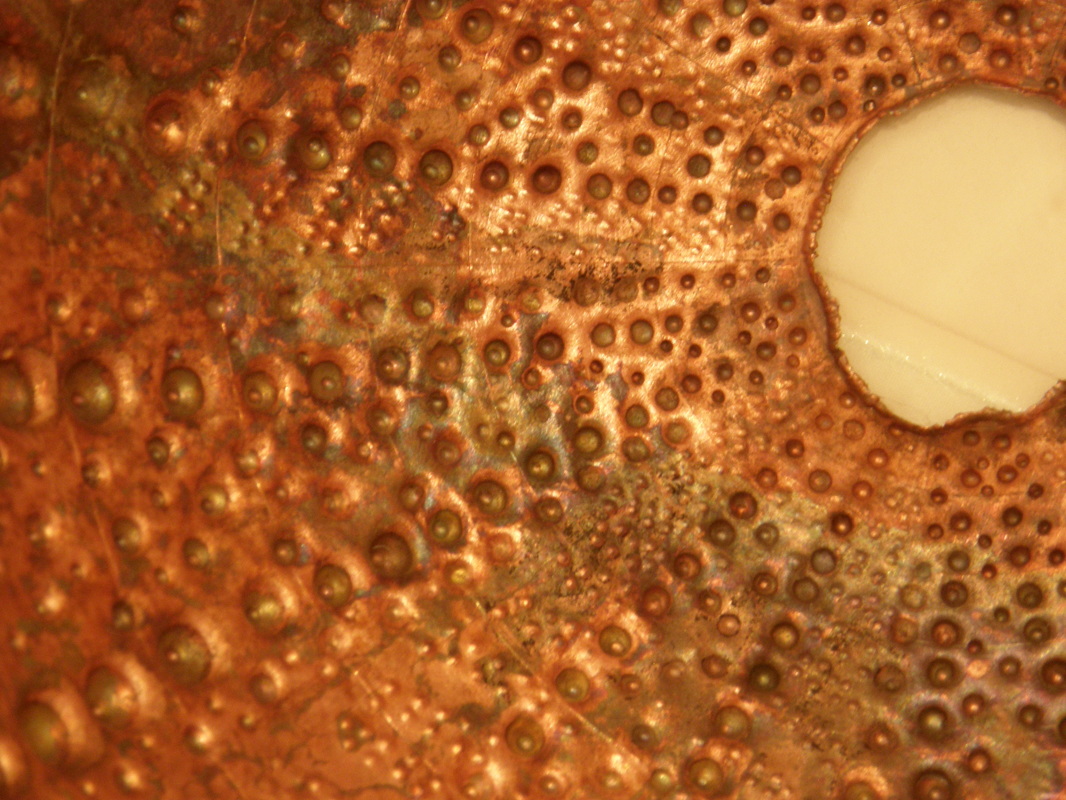
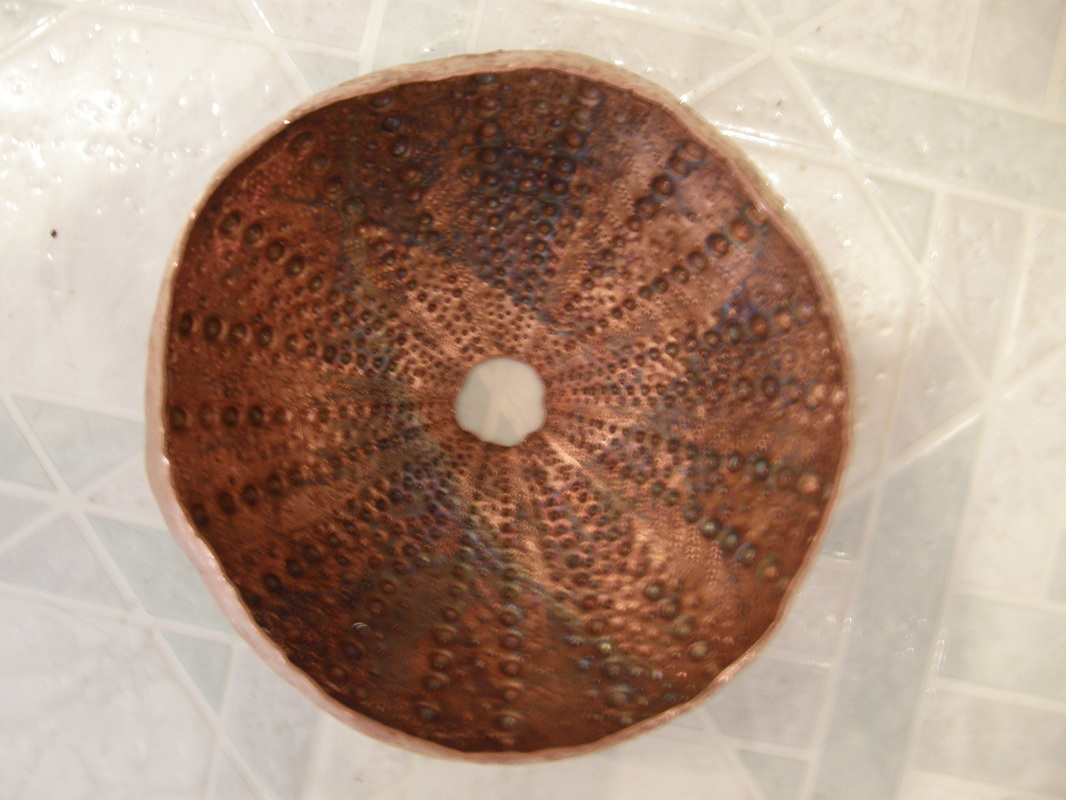
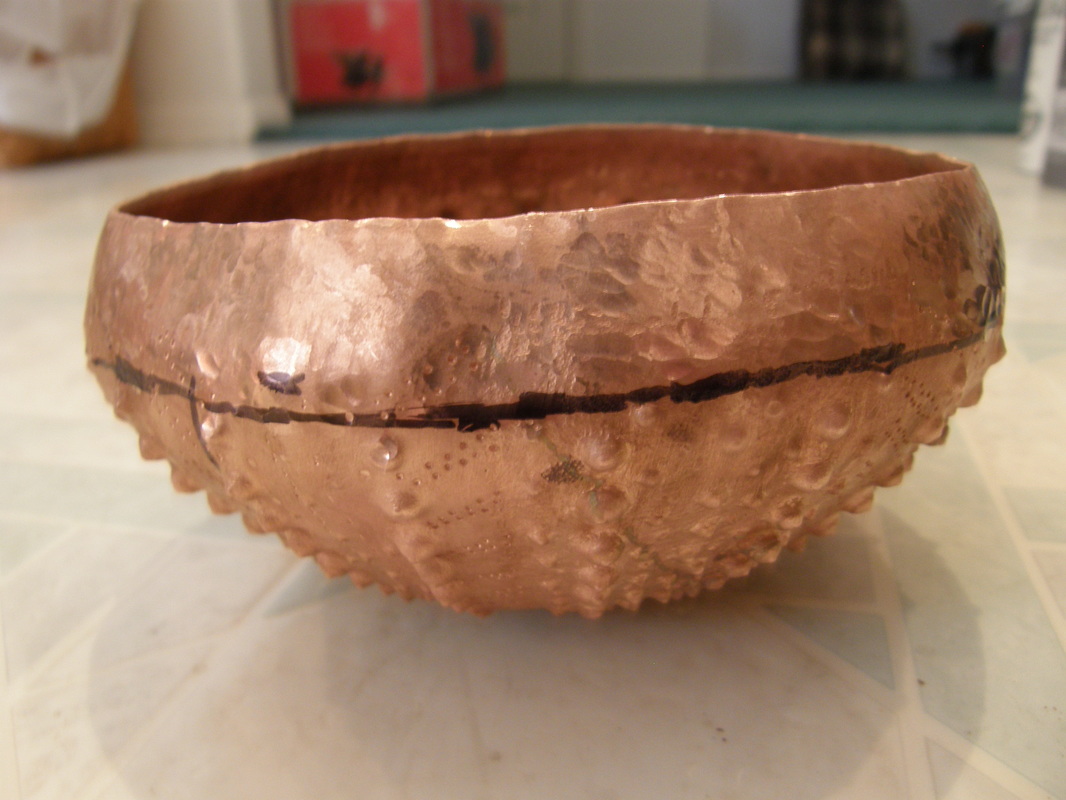
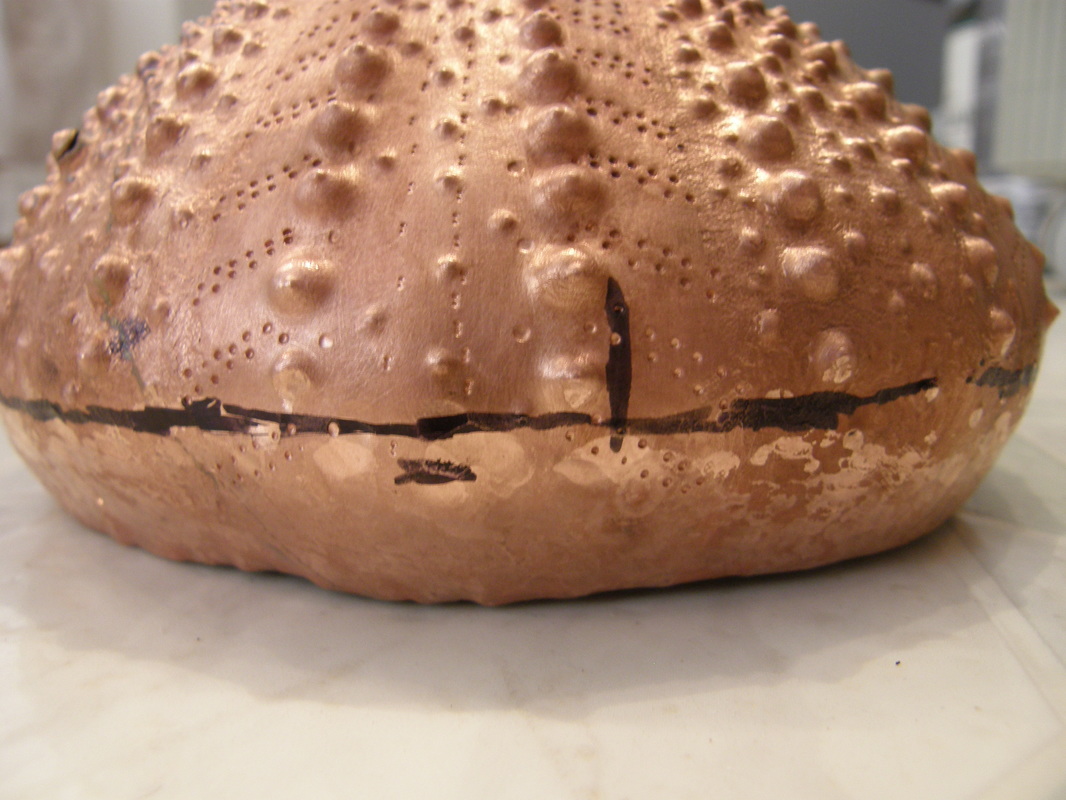
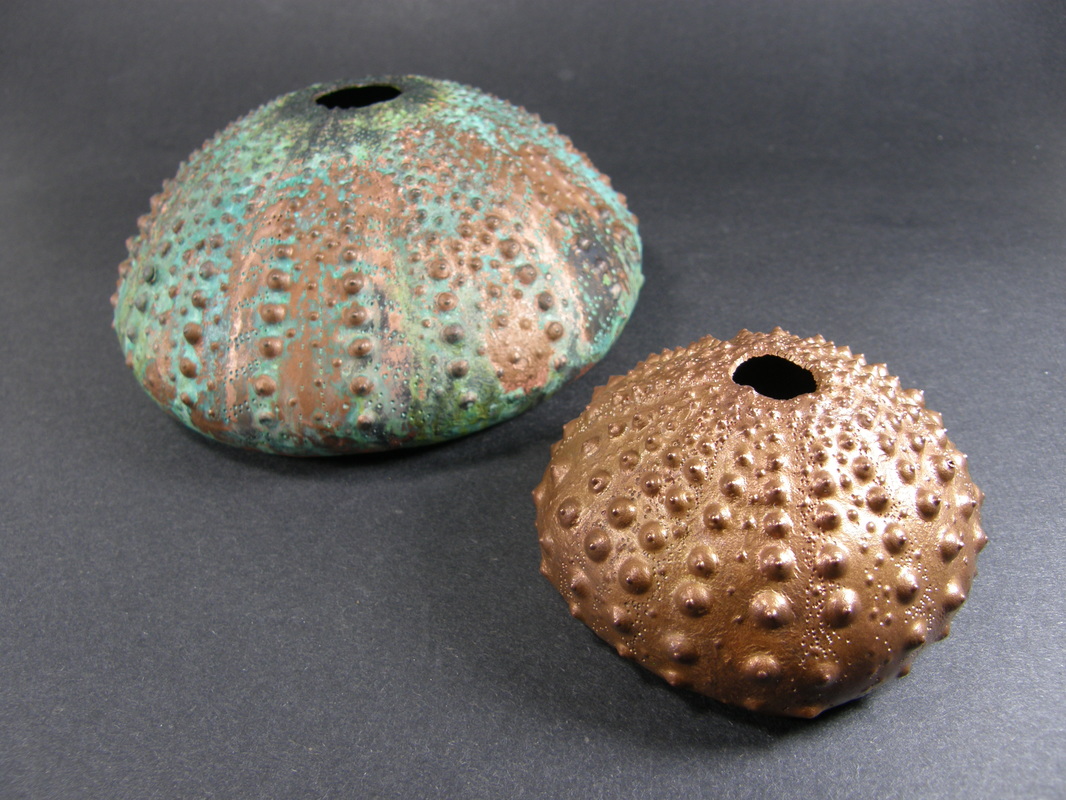
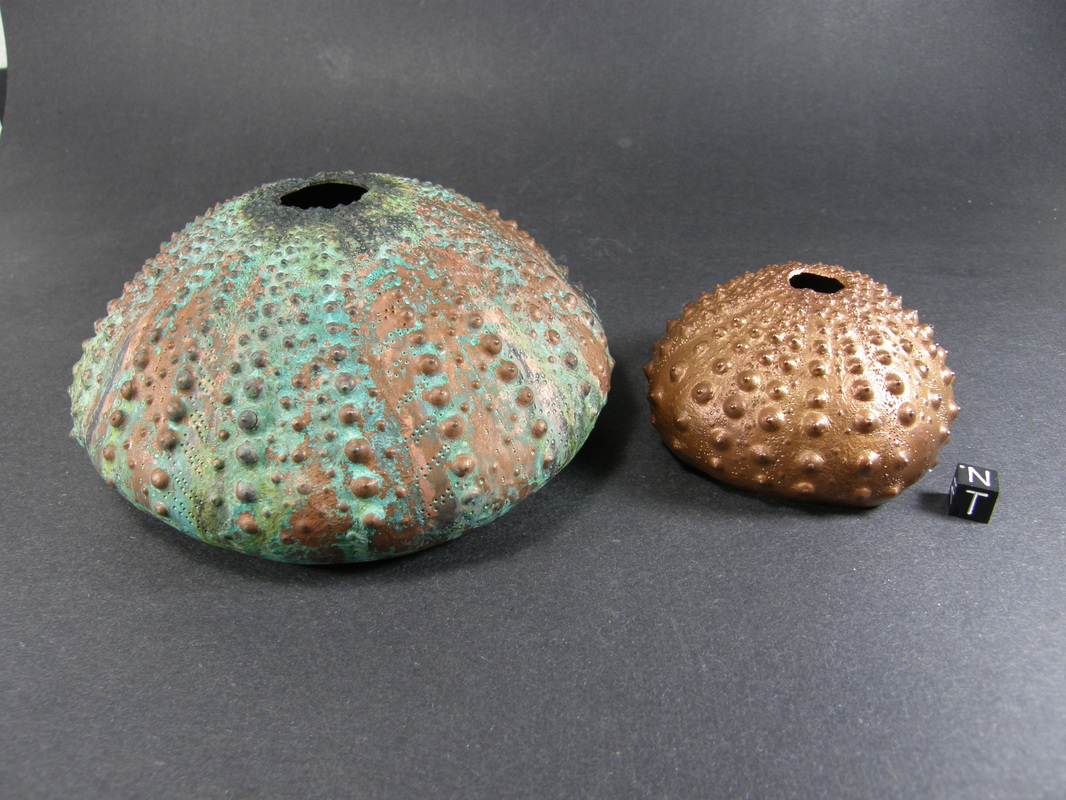
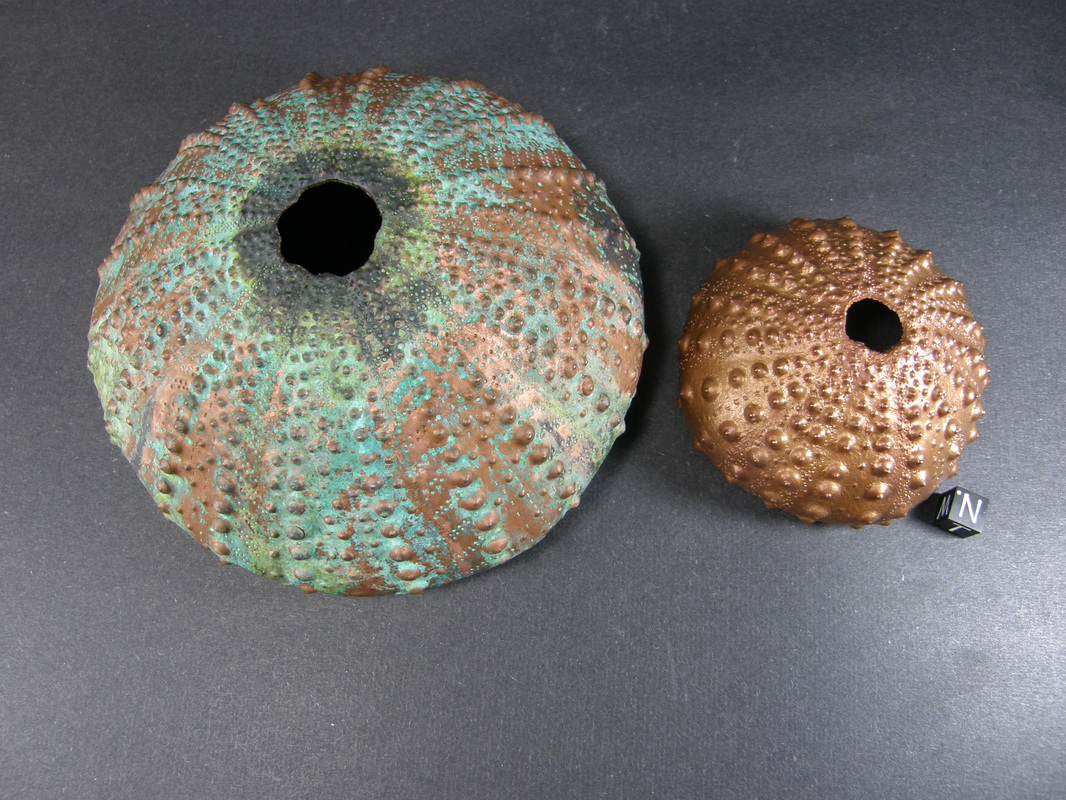
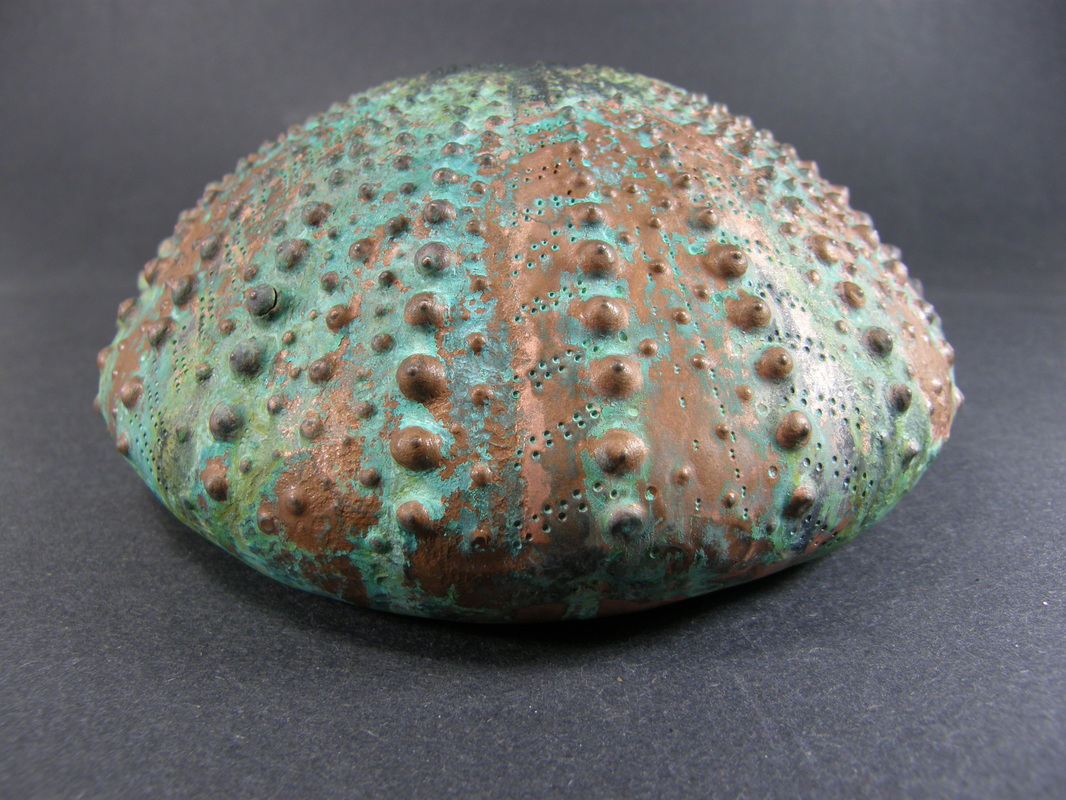
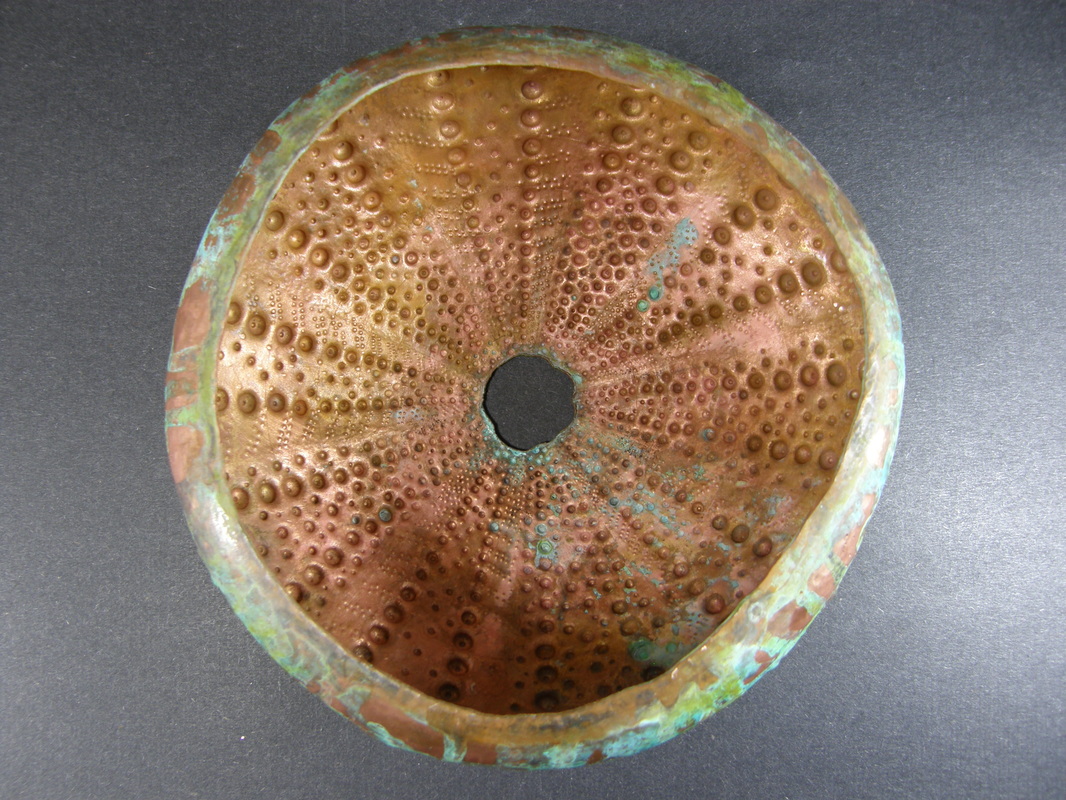
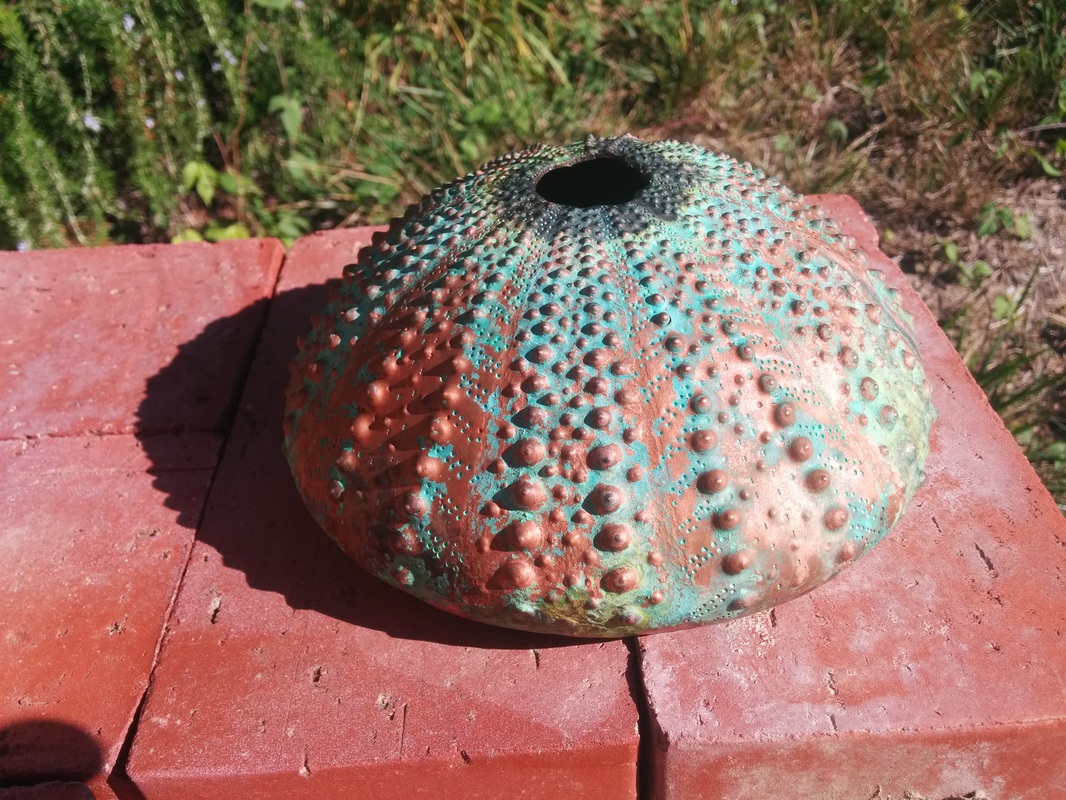
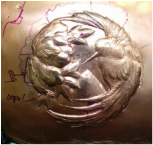
This sea urchin is an EXTRA LARGE where as the first and third were small and the second was medium/large.  I started with a 7" diameter 18g copper disk which was raised. I had to bring in the walls a bit or else it would not fit IN the pitch bowl. YES, IN IT. I removed most of the pitch from the bowl so I could literally get the shell into the bowl and then back fill around it. This allowed me to do all the repousse without having to remove and reposition it as I worked my way round the inside.  I finished the chasing last weekend and then I had to raise the edge more to roll it under. I then applied a Liberty Green patina to give it that "long under the sea" look. 

​Enjoy the process pictures. 
3 Comments

My Next Article Was Published

10/20/2015

0 Comments

 
By now, I hope, you have seen my two articles in the November issue of Art Jewelry Magazine. 
And if NOT here is a picture of the cover so you can go get it . 
Picture
See the third item on the left... Learn basic chasing using recycled tin... Well that is the first article.  It is about doing a simple chasing and repousse project on tin like the one you get those little mints in.   Here is a picture of the article cover and it starts on page 62.​
Picture
And the second article is a supplement to the first and it is oriented to getting beginners started; explaining tools, hammers, pitch bowls and pitch. My editor for the article suggested we split the original into two and since she supplied some of the equipment foe row pictures, she also gets credit for it. This article starts on page 68, right after the project article.
Picture
0 Comments

Low-Relief Chasing & Repousse

10/10/2015

0 Comments

 
Picture
As part of my visit to Nechamkin Silver Studio, two weeks ago, I spent 3 days working on low-relief chasing and repousse. 
This is a style that Liza is very proficient at and which I want to do on my teapot. I started to learn this style last year when I was at the studio and this session was to move my skills along. 

I like low-relief chasing & repousse yet I found it frustrating; I felt like a beginner - AGAIN. I knew what to do but the habits of "regular" and "high" kept wanting to take over and as a result, a couple of times I had to go back and push areas down or out as I had move them too far.

I will not finish the piece you see in the mini-movie below. I am going to start it again so when I do finish it I have my original and a completed piece which, I hope, will look much much better. 

​As usual, watch and enjoy!

0 Comments

Making A Teapot - Session One

10/10/2015

 
Two weeks ago I was Nechamkin Silver Studio to start what I consider to be an essential project for silversmiths. I am going to say it is a must on the silversmith's "bucket list"  - THE TEAPOT.  

Note: we are talking traditional silversmith, not a present day silversmith who makes jewelry out of silver.  A traditional silversmith how makes hollowware such as bowls and other vessels, trays, dishes, cutlery; and other functional items.

Making a teapot has been on my list of things to learn and make since I started on this path over 5 years ago. Actually it was on my list since I was a little kid and read about silversmiths and now I am finally starting the project.

I have read as many books as I can get my hands on about raising and the various parts of the teapot - the body, the spout, the handle, the lid and the feet or support on the bottom. Then there is the making of the parts - the raising, sinking soldering, making patterns and more. BUT until you start planning and making one, the concept of how much time and effort it takes starts to sink in (yeah, that's a metal pun) and unless you have someone to guide in mentor you, the teapot can be an exceptional failure. 

That brings us to earlier this year when Liza Nechamkin and I started to plan this project which will take many visits to her studio and a lot of homework on my part afterwards to either practice what I learned in each studio visit or to move the project along. 

Which brings us to two weeks ago, which was the first session - Making the body of the teapot.  Way back when, many teapots had raised bodies but raising a body can take time and can be tea-dious (see another pun) and so the body of this teapot will be seamed.     The best seam for long tubes is lapped and keyed which is what I learned to do on the first day of my visit along with forming the sheet into the tube and wiring it for soldering.  On the second day I soldered the tube with hard and I mean HARD solder.  Trust me hard solder does not like to flow and getting a 6" long seam soldered is difficult - imagine that easy solder flows like butter when melted; then hard solder flows like frozen cheese!  Plus the tube started out as 12" long and is 18g (0.04") thick which requires massive amounts of heat to just bring it up to temperature and THEN you have to solder it with hard solder.    

But before I soldered the silver tube, I made a practice tube out of copper with the lapped and keyed seam so I had twice the practice of doing it all including the soldering. 

The soldering was done in three phases - tacking it, the soldering and then the fixing of areas where the solder did not flow or did not flow enough.  The entire process was nerve wracking to say the least but I did it with Liz's wonderful instruction.

Now I have a massive tube of silver on my workbench.  Next time we will clean up the solder and planish the seam and THEN we will raise the top and bottom in.  Until that next session, which will be sometime next year, I will be practicing making lapped and keyed seam and soldering the seams closed.  Hmm, tricket boxes?

Here is a video of the process, enjoy. 

It Is All In The Details

10/6/2015

0 Comments

 
As when learning anything, learning  chasing and repoussé, has a progression of skills such as the basics of getting the design on the metal;  learning how to create volume and definition; adding details;  and then saying you are done "LEARNING" - and now you just DO IT.

As time and your experience progress, you will either strive to advance your skills OR be content where you are, with your skills.

l knew there was more to learn... I always feel there is more to learn.

For me, I have spent this year working to push my skill set to a new level.  One might not consider it a skill but adding those fine details that make a piece POP and how to do it was what I was hoping to accomplish. It is one thing to make practice pieces and struggle with choosing the right tool to make hair look real or pushing up, down, left and over with the curl of a leaf only to have it crack. It can be frustrating knowing what you want to do but never quite getting it.

I decided to short cut the frustration and take some lessons to teach me HOW TO SEE what I wanted to do. The instructors were teaching me flowers and details and textures but I was learning to see how to get there. And with so many of the classes I take it is not the project but a process and technique I can walk away with. 

Earlier in the year I went to Davide Bigazzi (my Dogwood Flower cuff) and this past week I was with Liza Nechamkin who does some amazing low-relief chasing & repousse and fine detail work.

But Friday I went back to the MET to look at the details of pieces and what it was that added that realistic touch. This is the 4th time I have been to the MET 3 years and like advancing my skills as a Silversmith; each time I have gone and seen what I needed to learn at that time.

Here are two movies - what I saw and what I went to see. 
0 Comments

    RSS Feed

    How to Aquire Your Own Shop Elf

    Archives

    October 2020
    August 2020
    March 2020
    December 2019
    November 2019
    October 2019
    September 2019
    August 2019
    July 2019
    June 2019
    May 2019
    March 2019
    February 2019
    January 2019
    December 2018
    November 2018
    October 2018
    September 2018
    August 2018
    July 2018
    May 2018
    April 2018
    February 2018
    January 2018
    November 2017
    October 2017
    September 2017
    July 2017
    June 2017
    May 2017
    April 2017
    March 2017
    February 2017
    January 2017
    December 2016
    November 2016
    October 2016
    September 2016
    August 2016
    July 2016
    June 2016
    May 2016
    April 2016
    March 2016
    February 2016
    January 2016
    December 2015
    November 2015
    October 2015
    September 2015
    August 2015
    July 2015
    June 2015
    May 2015
    April 2015
    March 2015
    February 2015
    January 2015
    December 2014
    November 2014
    October 2014
    September 2014
    August 2014
    July 2014
    June 2014
    May 2014
    April 2014
    March 2014
    February 2014
    January 2014
    December 2013
    November 2013
    October 2013
    September 2013
    August 2013
    July 2013
    June 2013
    May 2013
    April 2013
    March 2013
    February 2013
    January 2013
    December 2012
    November 2012
    October 2012
    September 2012
    August 2012
    July 2012
    June 2012
    May 2012
    April 2012
    March 2012
    February 2012
    January 2012
    November 2011
    August 2011
    July 2011
    June 2011
    May 2011
    April 2011
    March 2011
    February 2011
    January 2011
    December 2010
    November 2010

    Jan - Nov 2010 History
    File Size: 2272 kb
    File Type: pdf
    Download File

    Jan - Dec 2009 History
    File Size: 2332 kb
    File Type: pdf
    Download File

    Categories

    All
    42
    A Year Of Repousse
    Blacksmithing
    Blogoversary
    Box Project
    Business
    Chasing & Repousse
    Commission
    Education
    Embroidery
    Enamel
    Entries
    Entry
    Exhibition
    Facebook
    Filing
    Fold Forming
    Gold
    Holloware
    Hot Forging
    Hydraulic Press
    Jewelry
    Keum-boo
    Learning
    Leather
    Market
    Metal
    Patina
    Photography
    Polishing
    Publications
    Raising
    Sanding
    Santa Fe Symposium
    Shop Elf
    Sinking
    Social Media
    Soldering
    Store
    Studio Visits
    Superbowl Challenge
    Teaching
    Teapot Project
    Technique
    Temari
    Tin
    Tools
    Vessels
    Visiting Workshops
    Weaving
    Website
    Workshop
    Yubinuki

Powered by Create your own unique website with customizable templates.