Follow Me On:
The Adventurous Silversmith
  • Home
  • Blog
  • Portfolio
    • Metal Work >
      • Chasing & Repousse
      • Holloware
      • Jewelry
      • Other Wonderful Items
    • Fiber Arts >
      • Temari
      • Yubinuki
  • Resources
    • Library
    • Tools & Equipment
    • Links
  • About
    • Artist Statement
    • Curriculum Vitae
    • How it is Made
    • Contact

Fascination with Fold Forming

12/26/2010

 
A year ago, I took a class where we did some fold forming and learned to use a hydraulic press. The folding forming was a basic T-fold and then we used the press to deform the T-fold. We used the folded metal with a semi-circular die, to spread the fold open and to create dept for our finished piece.

I had not planned on taking that class but because I cancelled another one, I took this class instead only to find out about the hydraulic press. Afterwards I was pleaseantly surprised because I like the pendant I had made and I had learned two new techniques.

All of this was just prior to me taking classes with Deb. I was at that point were I knew I did not want to concentrate on jewelry; I wanted to learn silversmithing and was still looking for a teacher. I tucked these two techniques away only thinking about how they might be applied to jewelry and moved on.

Last month (November to be exact), I learned how to make a silver shibori bracelet. [Shibori is a Japanese term for several methods of dyeing cloth with a pattern by binding, stitching, folding, twisting, compressing it, or capping. Some of these methods are known in the West as tie-dye.] When the term shibori is applied to metal, it is a type of fold forming such that the folds are gentle giving the allusion of fabric. 

I fell in love with my cuff bracelet and now I want to learn more about fold forming so I spent part of the weekend watching YouTube videos on fold forming; I Google-d images; I researched books; I read everything on Charles Lewton-Brain's website (http://brainpress.com/Foldforming.html); and then I ordered his book as well as a good quantity of thin gauged copper.

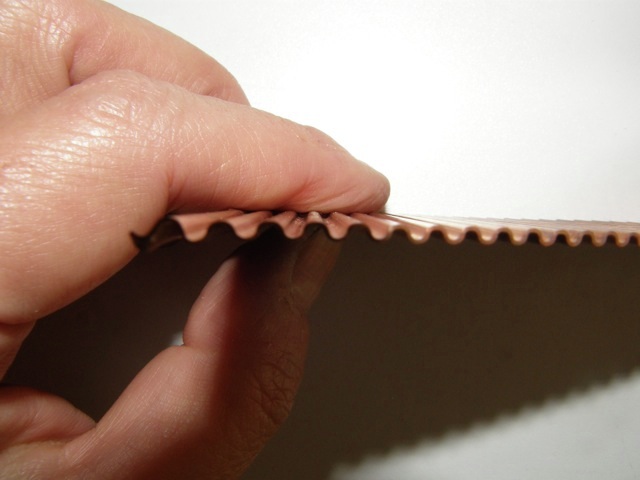
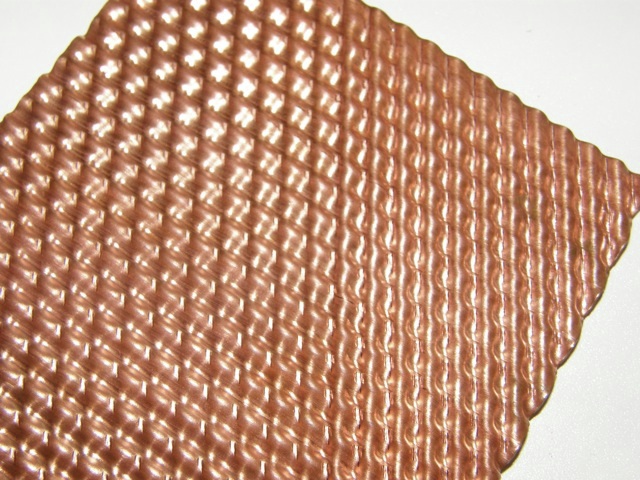
At the December 2nd Saturday, with Deb we discussed my bracelet, fold forming in general and then we went through a box of her fold forming experiment samples and Deb explained how she made some of them. Deb also had set up 2 metal corrugators made by her husband and I came home with some simple samples where I had used the 2 different corrugators alone and together which resulted in some very interesting textures. Yes, Virginia, corrugation is a type of micro-fold forming (See pictures below - remember you can click on the pictures to see a larger image).

With the new year around the corner, I hope to work my way through CL-B's fold forming book by doing a new fold every few weeks and then pondering some ideas of how to apply it to my work.

For your delight - here are some pictures of the corrugated samples I made. Click on any image to view it full sized

Mid-Course Correction

12/19/2010

 
Last weekend was another "2nd Saturday" with Deb. I took down my silver dish to solder the base on to it and to work on a piece with curves. 

Before we got started, I showed Deb the smashed vessel from the "Put The Hammer Down..." event. We discussed what I was doing and the events that transpired that resulted in me smashing it. I mentioned that I had changed to MY stake which was similar to her Dixion 13 but the dimensions were smaller; and Deb agreed that the stake change cause the shape to change and I would not have "recovered it" unless i was willing to continue and change the vessel to match my stake OR I could have stopped, gotten Deb's stake back and fixed it then. BUT of course this is after the smashing - hind sight is great but NEXT time, you DON'T change stakes mid-stream while working on a curve UNLESS YOU ARE CHANGING direction!

I also discussed how on the new piece, there was still a small bit of stretching occurring and I felt that she should also look at my hammering technique to see what I was not doing right (wrong is such an ugly word).  

In Deb's studio, I set up my stake at what I thought was the correct height and place my copper vessel on the stake and proceeded to land a few strikes on the wall of the vessel.  Thats all it took for Deb to see what was going on. 

First: my stake was positioned a bit to high 
Secondly: my blows were not landing the hammer face flat onto the metal.

Together, these two things were resulting in me doing more forging versus compression. You need the compression to bring the walls in but the forging was also pushing material forward from the hammer face, thus stretching the metal ever so slightly.  Basically in very simple terms what was (not any more!) happening was the bottom edge of the hammer was hitting the metal and the stake before the majority of the face of the hammer did. 

This mid-course correction has made my work easier as I am now getting more compression [that's thickening of the matter] and less stretching. It has also made me work a bit slower but more exact resulting in more symmetry around the diameter as well.

As Hans Solo said to Luke Skywalker, after Luke hit his first target and was whooping it up, while in the Millennium Falcon.. "Don't get cocky kid".

My next post will be about my new fascination with fold forming and the experiments I am doing

You have to stay on top of these things

12/12/2010

 
I have spent most of today catching up on photographing my work. I find that I take pictures as I work but I don't take "good" pictures when I am done. 
What do I consider a good picture?

1) High Resolution: Preferably in Camera Raw so it can be cleaned up later but you have all the data to begin with.

2) In my mini-photobooth: So I have a consistant color background in all my good pictures.

3) Using indirect but natural light: The indirect light cuts down on reflection points that are too bright and the "outdoor" natural light bulbs give the right temperature so the picture is not yellow or blue which would then have to be adjusted for later.

4) Minimal shadows: I use 4 lights to help cover the entire piece.

5) Take the pictures in a dark room: This is so no other light can impact the colors, shadows, and bright spots of the picture.

Once I have several pictures in raw format, I bring the images onto my computer and open them up in Adobe Bridge. Next I decide which pictures are the best to keep, deleting the ones I don't like. Then I save them as digital negatives with the raw information embedded in the file, I don't make any adjustments at this time.  Once this is done, then I can work with the file to bring down the over exposed areas and bring up those areas that are over exposed. IF everything is set up correctly, I should not have do any tweaking of the image. In today's batch, I did not make any adjustments so a big yipeee for me.

From the digital negative, I then open the image in Photoshop, crop the image, if required. At this point I would save the image as a high quality tiff file (jpg's can reduce the quality every time you open and then re-save the file) and I save a jpg just for posting; but now I add a copyright at the lower left corner and then do my saving. Once this is done, I also print out a picture to add to my photo album slash portfolio. You never know when you might be asked to show your work!

I am not happy with many of the pictures i have in my portfolio or have posted here on the website and redoing them is a big task. As a result, today I decided to just work on two items - start with just a few and then the task is not so over whelming. I am hoping to redo at least one per night when I get home from work. 

Yet, some pictures I can't redo because I no longer have them, they were either sold or they were presents - which is why you have to stay on top of this; at least take the pictures, they can be worked with at another time but taking them before they leave your hot little hands is a must (yeah, lets see how long that lasts!)

Then along with posting new pictures here on the website, I shall also be rearranging the layout on a few pages, adding "my banner" in my chosen font (more Photoshop work), and posting a few more items for sale. 

KEEP YOUR EYES OPEN FOR CHANGES!

I GOTS INGOTS

12/6/2010

 
I GOTS INGOTS
With silver topping 30 bucks a troy ounce today, I thought this was an appropriate post.

When working on a project, invariably we generate scrap. We get dust and oddly sized pieces from cutting; we get more dust from filing; there are odd bits and bobs and more dust from wire when cutting and snipping; and of course there is scrap which was a project that is just not up to snuff.

Basically we can generate quite a bit of it and with the way the prices are going these days who would dare throw it away. I try to keep very last mote of the stuff be it copper or silver.

Last year when prices on silver started to take off, I bought quite a bit of wire and sheet stock. If I was to send my scrap to a refiner well, I would still get more for my scrap, despite the refiner taking their cut, than I paid for it originally.  Think about it, if you send your scrap to a refiner and he sends you cash after he takes his cut for processing, you might end up with more money because the original price of the scrap was less than the current market price but you still have to go purchase more material and you won't get the same amount of material in weight that you sent in - so you are loosing money.

But I don't do that - I recast my scrap for my own use.

Last year, at about this time, I took the casting ingot and rolling mill 1 day class at The Whaley Studio but I never did get around to setting up my tanks though I did get a crucible and an ingot mold.  Over the past year I have cast some round ingot and made my own wire and I have also cast some rectangular ingots and rolled out some sheet for use in jewelry.  I also purchased a rolling mill a few months ago.

After saving my silver scrap for months, recently I went down to Jay's to use his gas setup and pour some ingots.  I ended up with FOUR sterling silver ingots that total about 12 troy ounces. That is about 3 troy ounces per ingot. I also cast two ingots of Shibuishi that I alloyed my self at 90% copper and 10% silver, These two ingots together total about 5 troy ounces and are a pale rosy pink.


So do the math, at today's silver prices 12 ozt x 30.xx which works out to over 360 clams, provided it was pure. My ingots are sterling which actually works out to about 11 ozt of fine silver so my actual value is $330. That's a lot of money and if you send it into a refiner who lets say only gives you 75% of the value; that means you only get $250 and they keep $82. If you turn that around for sheet or wire, there are processing charges as well, and so you walk away with a lot less usable material.

What do I have planned for my ingots - Why I will make sheet of course!

With my rolling mill I will make some 18, 20, and smaller gauge sheet. We are not talking small amounts of sheet for jewelry - I am talking at least 3" by 3" sheet for some small vessels and I hope to get the largest ingot to almost 6" by 6".  Mind you, this takes can take several hours of work, but if you do a little bit each day, it is eventually done, and it does go faster as the ingot gets thinner.

And because I did not send my scrap to a refiner, I was able to keep all this material for my self and my cost was the time and gas.
 
 So, find your self a class to learn to cast ingots and use a rolling mill - I suggest you go take it soon and save yourself some money!

Oh, and recently I was talking to a woman and she says she has NEVER saved her scrap; she throws it away, oh no! I want to know where her garbage is so I can go through it.

    RSS Feed

    Archives

    October 2020
    August 2020
    March 2020
    December 2019
    November 2019
    October 2019
    September 2019
    August 2019
    July 2019
    June 2019
    May 2019
    March 2019
    February 2019
    January 2019
    December 2018
    November 2018
    October 2018
    September 2018
    August 2018
    July 2018
    May 2018
    April 2018
    February 2018
    January 2018
    November 2017
    October 2017
    September 2017
    July 2017
    June 2017
    May 2017
    April 2017
    March 2017
    February 2017
    January 2017
    December 2016
    November 2016
    October 2016
    September 2016
    August 2016
    July 2016
    June 2016
    May 2016
    April 2016
    March 2016
    February 2016
    January 2016
    December 2015
    November 2015
    October 2015
    September 2015
    August 2015
    July 2015
    June 2015
    May 2015
    April 2015
    March 2015
    February 2015
    January 2015
    December 2014
    November 2014
    October 2014
    September 2014
    August 2014
    July 2014
    June 2014
    May 2014
    April 2014
    March 2014
    February 2014
    January 2014
    December 2013
    November 2013
    October 2013
    September 2013
    August 2013
    July 2013
    June 2013
    May 2013
    April 2013
    March 2013
    February 2013
    January 2013
    December 2012
    November 2012
    October 2012
    September 2012
    August 2012
    July 2012
    June 2012
    May 2012
    April 2012
    March 2012
    February 2012
    January 2012
    November 2011
    August 2011
    July 2011
    June 2011
    May 2011
    April 2011
    March 2011
    February 2011
    January 2011
    December 2010
    November 2010

    Jan - Nov 2010 History
    File Size: 2272 kb
    File Type: pdf
    Download File

    Jan - Dec 2009 History
    File Size: 2332 kb
    File Type: pdf
    Download File

    Categories

    All
    42
    A Year Of Repousse
    Blacksmithing
    Blogoversary
    Box Project
    Business
    Chasing & Repousse
    Commission
    Education
    Embroidery
    Enamel
    Entries
    Entry
    Exhibition
    Facebook
    Filing
    Fold Forming
    Gold
    Holloware
    Hot Forging
    Hydraulic Press
    Jewelry
    Keum-boo
    Learning
    Leather
    Market
    Metal
    Patina
    Photography
    Polishing
    Publications
    Raising
    Sanding
    Santa Fe Symposium
    Sinking
    Social Media
    Soldering
    Store
    Studio Visits
    Superbowl Challenge
    Teaching
    Teapot Project
    Technique
    Temari
    Tin
    Tools
    Vessels
    Visiting Workshops
    Weaving
    Website
    Workshop
    Yubinuki

Powered by Create your own unique website with customizable templates.