
Before you can start sewing a yubinuki design, the pattern guide has be create so it can be used to mark where the design is to be sewn. But how to make the divisions on the pattern guide can be difficult. WHY?
IF your cores vary in size, each time you measure the outer (surface) circumference, it will be easy to take that measurement and divide it using a calculator but if the length of each division has fractions of millimeters actually marking the division lines on the pattern guide will be difficult.
Well, using a division template, removes the math and hassle. Shh, this works due to geometry!
The three basic division grids you need are 1 cm, 5 mm, and 2.5 mm and now will tell you how to make a 5mm grid of your own and then you can make any size you want.
There are several ways to make a division grid.
Hand Drawn:
Computer Drawn:
The next tutorial will be how to take the the core and add the padding, mark the pattern guide using the division tool, and sew a simple design.
IF your cores vary in size, each time you measure the outer (surface) circumference, it will be easy to take that measurement and divide it using a calculator but if the length of each division has fractions of millimeters actually marking the division lines on the pattern guide will be difficult.
Well, using a division template, removes the math and hassle. Shh, this works due to geometry!
The three basic division grids you need are 1 cm, 5 mm, and 2.5 mm and now will tell you how to make a 5mm grid of your own and then you can make any size you want.
There are several ways to make a division grid.
Hand Drawn:
- Take a piece of 8.5" by 11" paper, orient it so the 11 inches is horizontal.
- From the top edge, measure down 1" on the left and right side and make a mark.
- Using a ruler, draw a line across.
- Now mark the left and right sides every 5 mm and then draw lines across.
- Either laminate the page or slip it into a protective sleeve so when it is used, it stays mark free.
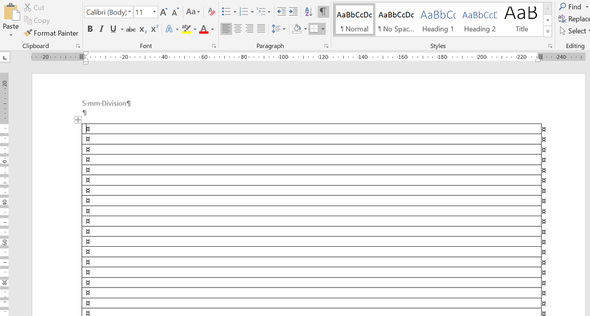
Computer Drawn:
- Open your word processing program and set the page orientation to landscape.
- Insert/add a table to the page that is 1 column and many rows, have the rows fill the page.
- Change the table properties to have the row height be exactly 5 mm. If required you might have to change the options to measure in millimeters vs. inches if that is the default.
- Set the table properties to also have a thin border of black, so when it prints the border lines are visible
- Save the document, now you can print one when ever it is needed.
The next tutorial will be how to take the the core and add the padding, mark the pattern guide using the division tool, and sew a simple design.
 RSS Feed
